> ## Documentation Index
> Fetch the complete documentation index at: https://docs.gocertify.me/llms.txt
> Use this file to discover all available pages before exploring further.
# Integrate on-site
> Convert shoppers with targeted, gated rewards.
## Integrate on-site
Make sure the script is implemented site-wide to access all our features.
Integrate Gocertify by adding the Gocertify script to your site's `` using either a tag manager (no developer needed) or manually pasting it in (basic HTML knowledge recommended). The setup takes less than 2 minutes!
## Get your script from the dashboard
Need a developer to handle the integration? Use the **Need a developer?** section on the settings page to quickly invite them to your team.
The easiest way to get your Gocertify script is from the **Integrate on-site** settings page in your dashboard. The script snippet is pre-configured with your brand identifier - just copy and paste it directly into your site.
In your dashboard, go to **Settings** → **Integrate on-site**.
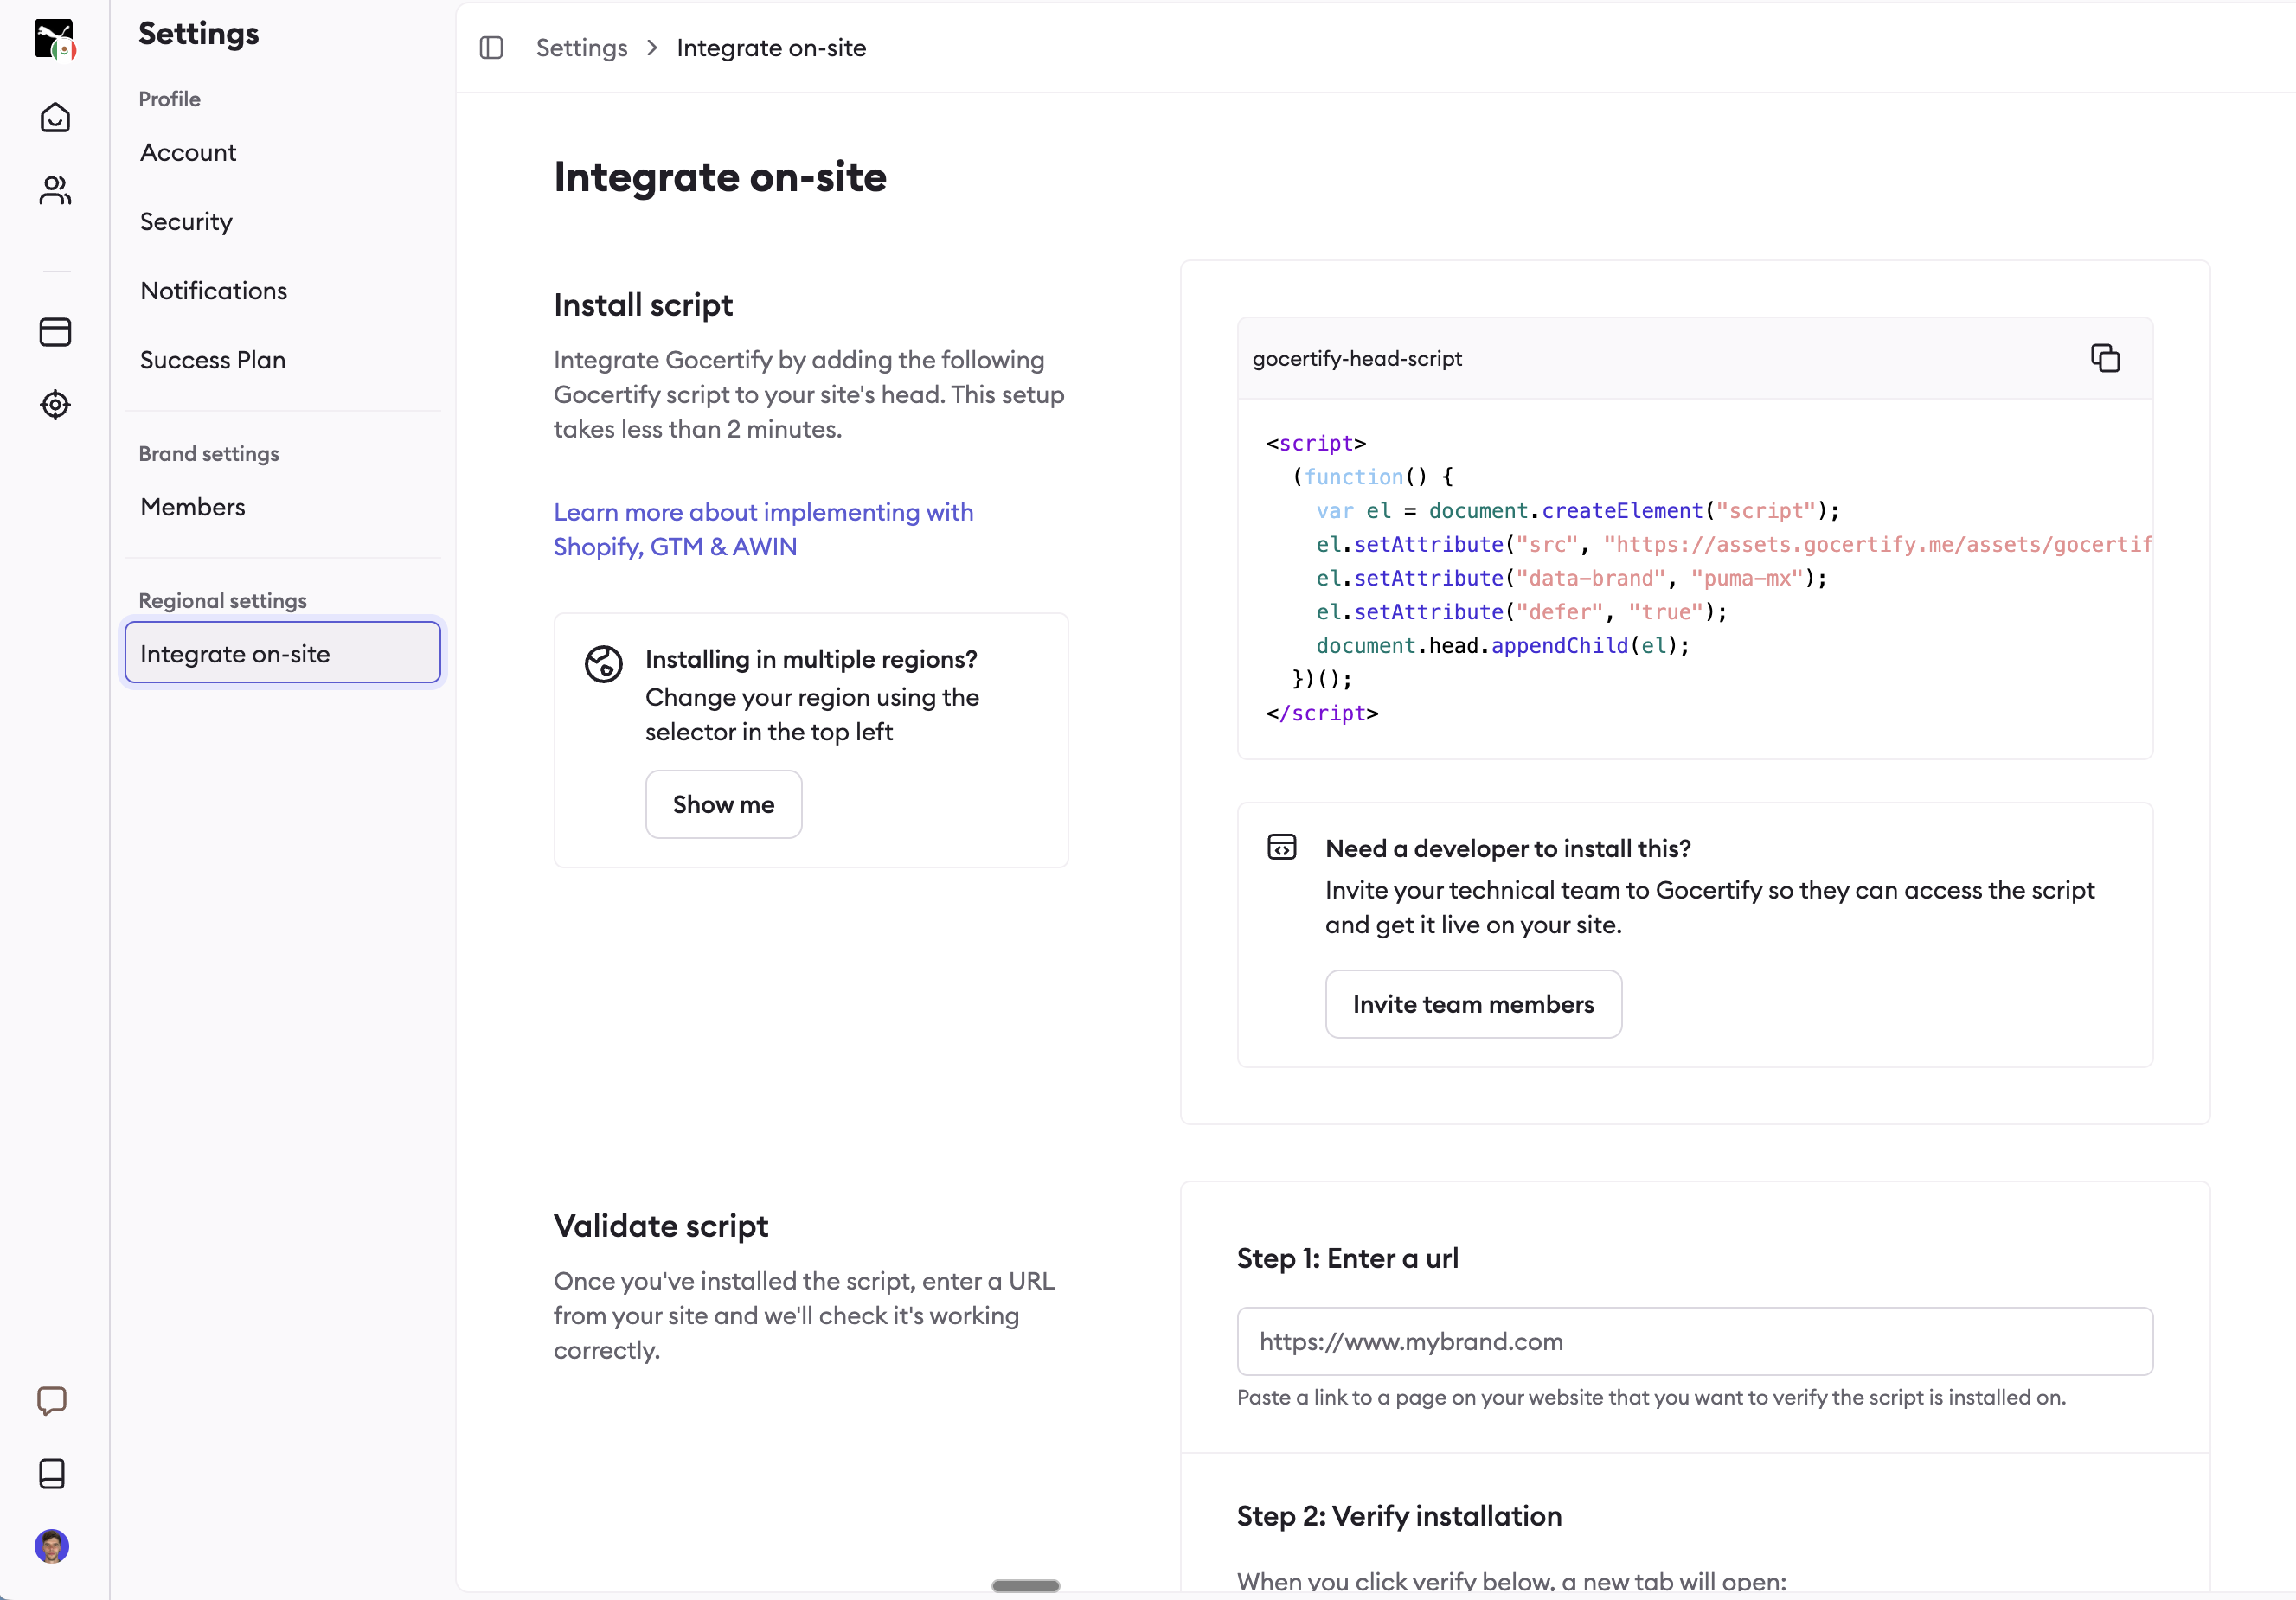 Click the copy icon next to the script snippet. Your brand identifier is already included, so no manual editing is required.
**Installing in multiple regions?** If you have access to multiple regions, you'll see a hint card with a **"Show me"** button. Click it to open the region selector and switch to the correct region before copying the script—each region has a unique brand identifier.
Paste the script into your site using one of the installation methods listed in the [installation methods](#installation-methods) section below.
## Installation methods
{/* ```javascript gocertify-script
``` */}
You can use any **one** of the following methods to add the Gocertify script to your site. You only need to add the script **once** to your site. Pick your preferred method below and follow the steps.
**Pro tip**: Get your script with your brand identifier pre-configured from the [Integrate on-site settings page](#get-your-script-from-the-dashboard) to avoid manual configuration errors.
Copy and paste the Gocertify script into the `` of your site. Remember to replace `example-company` with your actual company name.
```javascript gocertify-script theme={null}
```
**Note**: If you cannot add the script to the `` of your site you can place it in the `` .
Navigate to our [Shopify app](https://apps.shopify.com/gocertify).
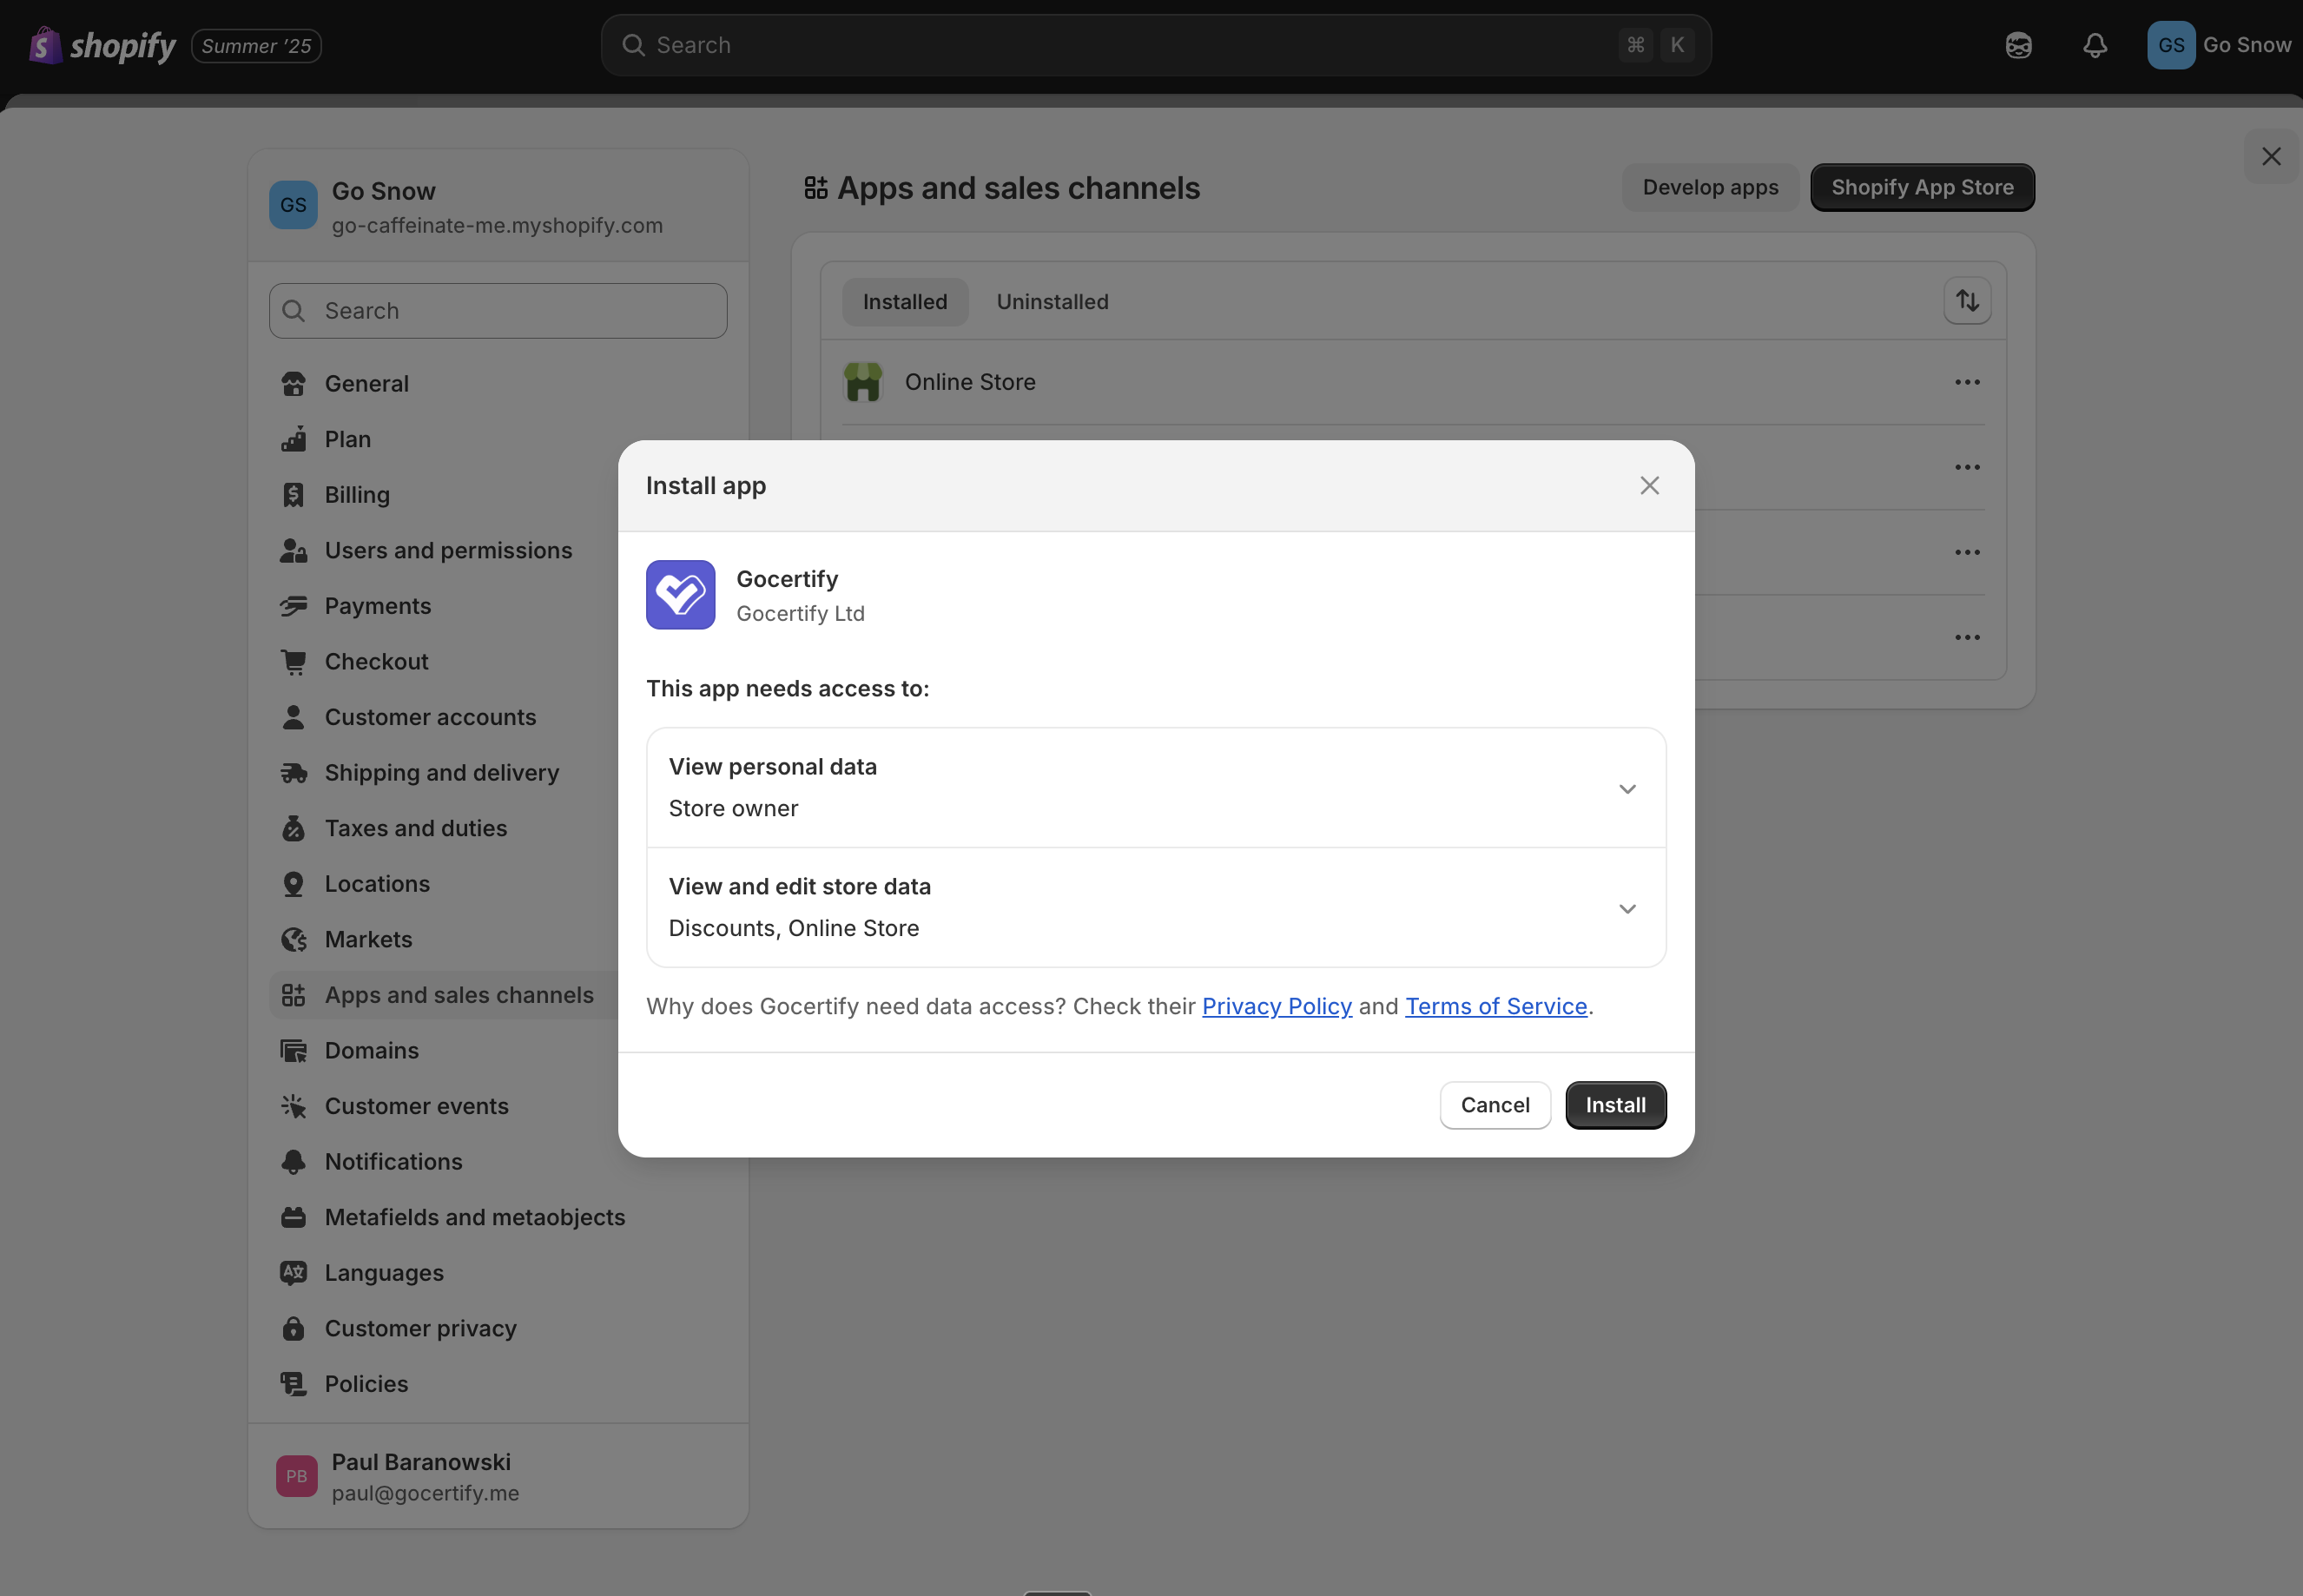
Install the app by clicking `Install`.
Click the copy icon next to the script snippet. Your brand identifier is already included, so no manual editing is required.
**Installing in multiple regions?** If you have access to multiple regions, you'll see a hint card with a **"Show me"** button. Click it to open the region selector and switch to the correct region before copying the script—each region has a unique brand identifier.
Paste the script into your site using one of the installation methods listed in the [installation methods](#installation-methods) section below.
## Installation methods
{/* ```javascript gocertify-script
``` */}
You can use any **one** of the following methods to add the Gocertify script to your site. You only need to add the script **once** to your site. Pick your preferred method below and follow the steps.
**Pro tip**: Get your script with your brand identifier pre-configured from the [Integrate on-site settings page](#get-your-script-from-the-dashboard) to avoid manual configuration errors.
Copy and paste the Gocertify script into the `` of your site. Remember to replace `example-company` with your actual company name.
```javascript gocertify-script theme={null}
```
**Note**: If you cannot add the script to the `` of your site you can place it in the `` .
Navigate to our [Shopify app](https://apps.shopify.com/gocertify).
Install the app by clicking `Install`.
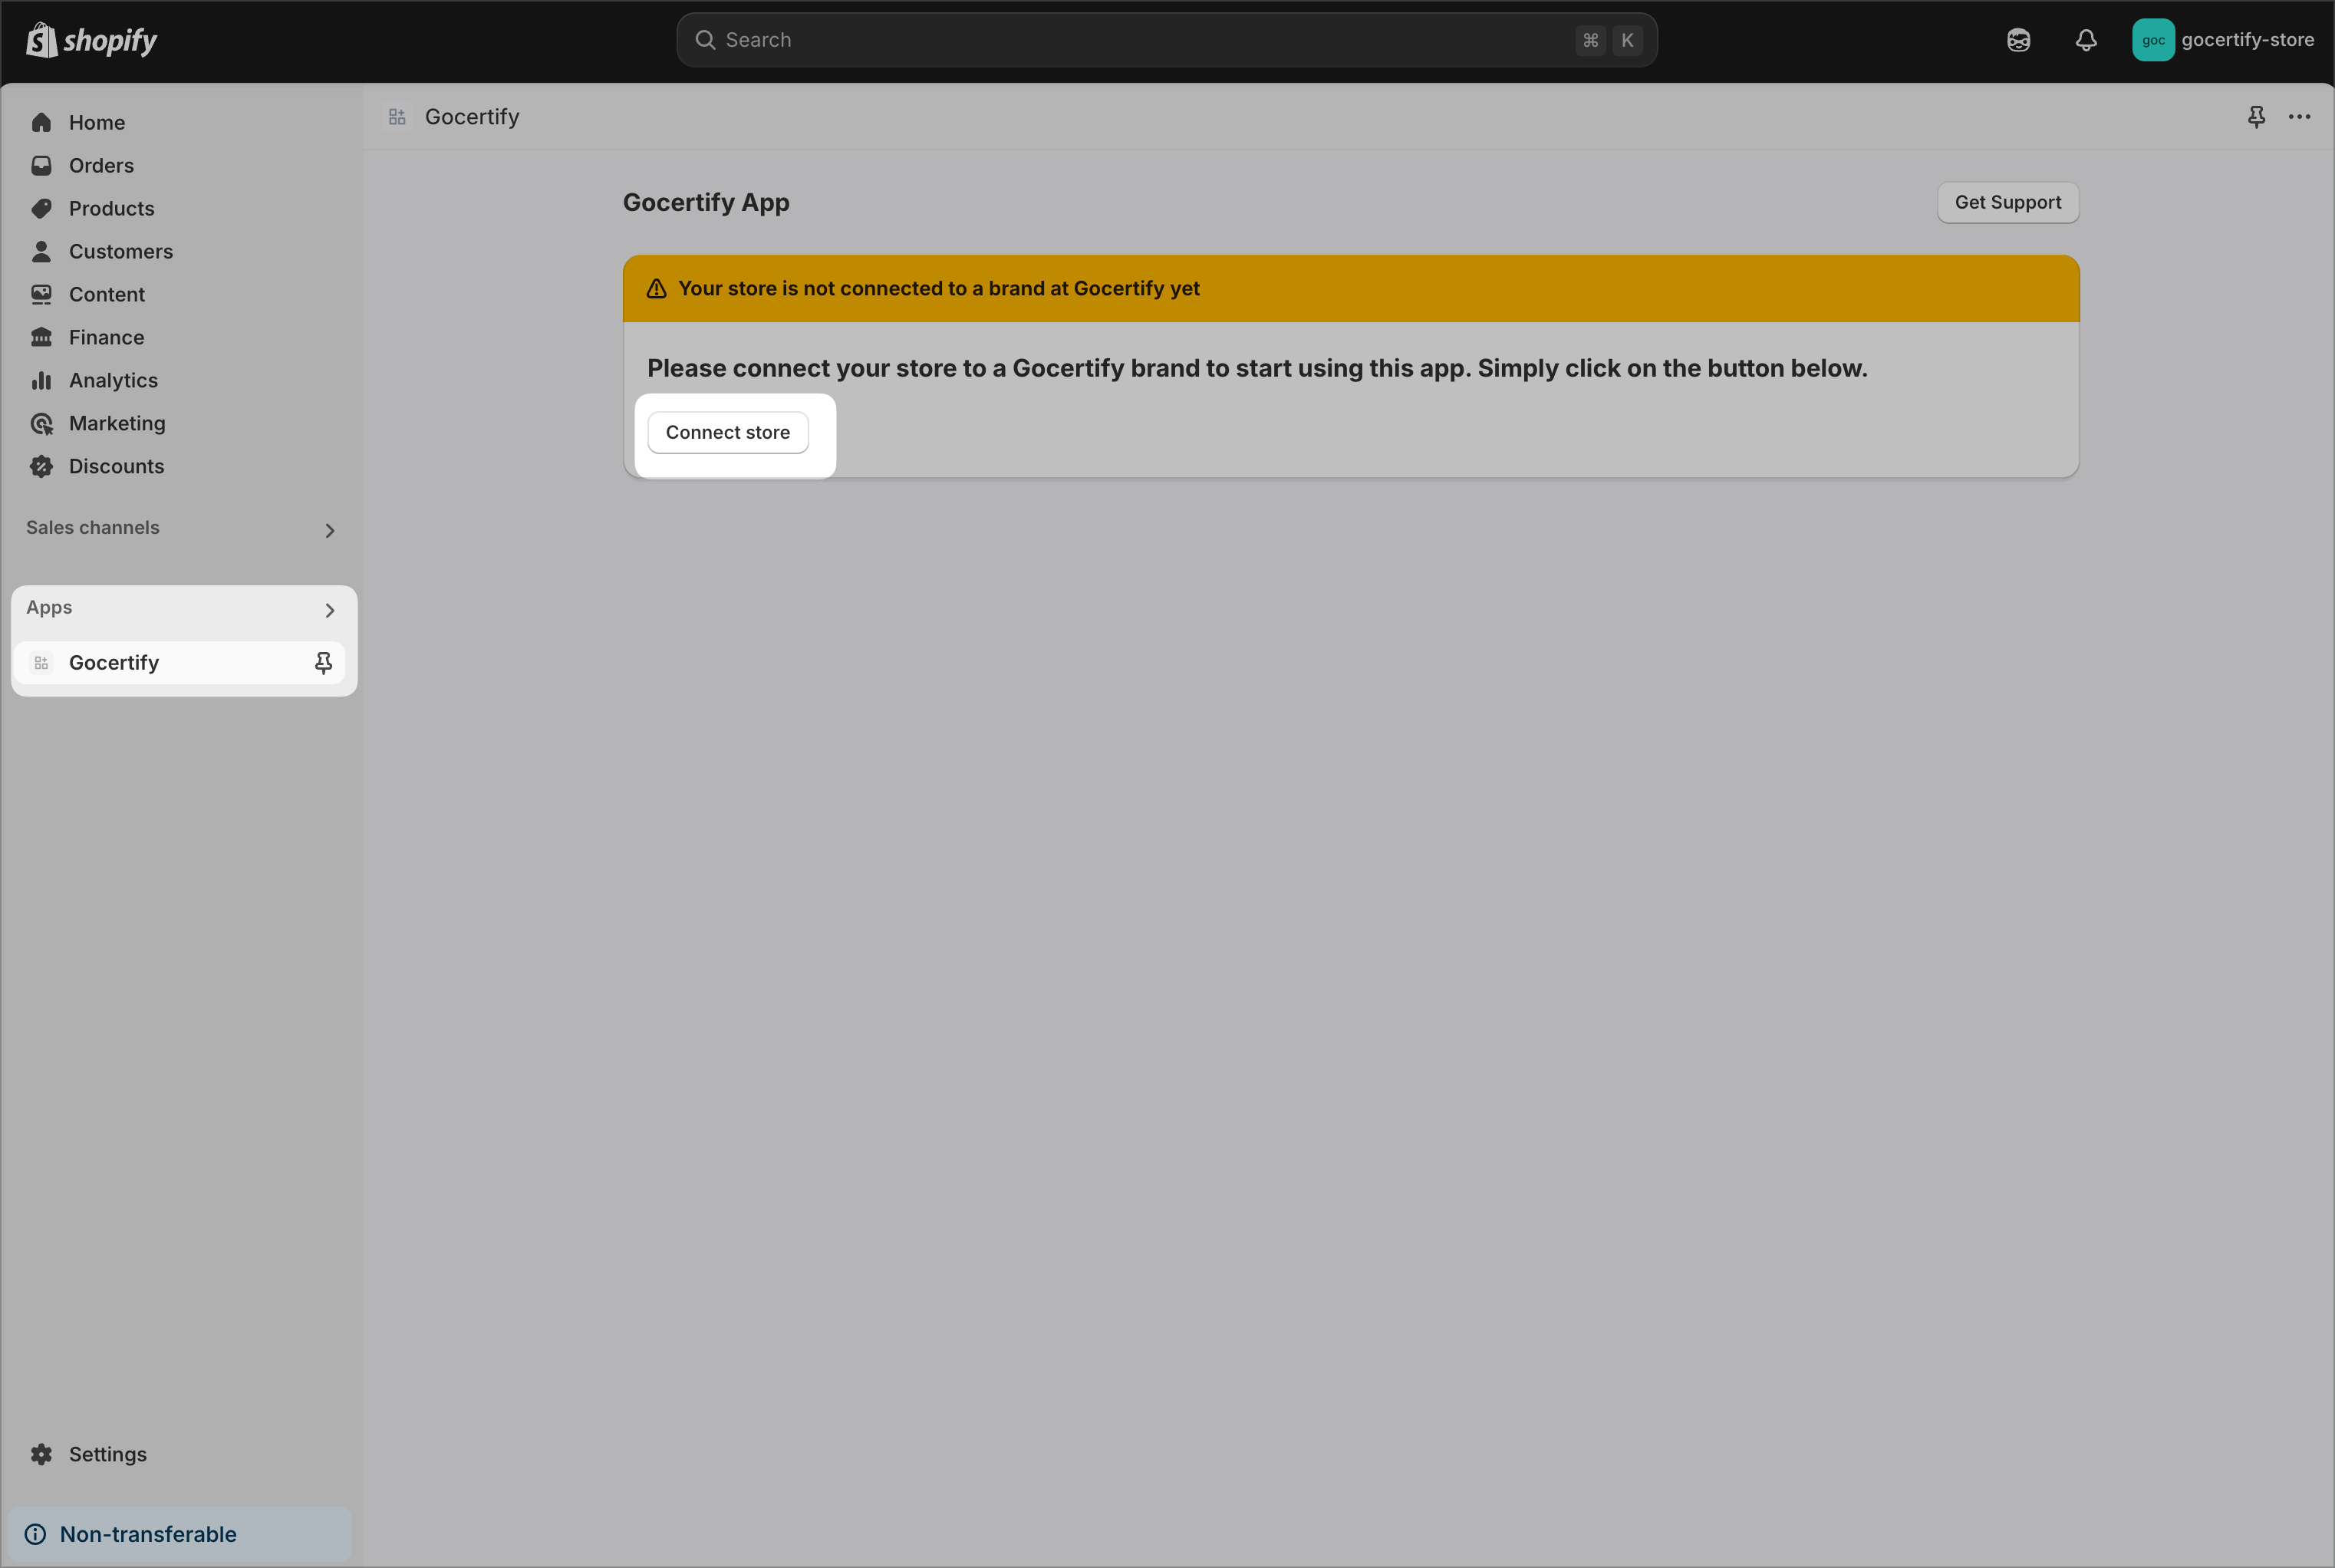
 Once installed, you will see the app appear in your left side menu. Click on the app and you will be asked to connect to your Gocertify brand by clicking `Connect`.
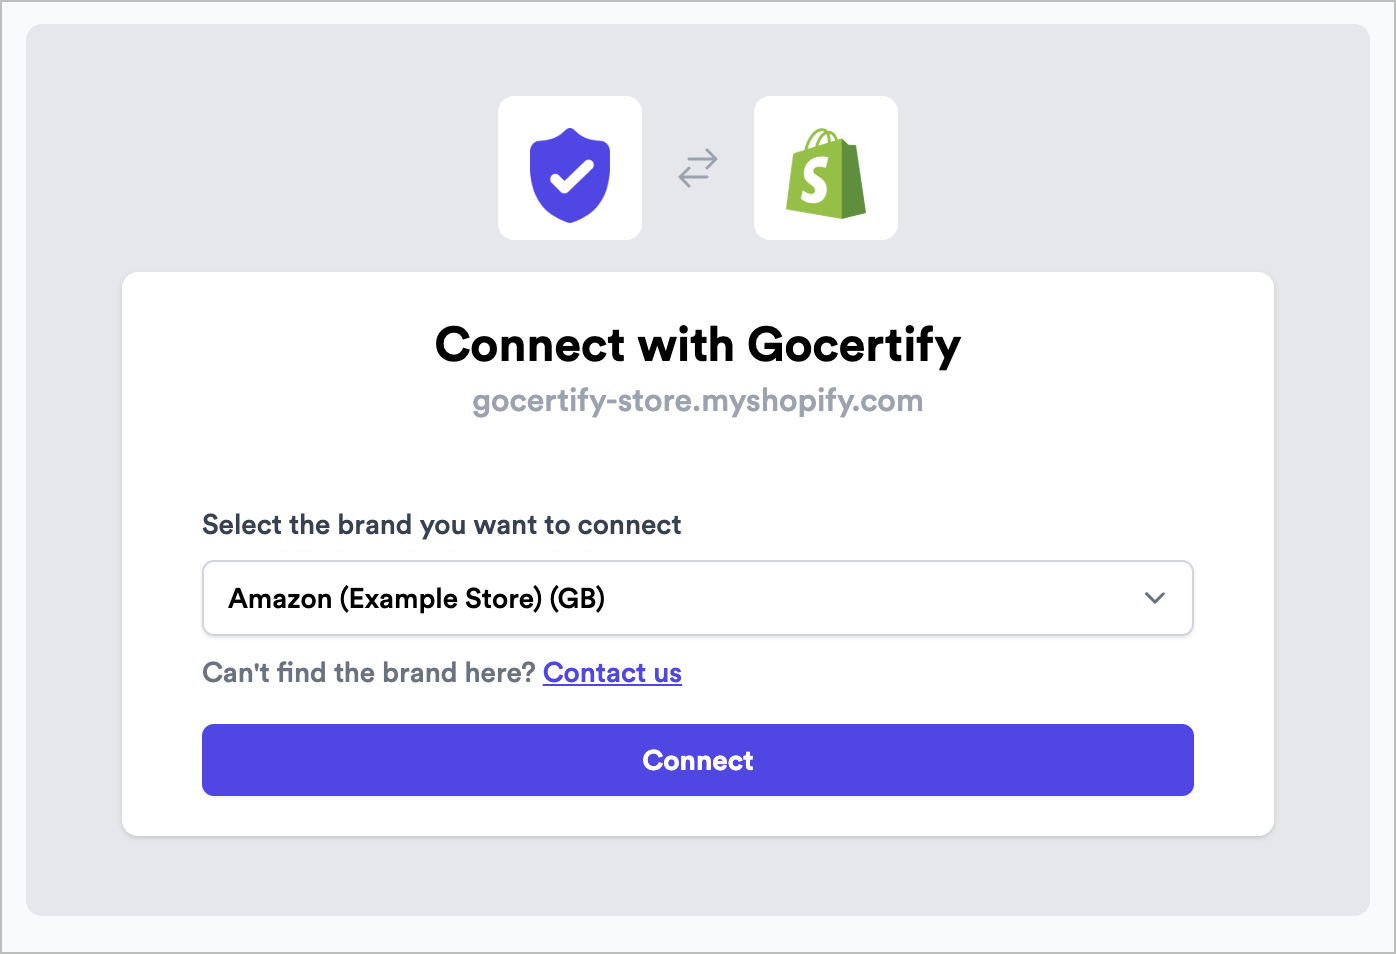
 You will be presented with a list of brands you have access to. Select the brand you want to connect the app to. If you cannot see your brand, please contact your Gocertify account manager.
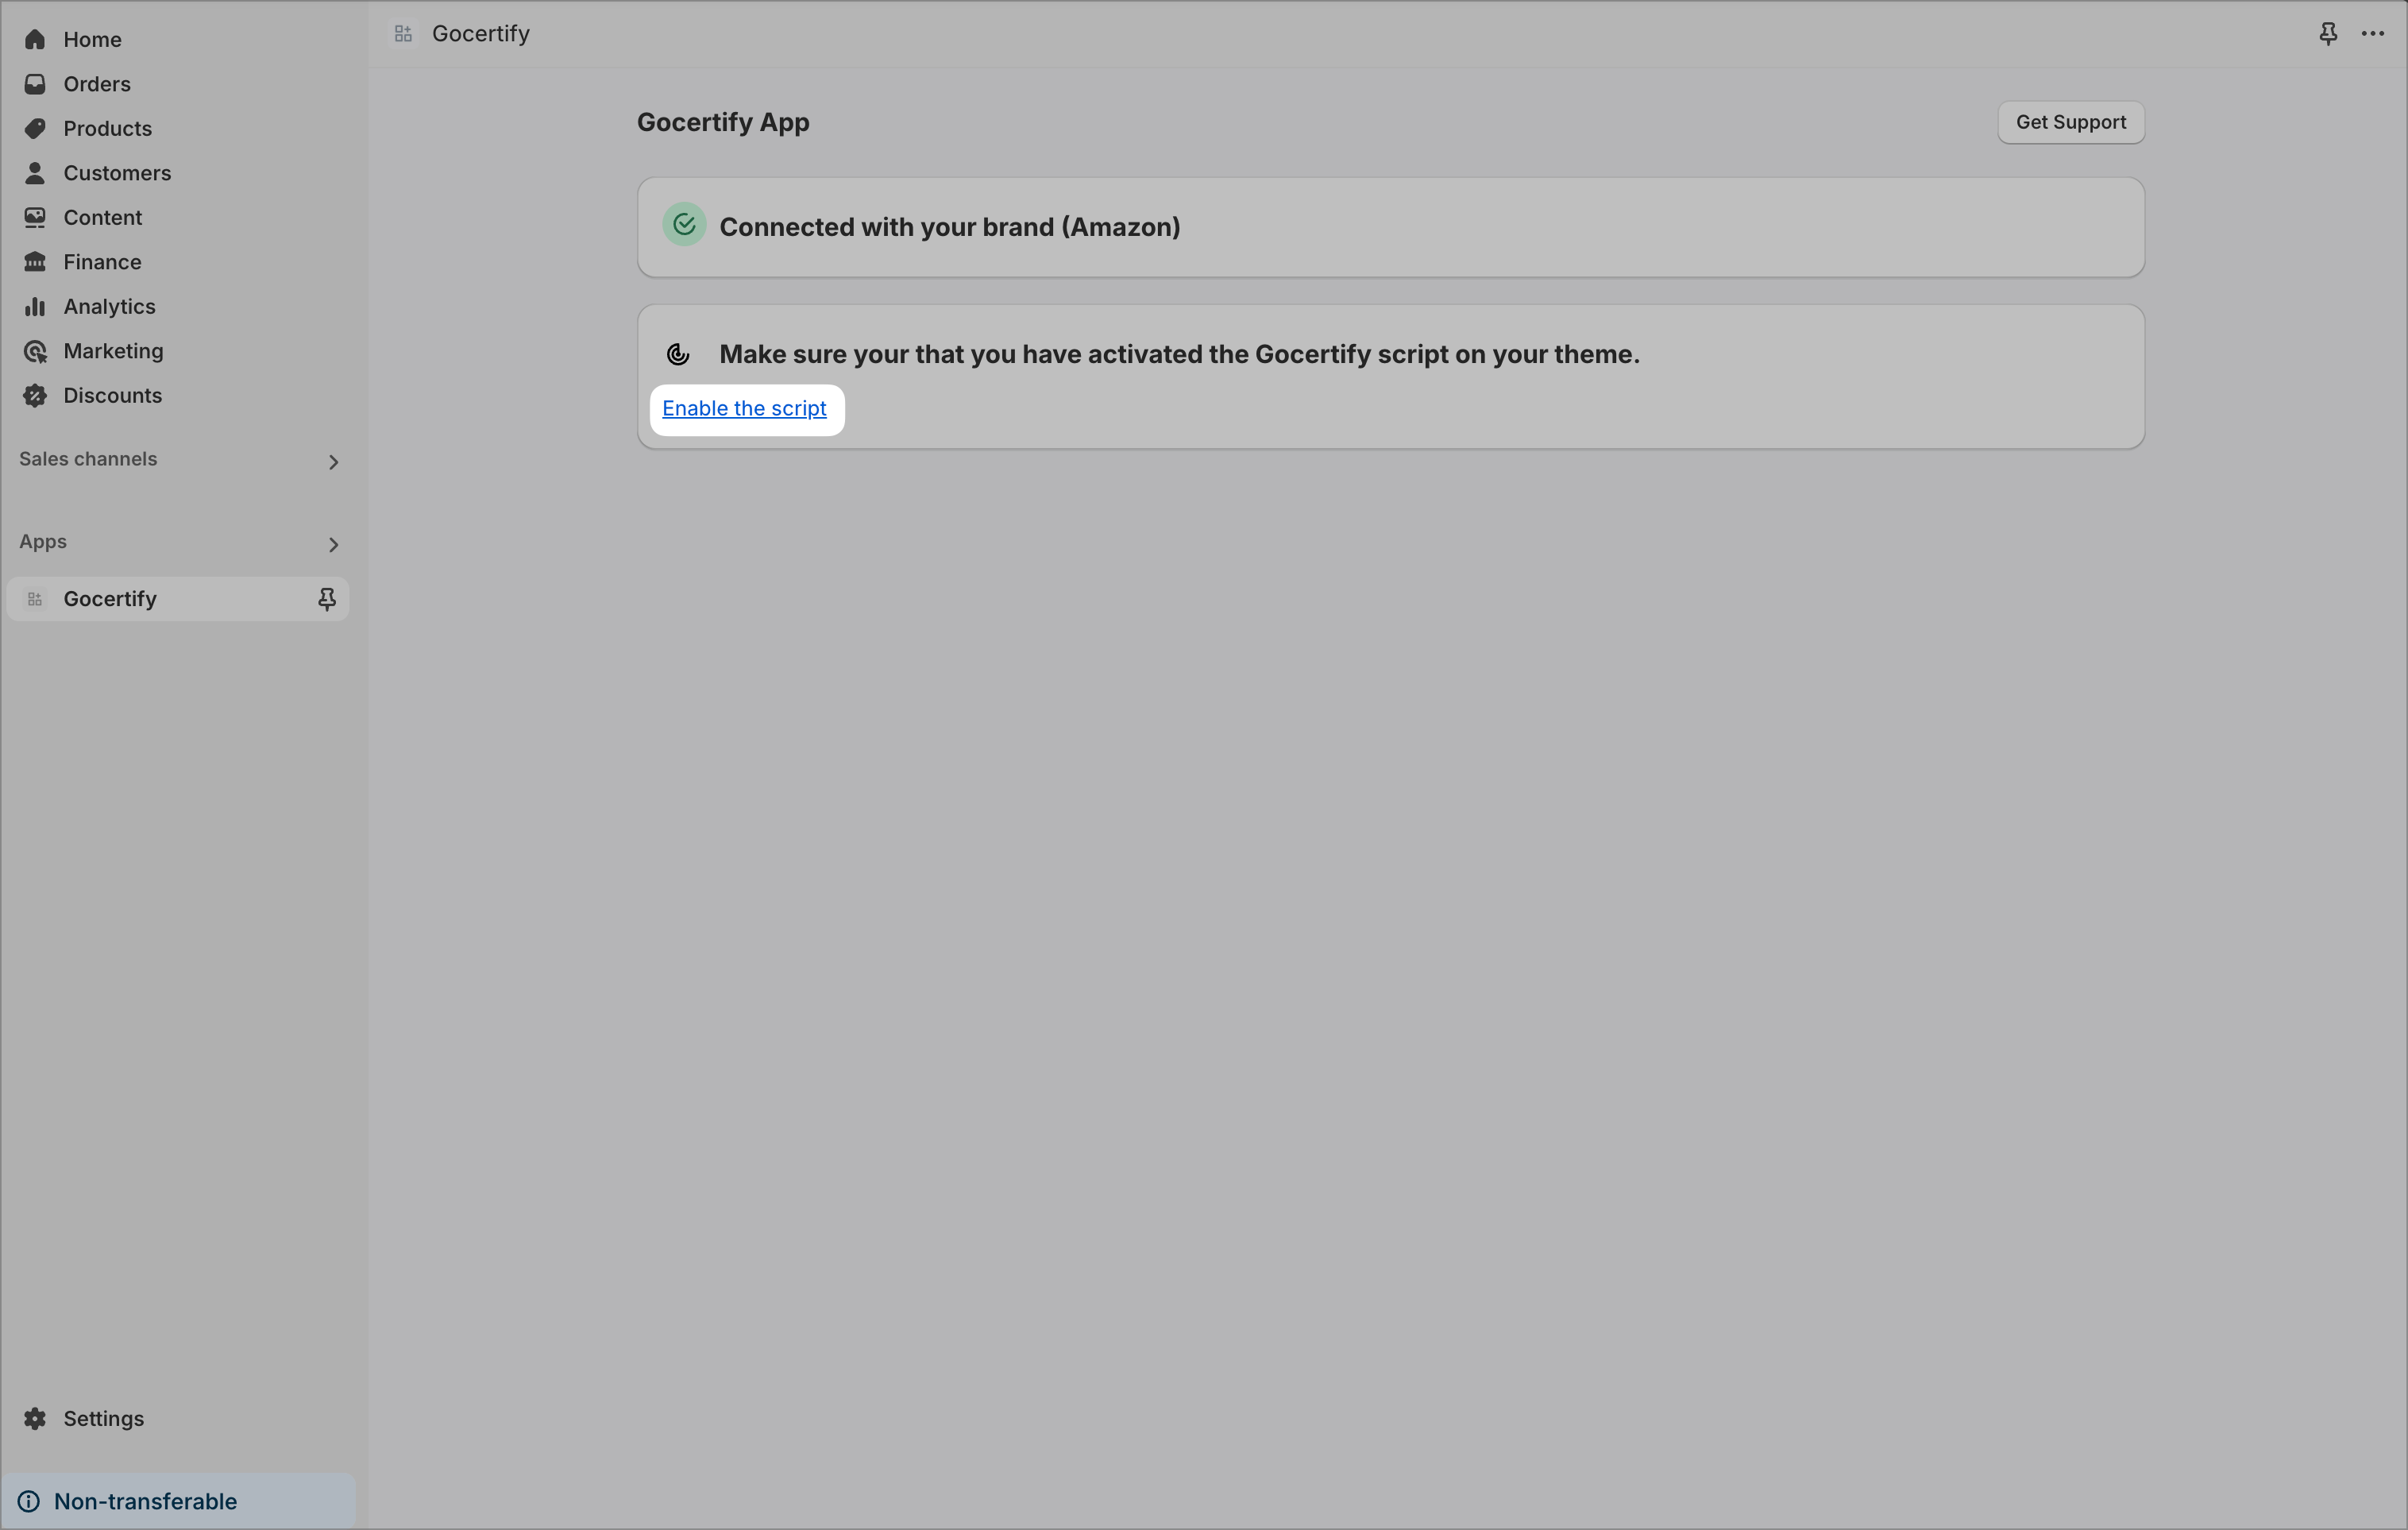
 Once successfully connected you will see a success message and a button asking you to `Enable the script`. Click this button to navigate to the embed page.
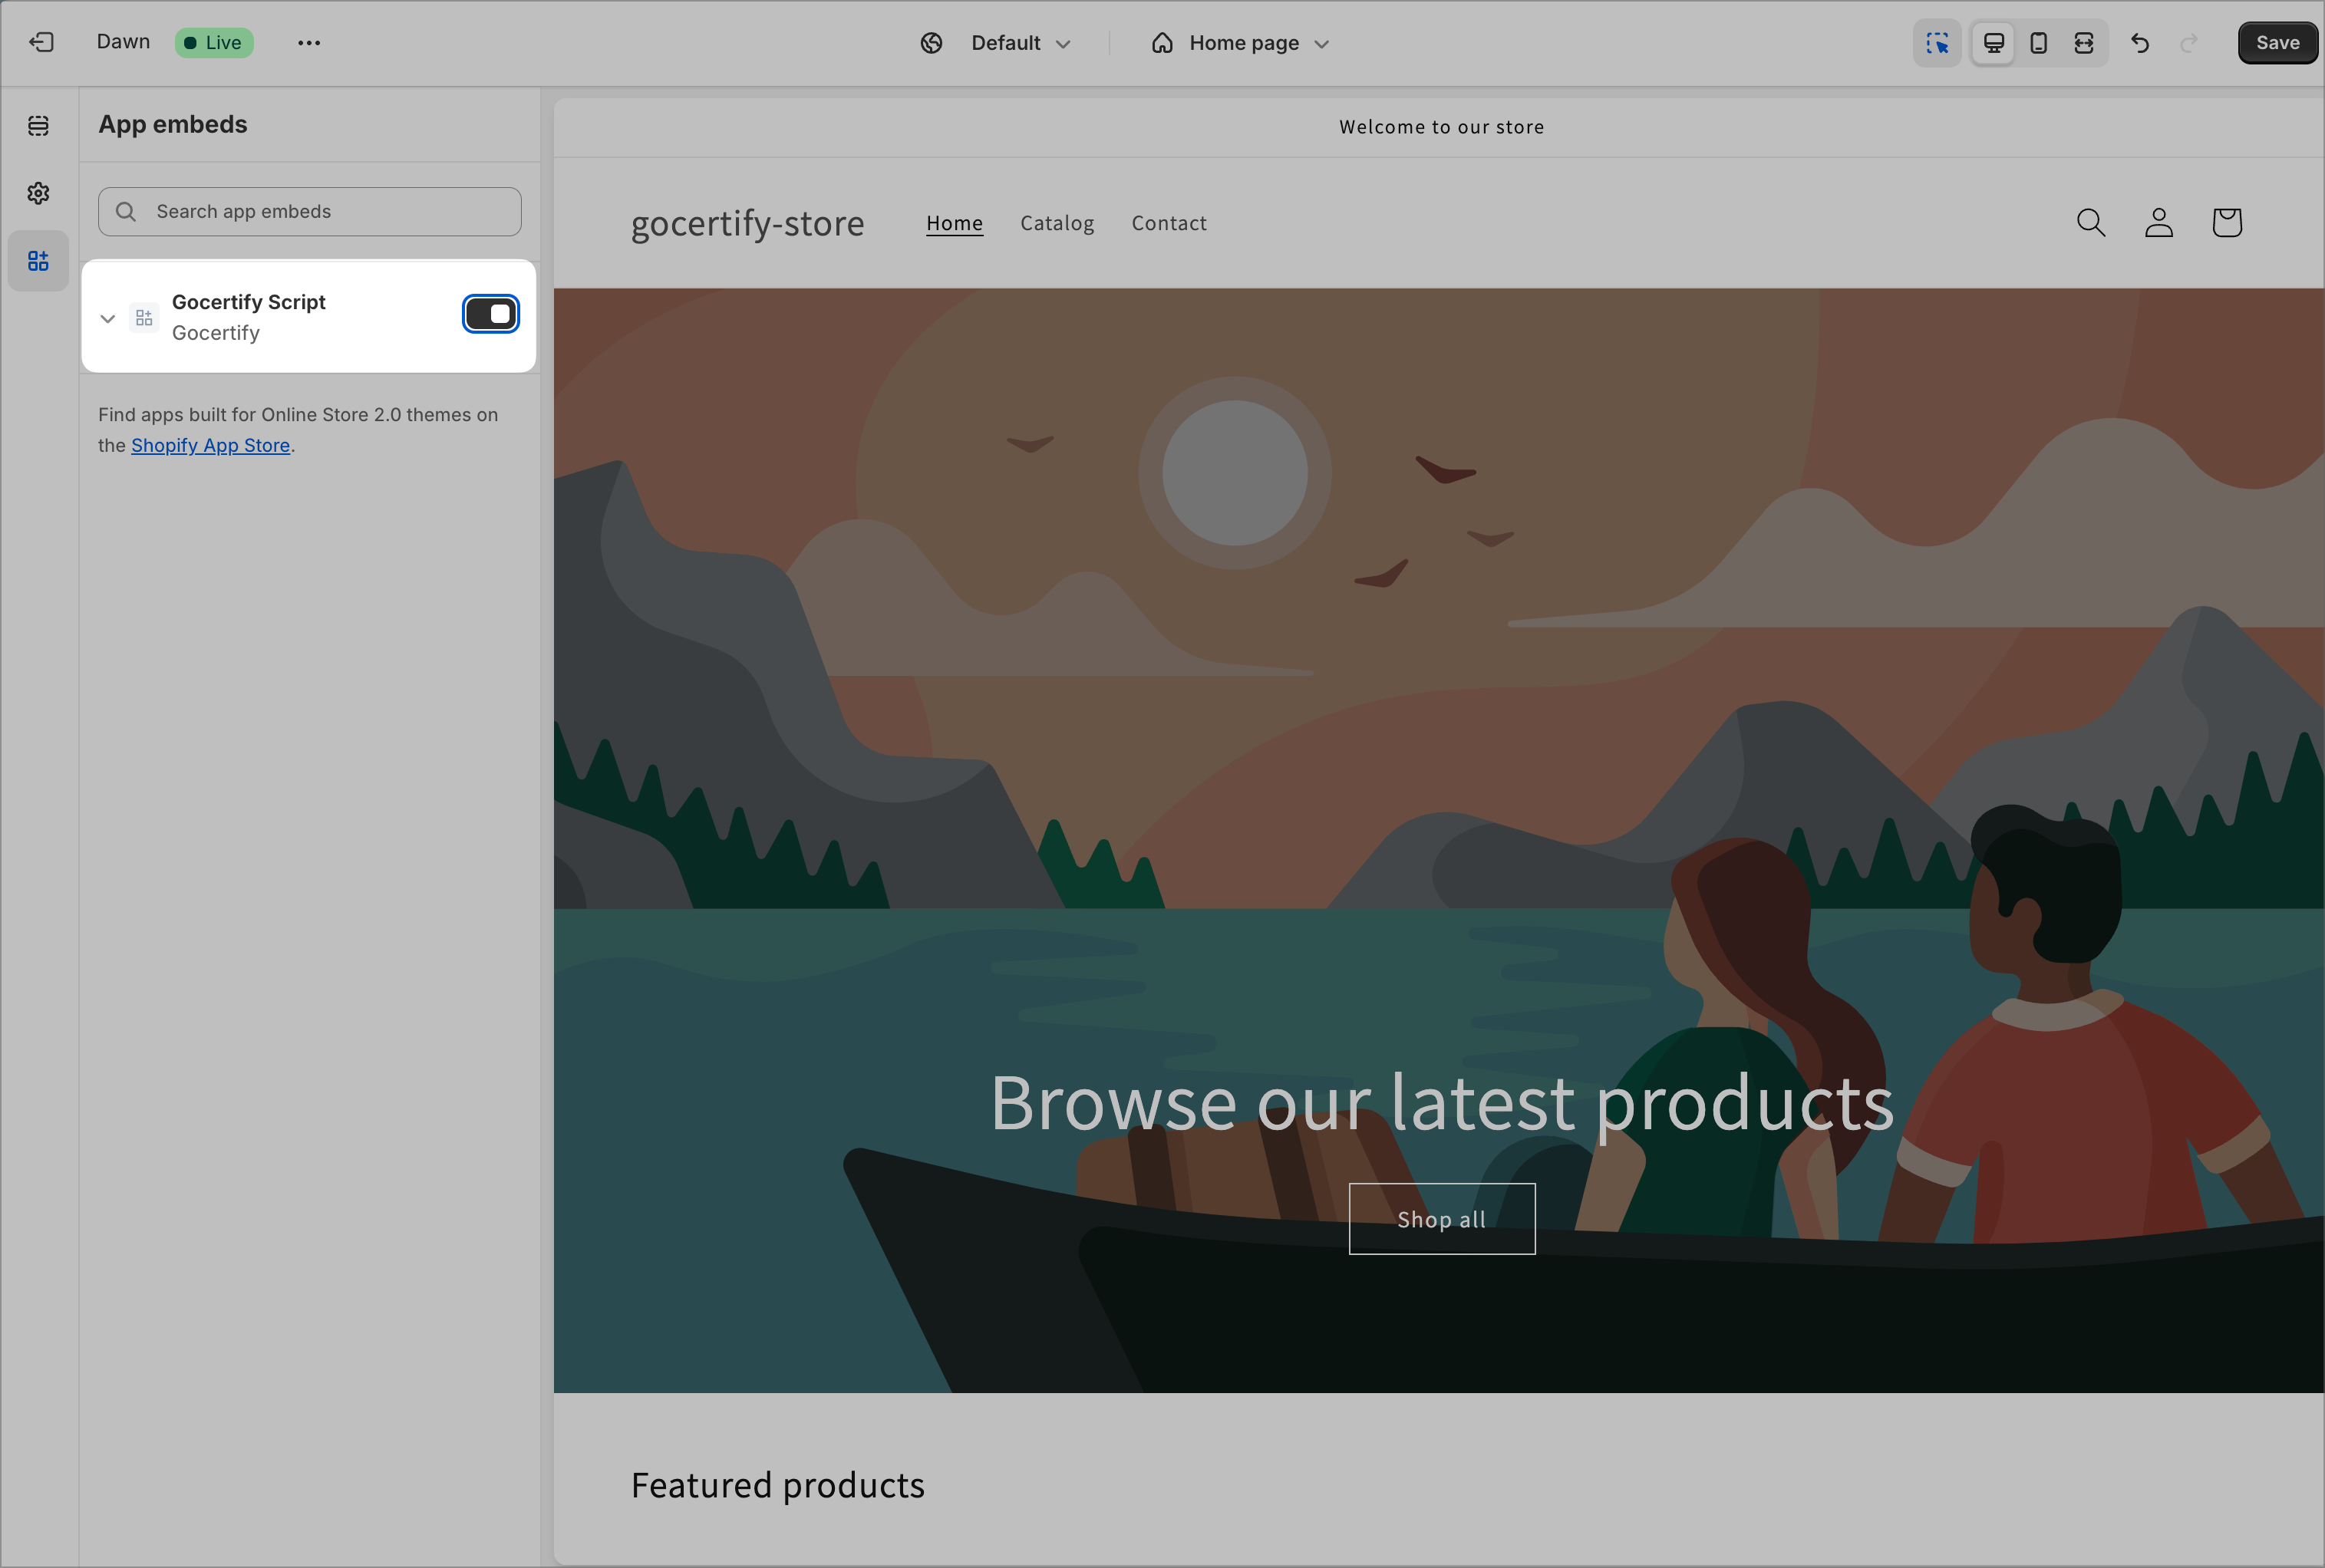
 Click the toggle to enable the embed script. The Gocertify head script is now enabled and added to your site.
 Once you have enabled the embed script, you can use Shopify Blocks to add on-site messaging to your site.
Watch our [tutorial video](https://www.loom.com/share/c71c832b378e4e17b6aa80a6bcc284a7?sid=9604726f-f6e8-4997-bf66-9a11773773d2) or follow these steps.
Navigate to your [Google Tag Manager](https://tagmanager.google.com/#/home) (GTM) account and select `Add new Tag`
Within the tag configuration, select the `Custom HTML` option.
Copy and paste the following script into the HTML tag. Remember to replace `example-company` with your actual company name.
```javascript gocertify-script theme={null}
```
Within the `Triggers` options configure the tag to fire on all pages.
**Note**: The script is just 12kb and well optimised so it won't slow down your site.
Save your tag as `gocertify` and publish your container.
**Prerequisite**: The Bloomreach [JS SDK](https://documentation.bloomreach.com/engagement/docs/js-sdk) must be integrated into your website. The SDK retrieves active tags and executes them after the page loads.
In your Bloomreach Engagement project, go to **Data & Assets** → **Tag Manager**.
Click **+ Create new**. Skip the preset selection to create a custom tag.
In the **Definition** section, paste your script into the code editor. Remember to replace `example-company` with your actual company name.
```javascript gocertify-script theme={null}
```
In the **Settings** section, set **Fire on** to fire on all pages so the script loads site-wide.
**Note**: The script is just 12kb and well optimised so it won't slow down your site.
Save your tag as `gocertify` and activate it.
Watch our [tutorial video](https://www.loom.com/share/e13b1bc79c2545078fb46d4b78c8bb50?sid=46361597-a98e-4871-8f2d-7a24166e9c00) to see how it's done.
Select `Toolbox` from your main menu and then under `Links and Tools` select `Plugin Store`.
Once you have enabled the embed script, you can use Shopify Blocks to add on-site messaging to your site.
Watch our [tutorial video](https://www.loom.com/share/c71c832b378e4e17b6aa80a6bcc284a7?sid=9604726f-f6e8-4997-bf66-9a11773773d2) or follow these steps.
Navigate to your [Google Tag Manager](https://tagmanager.google.com/#/home) (GTM) account and select `Add new Tag`
Within the tag configuration, select the `Custom HTML` option.
Copy and paste the following script into the HTML tag. Remember to replace `example-company` with your actual company name.
```javascript gocertify-script theme={null}
```
Within the `Triggers` options configure the tag to fire on all pages.
**Note**: The script is just 12kb and well optimised so it won't slow down your site.
Save your tag as `gocertify` and publish your container.
**Prerequisite**: The Bloomreach [JS SDK](https://documentation.bloomreach.com/engagement/docs/js-sdk) must be integrated into your website. The SDK retrieves active tags and executes them after the page loads.
In your Bloomreach Engagement project, go to **Data & Assets** → **Tag Manager**.
Click **+ Create new**. Skip the preset selection to create a custom tag.
In the **Definition** section, paste your script into the code editor. Remember to replace `example-company` with your actual company name.
```javascript gocertify-script theme={null}
```
In the **Settings** section, set **Fire on** to fire on all pages so the script loads site-wide.
**Note**: The script is just 12kb and well optimised so it won't slow down your site.
Save your tag as `gocertify` and activate it.
Watch our [tutorial video](https://www.loom.com/share/e13b1bc79c2545078fb46d4b78c8bb50?sid=46361597-a98e-4871-8f2d-7a24166e9c00) to see how it's done.
Select `Toolbox` from your main menu and then under `Links and Tools` select `Plugin Store`.
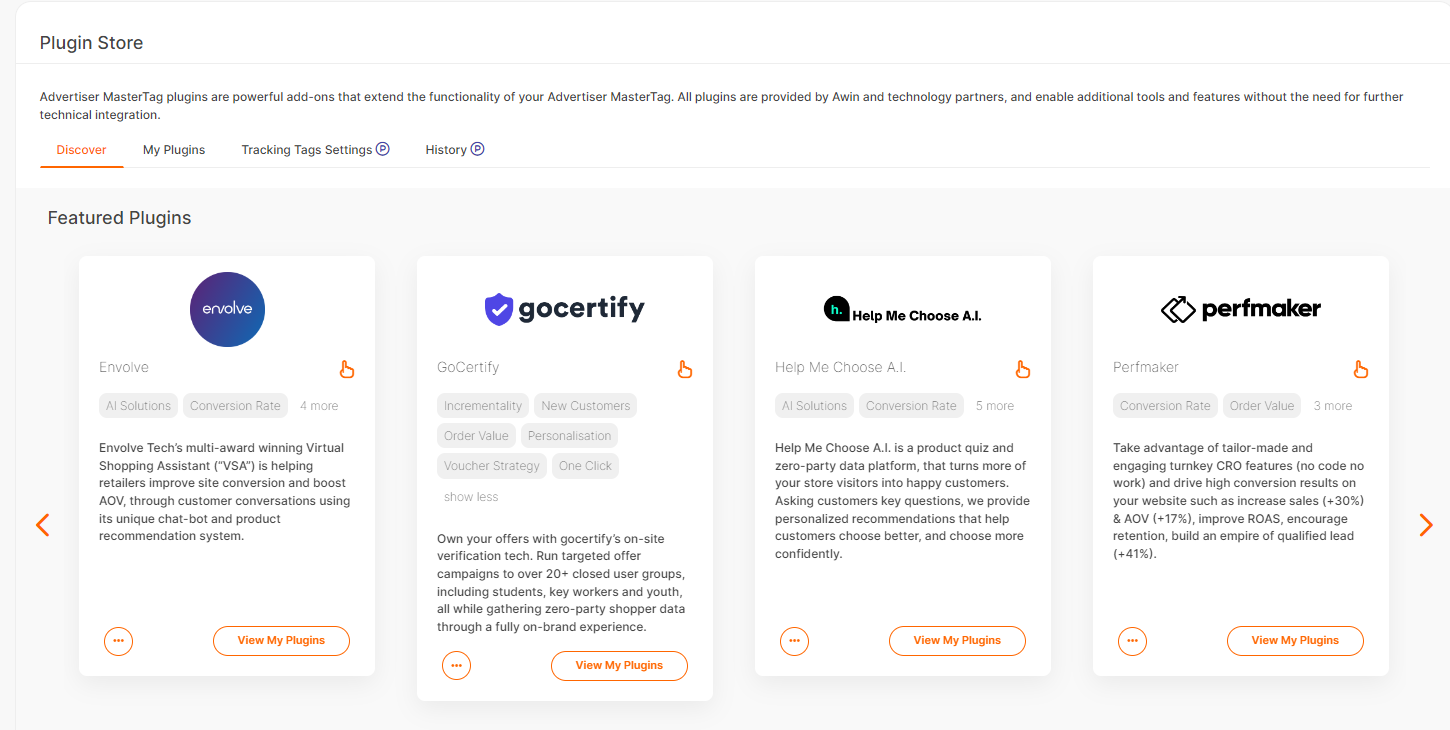 Within the store search for the Gocertify plugin and click `Activate now` and confirm your choice.
Once activated the final modal will give you the option to `View My Plugins`. Select this and you will see that the plugin is activated and the script has been deployed.
If you encounter the error `Refused to load the script 'https://assets.gocertify.me/assets/gocertify.js'` due to Content Security Policy violations, add this domain to your CSP whitelist to resolve the issue.
### Validate your installation
Once you've added the script to your site, use the built-in validation tool (found in the [Integrate on-site settings page](#get-your-script-from-the-dashboard)) to confirm it's working:
In the validation section, enter the URL of a page where you've installed the script.
Click validate. The tool will check that the Gocertify script is present and correctly configured.
Within the store search for the Gocertify plugin and click `Activate now` and confirm your choice.
Once activated the final modal will give you the option to `View My Plugins`. Select this and you will see that the plugin is activated and the script has been deployed.
If you encounter the error `Refused to load the script 'https://assets.gocertify.me/assets/gocertify.js'` due to Content Security Policy violations, add this domain to your CSP whitelist to resolve the issue.
### Validate your installation
Once you've added the script to your site, use the built-in validation tool (found in the [Integrate on-site settings page](#get-your-script-from-the-dashboard)) to confirm it's working:
In the validation section, enter the URL of a page where you've installed the script.
Click validate. The tool will check that the Gocertify script is present and correctly configured.
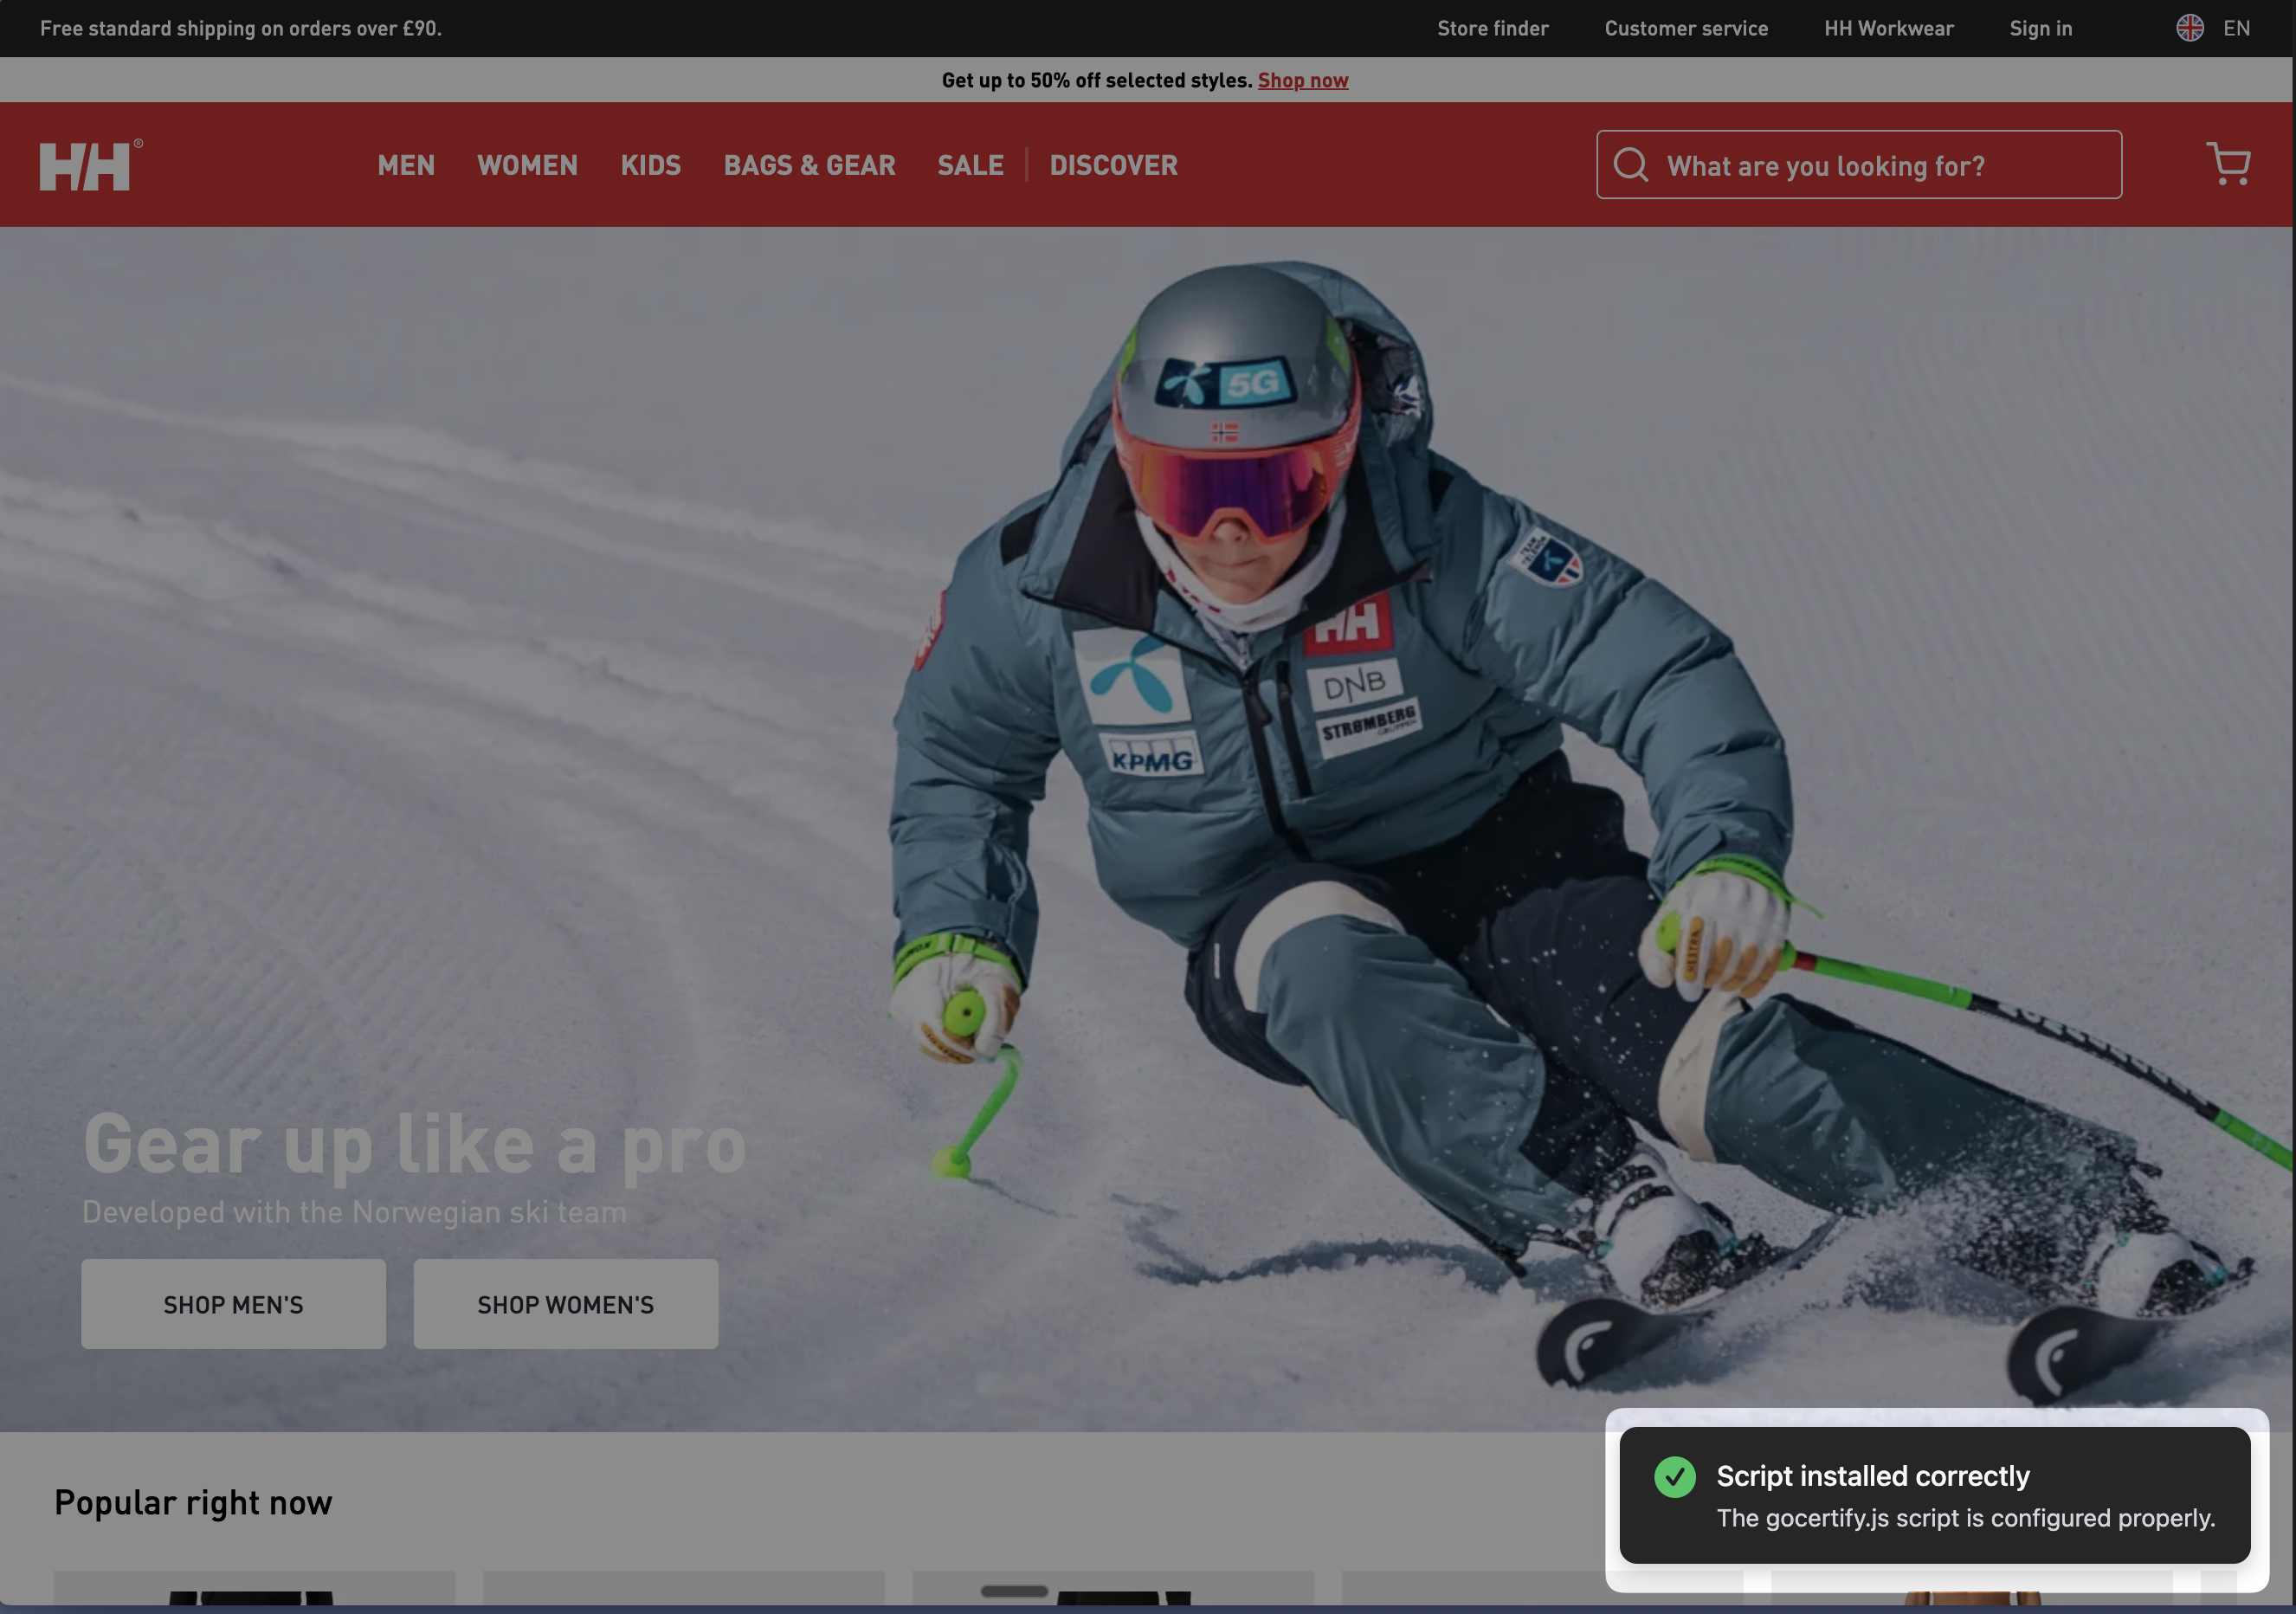 A success message confirms everything is working. If validation fails, check that the script was added to the `` and that the page has been published.