> ## Documentation Index
> Fetch the complete documentation index at: https://docs.gocertify.me/llms.txt
> Use this file to discover all available pages before exploring further.

# Emarsys

> Start building loyal communities with targeted, gated offers.

Once the user submits their email and/or mobile number, Gocertify will send this data your Emarsys account, creating (or updating) a *Contact*, with the “Opt-in” field set as `True`. Gocertify will also trigger an *External Event* called `gocertify_consent_intent`, which can be used to create automations.

After that screen, when the user successfully verifies as a target group (student, healthcare, senior, etc), Gocertify will update the Contact, setting a new field called “gocertify\*student*verified\_at” with the current date, useful to generate \_Segments*.
Gocertify will also trigger another External Event called `gocertify_offer_claimed`, that can be used to initiate another automation.

## Requirements to go live

To start syncing data you'll need to create a new API user and share the details with your Gocertify account manager.

<Accordion title="See step by step tutorial">
  <Steps>
    <Step title="Create a new API Credentials">
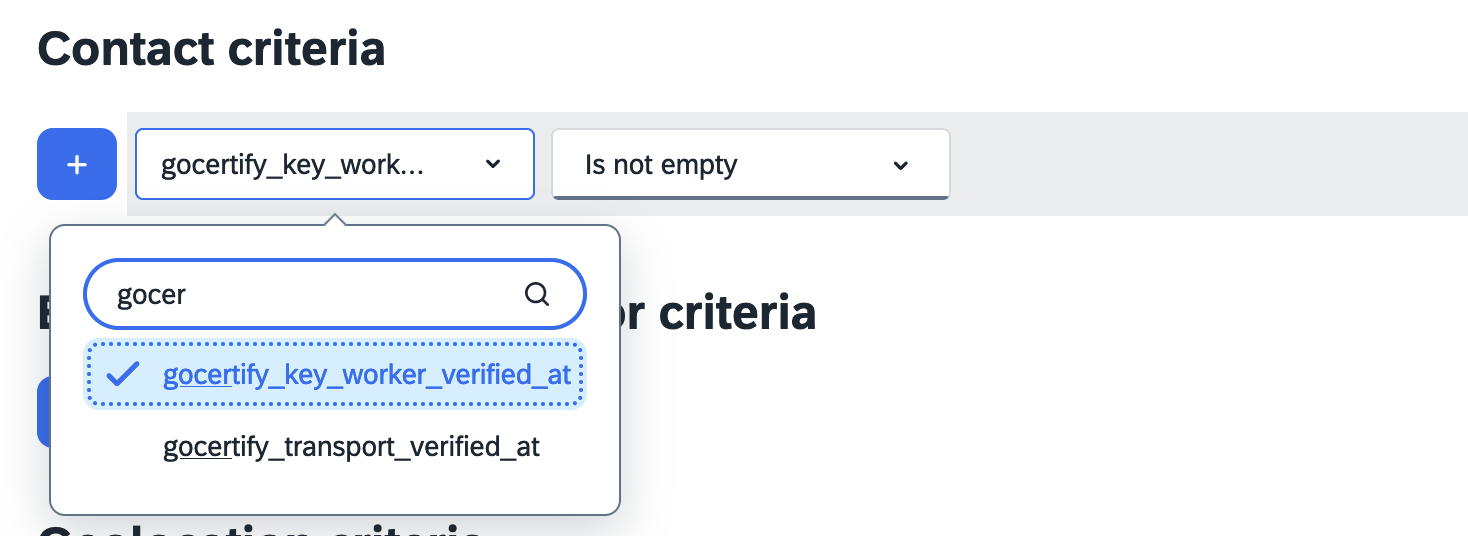
      Sign into [Emarsys](https://login.emarsys.net/bootstrap.php?r=customer/Login) and in the sidebar menu, click in “Management” and then choose “Security Settings”.

      <img className="block dark:hidden" src="https://mintcdn.com/gocertify-db9cc6b8/jGJls7PPp-s8_HqB/images/integrations/cdp/emarsys/emarsysSecuritySettings.png?fit=max&auto=format&n=jGJls7PPp-s8_HqB&q=85&s=712459a580ddb0b1a636547622ccc648" alt="Emarsys security settings" style={{ borderRadius: '0.5rem' }} width="1120" height="982" data-path="images/integrations/cdp/emarsys/emarsysSecuritySettings.png" />

      <img className="hidden dark:block" src="https://mintcdn.com/gocertify-db9cc6b8/jGJls7PPp-s8_HqB/images/integrations/cdp/emarsys/emarsysSecuritySettings.png?fit=max&auto=format&n=jGJls7PPp-s8_HqB&q=85&s=712459a580ddb0b1a636547622ccc648" alt="Emarsys security settings" style={{ borderRadius: '0.5rem' }} width="1120" height="982" data-path="images/integrations/cdp/emarsys/emarsysSecuritySettings.png" />
    </Step>

    <Step title="Create a new API Credentials">
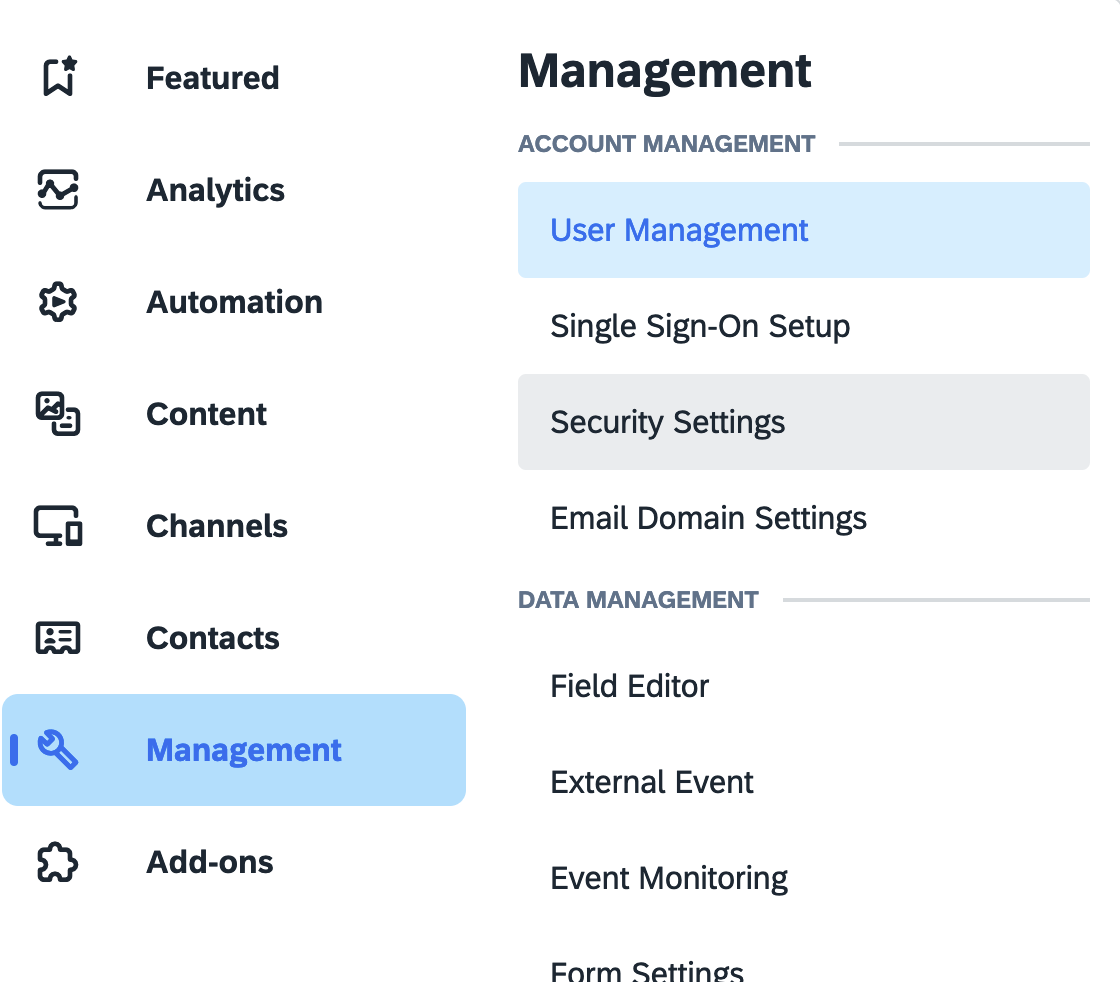
      In the Security Settings module, choose the “API” icon in the left and then click on “Create API Credentials”. Then confirm the creation.

      <img className="block dark:hidden" src="https://mintcdn.com/gocertify-db9cc6b8/jGJls7PPp-s8_HqB/images/integrations/cdp/emarsys/emarsysAPICredentials.png?fit=max&auto=format&n=jGJls7PPp-s8_HqB&q=85&s=a3445c55ada4f9105ec88f41a99e7fae" alt="Emarsys API Credentials" style={{ borderRadius: '0.5rem' }} width="3078" height="1264" data-path="images/integrations/cdp/emarsys/emarsysAPICredentials.png" />

      <img className="hidden dark:block" src="https://mintcdn.com/gocertify-db9cc6b8/jGJls7PPp-s8_HqB/images/integrations/cdp/emarsys/emarsysAPICredentials.png?fit=max&auto=format&n=jGJls7PPp-s8_HqB&q=85&s=a3445c55ada4f9105ec88f41a99e7fae" alt="Emarsys API Credentials" style={{ borderRadius: '0.5rem' }} width="3078" height="1264" data-path="images/integrations/cdp/emarsys/emarsysAPICredentials.png" />
    </Step>

    <Step title="Choose the OpenID connect">
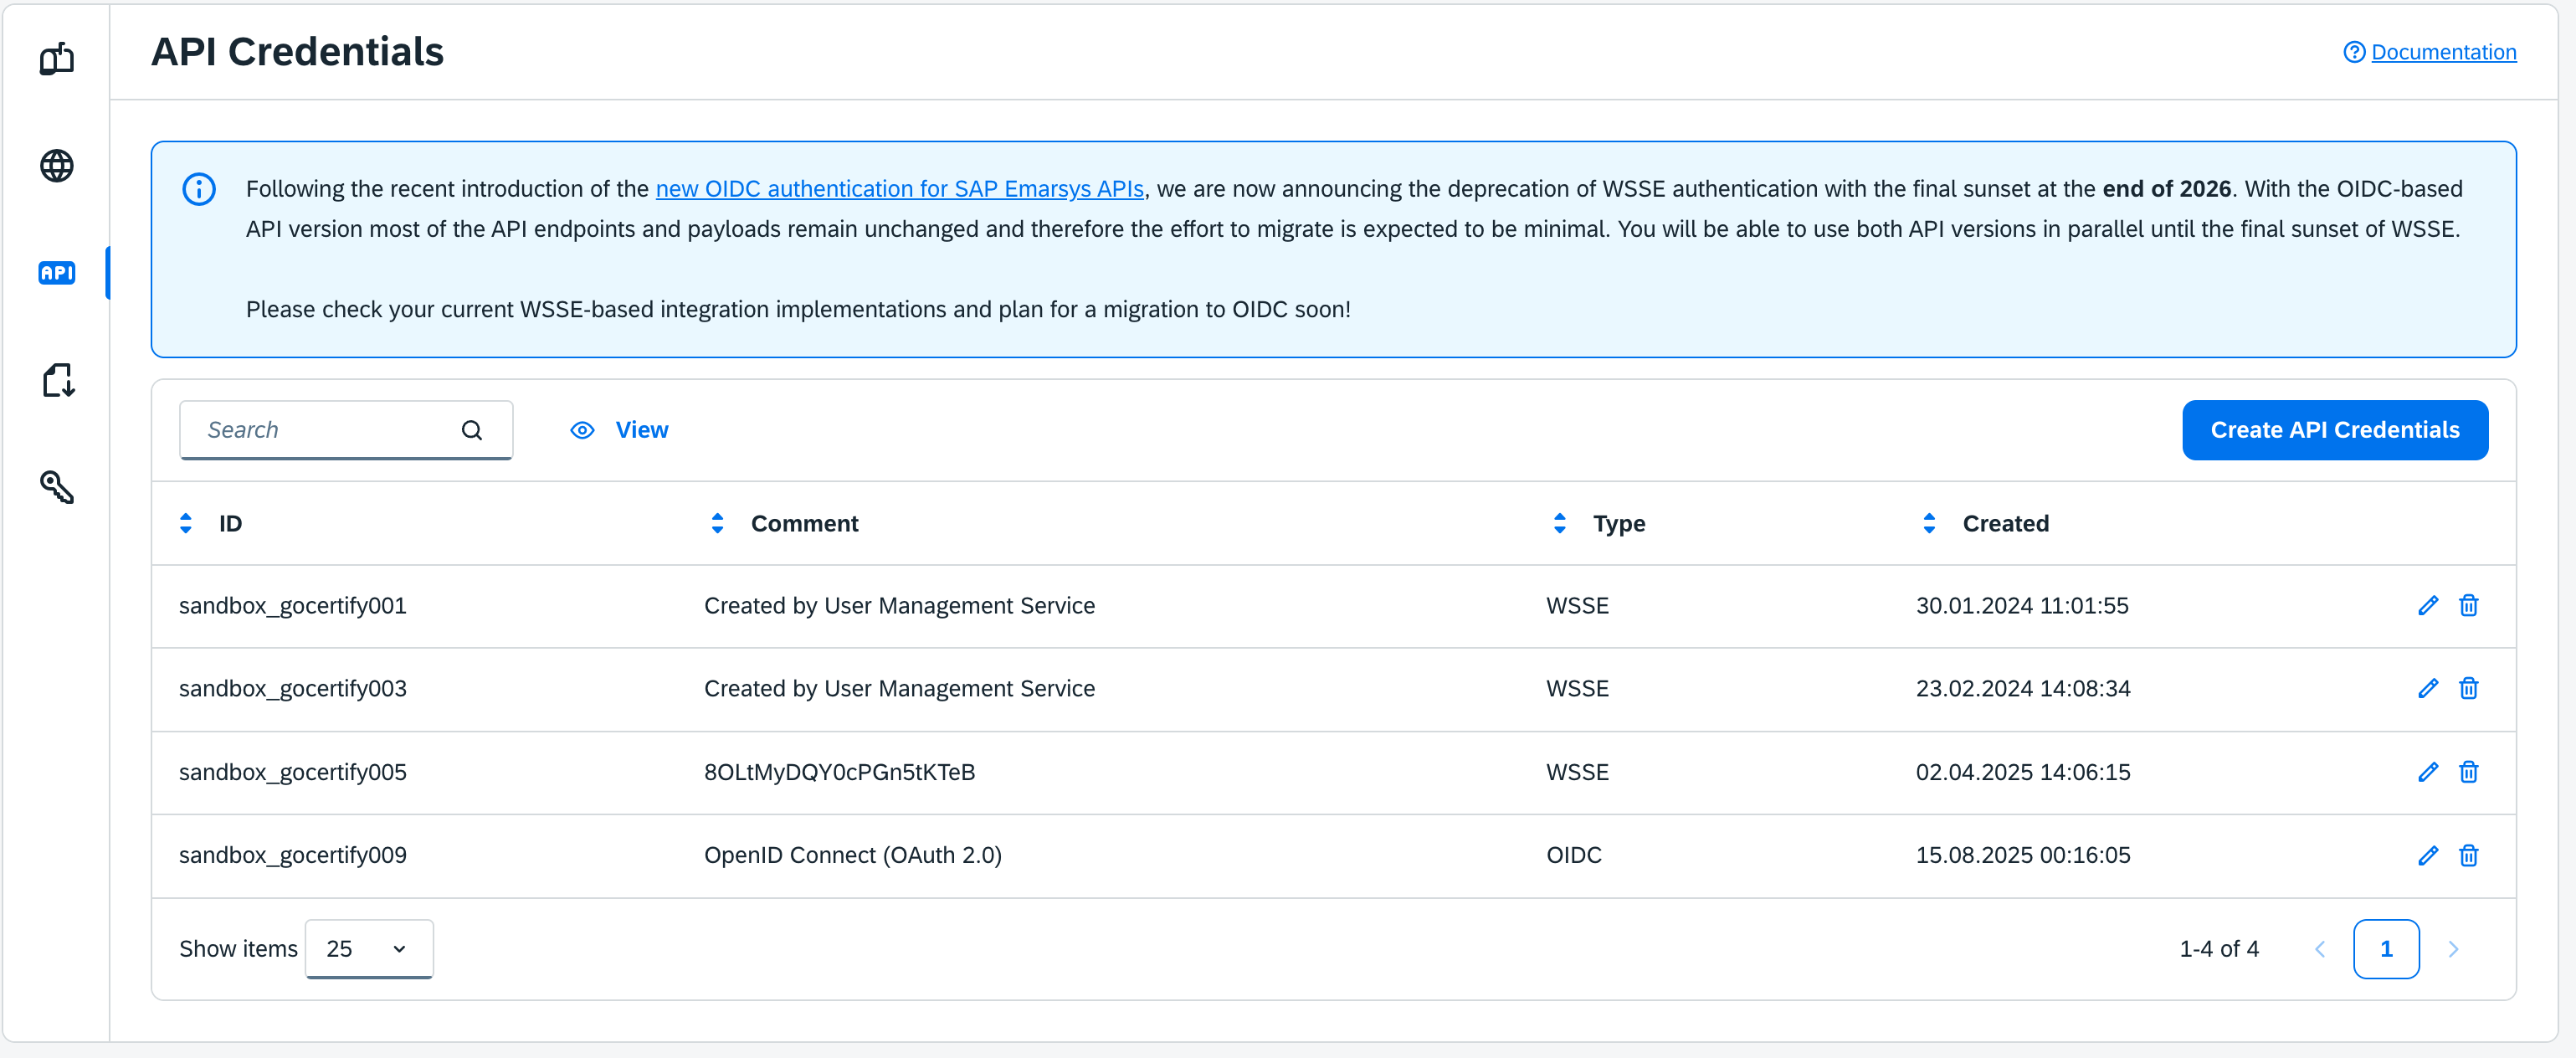
      Select "OpenID Connect" from the credentials type options.

      <img className="block dark:hidden" src="https://mintcdn.com/gocertify-db9cc6b8/jGJls7PPp-s8_HqB/images/integrations/cdp/emarsys/emarsysAPICredentialsChoose.png?fit=max&auto=format&n=jGJls7PPp-s8_HqB&q=85&s=1035404e37dc80bd73bcb73678b76b8a" alt="Emarsys API Credentials" style={{ borderRadius: '0.5rem' }} width="659" height="346" data-path="images/integrations/cdp/emarsys/emarsysAPICredentialsChoose.png" />

      <img className="hidden dark:block" src="https://mintcdn.com/gocertify-db9cc6b8/jGJls7PPp-s8_HqB/images/integrations/cdp/emarsys/emarsysAPICredentialsChoose.png?fit=max&auto=format&n=jGJls7PPp-s8_HqB&q=85&s=1035404e37dc80bd73bcb73678b76b8a" alt="Emarsys API Credentials" style={{ borderRadius: '0.5rem' }} width="659" height="346" data-path="images/integrations/cdp/emarsys/emarsysAPICredentialsChoose.png" />
    </Step>

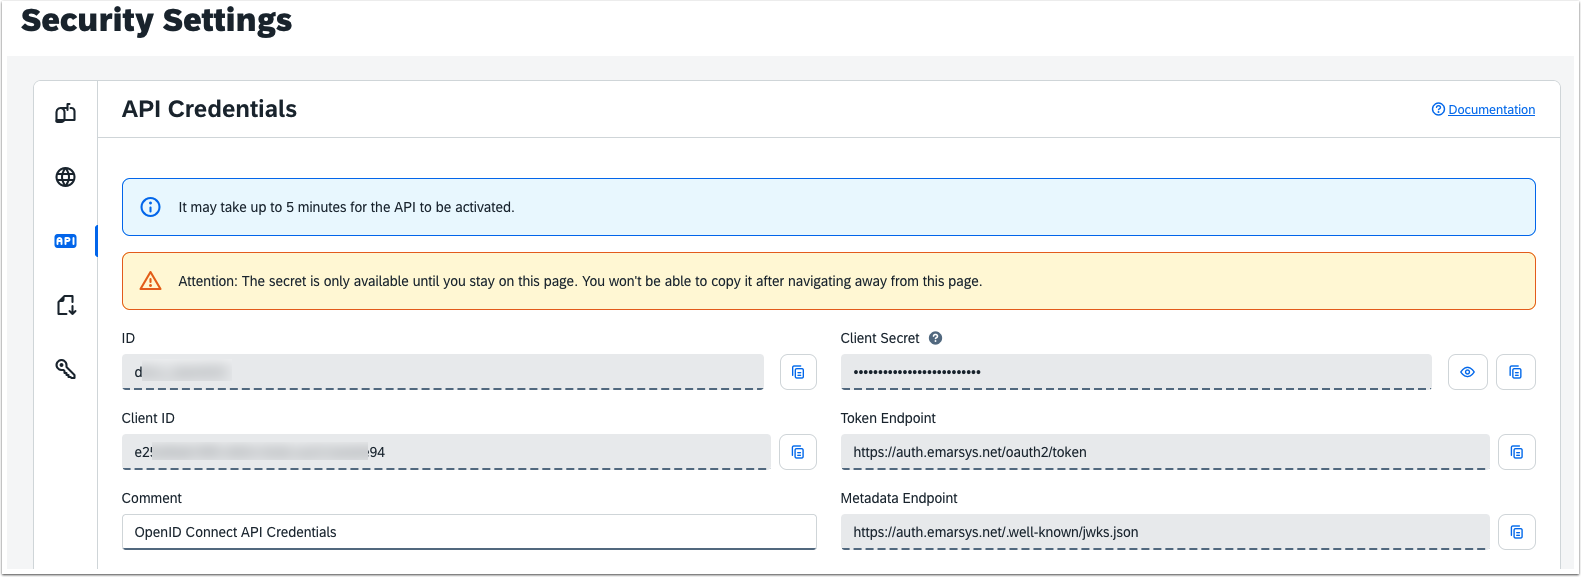
    <Step title="Copy Credentials">
      Copy Client ID and Client Secret

      <img className="block dark:hidden" src="https://mintcdn.com/gocertify-db9cc6b8/jGJls7PPp-s8_HqB/images/integrations/cdp/emarsys/emarsysOpenIDUser.png?fit=max&auto=format&n=jGJls7PPp-s8_HqB&q=85&s=dfe48f029e070a01b6a4be831bf34c84" alt="Emarsys API key" style={{ borderRadius: '0.5rem' }} width="1581" height="577" data-path="images/integrations/cdp/emarsys/emarsysOpenIDUser.png" />

      <img className="hidden dark:block" src="https://mintcdn.com/gocertify-db9cc6b8/jGJls7PPp-s8_HqB/images/integrations/cdp/emarsys/emarsysOpenIDUser.png?fit=max&auto=format&n=jGJls7PPp-s8_HqB&q=85&s=dfe48f029e070a01b6a4be831bf34c84" alt="Emarsys API key" style={{ borderRadius: '0.5rem' }} width="1581" height="577" data-path="images/integrations/cdp/emarsys/emarsysOpenIDUser.png" />

      <div style={{ background: '#FFF4E5', border: '1px solid #FFA726', borderLeft: '4px solid #FF5722', color: '#BF360C', padding: '1rem', borderRadius: '0.5rem', margin: '1rem 0', fontWeight: 500, display: 'flex', alignItems: 'flex-start', gap: '0.5rem' }}>
        <div style={{ color: '#FF5722', fontSize: '1.2rem', fontWeight: 'bold', marginTop: '0.1rem' }}>⚠️</div>
        <div><strong style={{ color: '#BF360C' }}>Caution:</strong> Please note that, as the orange warning strip at the top indicates, this is the only time this secret is displayed. If you navigate away from this page without making a note of it, it is impossible to retrieve the secret and new credentials have to be generated.</div>
      </div>
    </Step>

    <Step title="Share the user details with Gocertify">
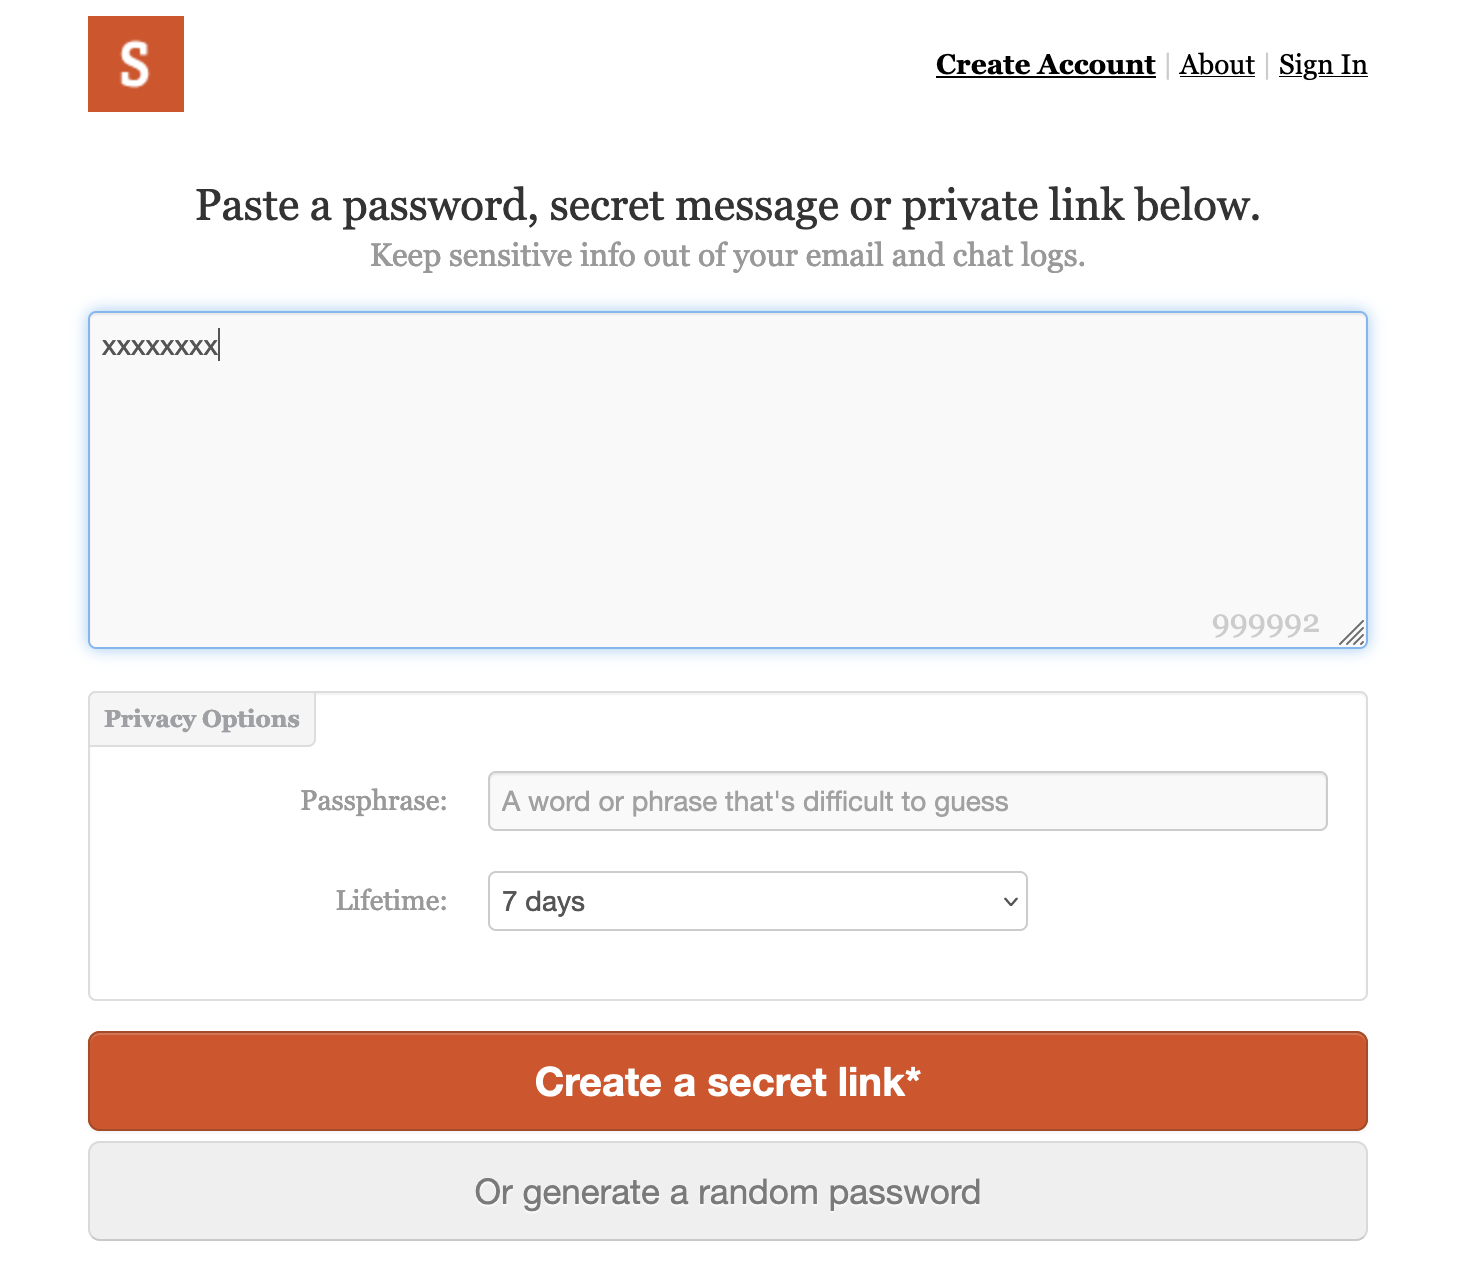
      Go to onetimesecret.com and paste the copied Client ID and Client Secret. Even if it's not required, we encourage you to also add a random “Passphrase”.
      This will generate a secret link that will expire within 7 days and will be visible only once.

      Share this link with your Customer Success Manager, we will set this User name and Secret in our systems to continue the integration

      <img className="block dark:hidden" src="https://mintcdn.com/gocertify-db9cc6b8/PPr5fj4e8e7ywwBC/images/integrations/cdp/onetimeSecret.png?fit=max&auto=format&n=PPr5fj4e8e7ywwBC&q=85&s=3e17dc8933eb6f7846f5864dd2623518" alt="Onetime Secret" style={{ borderRadius: '0.5rem' }} width="1466" height="1268" data-path="images/integrations/cdp/onetimeSecret.png" />

      <img className="hidden dark:block" src="https://mintcdn.com/gocertify-db9cc6b8/PPr5fj4e8e7ywwBC/images/integrations/cdp/onetimeSecret.png?fit=max&auto=format&n=PPr5fj4e8e7ywwBC&q=85&s=3e17dc8933eb6f7846f5864dd2623518" alt="Onetime Secret" style={{ borderRadius: '0.5rem' }} width="1466" height="1268" data-path="images/integrations/cdp/onetimeSecret.png" />
    </Step>

    <Step title="Edit API Credentials">
      In the list of all your API Credentials, go to the one you just created and click on the Edit (the pen) icon.

      <img className="block dark:hidden" src="https://mintcdn.com/gocertify-db9cc6b8/jGJls7PPp-s8_HqB/images/integrations/cdp/emarsys/emarsysAPICredentials.png?fit=max&auto=format&n=jGJls7PPp-s8_HqB&q=85&s=a3445c55ada4f9105ec88f41a99e7fae" alt="Emarsys edit API Credentials" style={{ borderRadius: '0.5rem' }} width="3078" height="1264" data-path="images/integrations/cdp/emarsys/emarsysAPICredentials.png" />

      <img className="hidden dark:block" src="https://mintcdn.com/gocertify-db9cc6b8/jGJls7PPp-s8_HqB/images/integrations/cdp/emarsys/emarsysAPICredentials.png?fit=max&auto=format&n=jGJls7PPp-s8_HqB&q=85&s=a3445c55ada4f9105ec88f41a99e7fae" alt="Emarsys edit API Credentials" style={{ borderRadius: '0.5rem' }} width="3078" height="1264" data-path="images/integrations/cdp/emarsys/emarsysAPICredentials.png" />
    </Step>

    <Step title="Authorise the API Credentials">
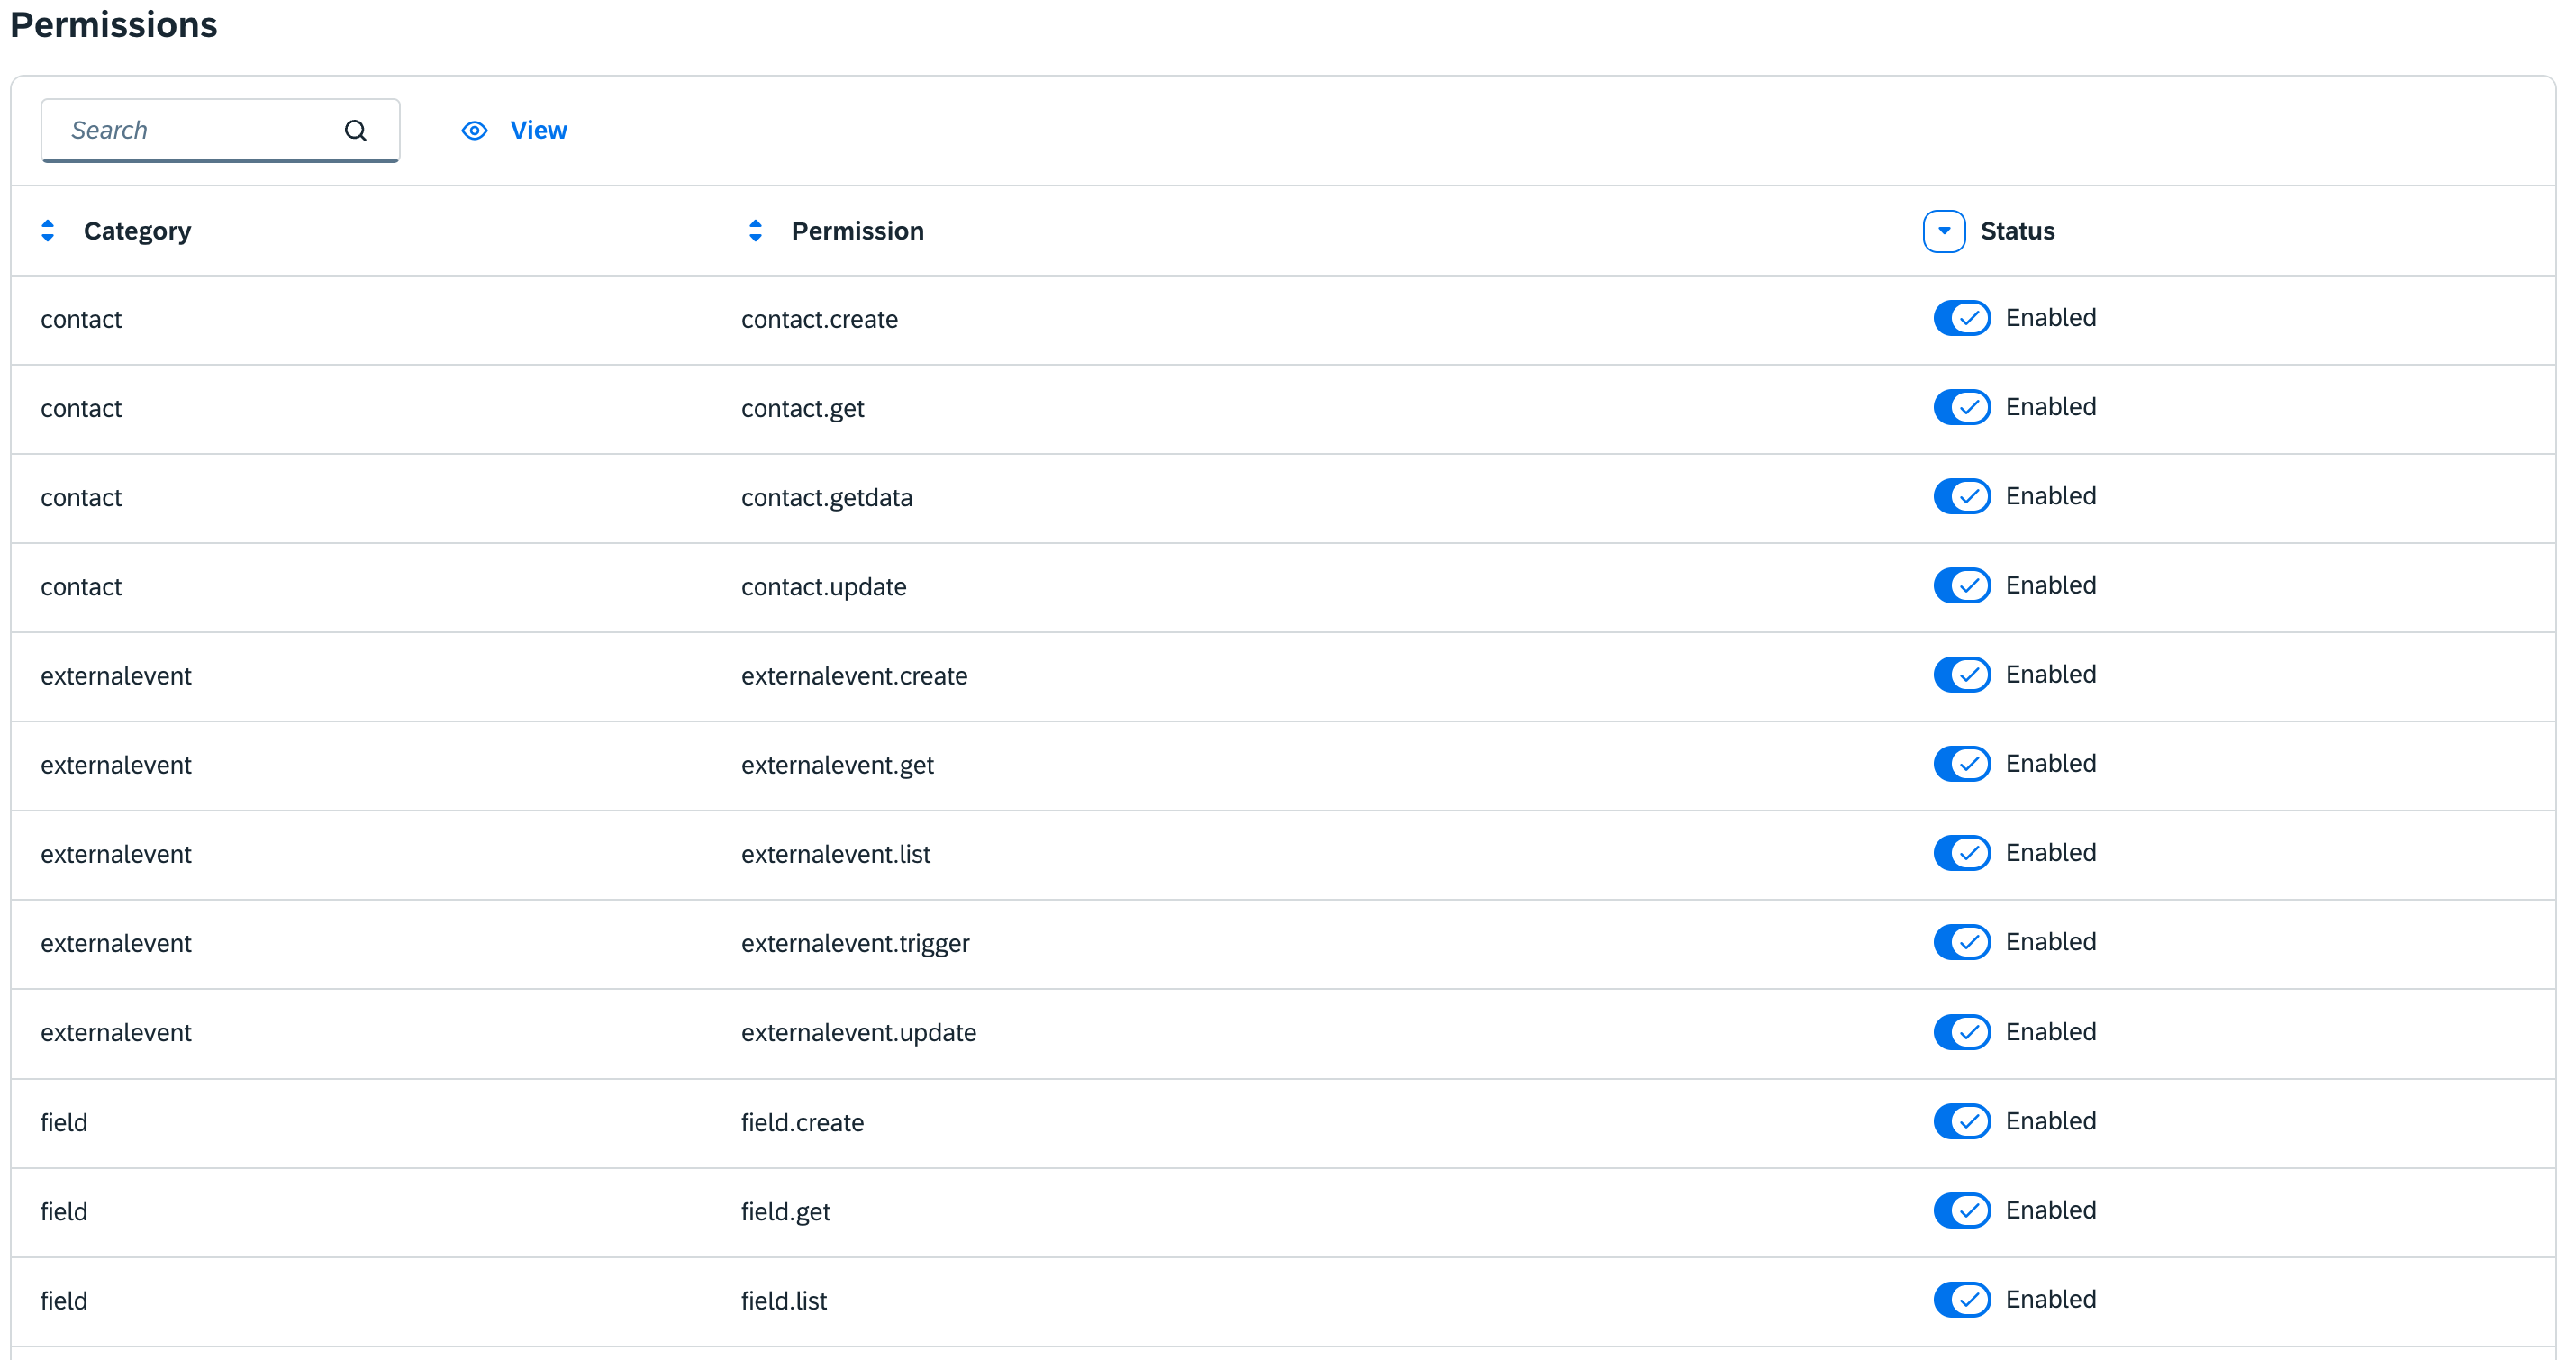
      Authorise the API Credentials to do all the automations we described in the overview, enabling all the checkboxes shown below:

      <img className="block" src="https://mintcdn.com/gocertify-db9cc6b8/jGJls7PPp-s8_HqB/images/integrations/cdp/emarsys/emarsysPermissions.png?fit=max&auto=format&n=jGJls7PPp-s8_HqB&q=85&s=737f0e93af3f34973eff23e4675e1aee" alt="Emarsys Permissions" style={{ borderRadius: '0.5rem' }} width="2860" height="1510" data-path="images/integrations/cdp/emarsys/emarsysPermissions.png" />
    </Step>

    <Step title="Navigate to Field Editor">
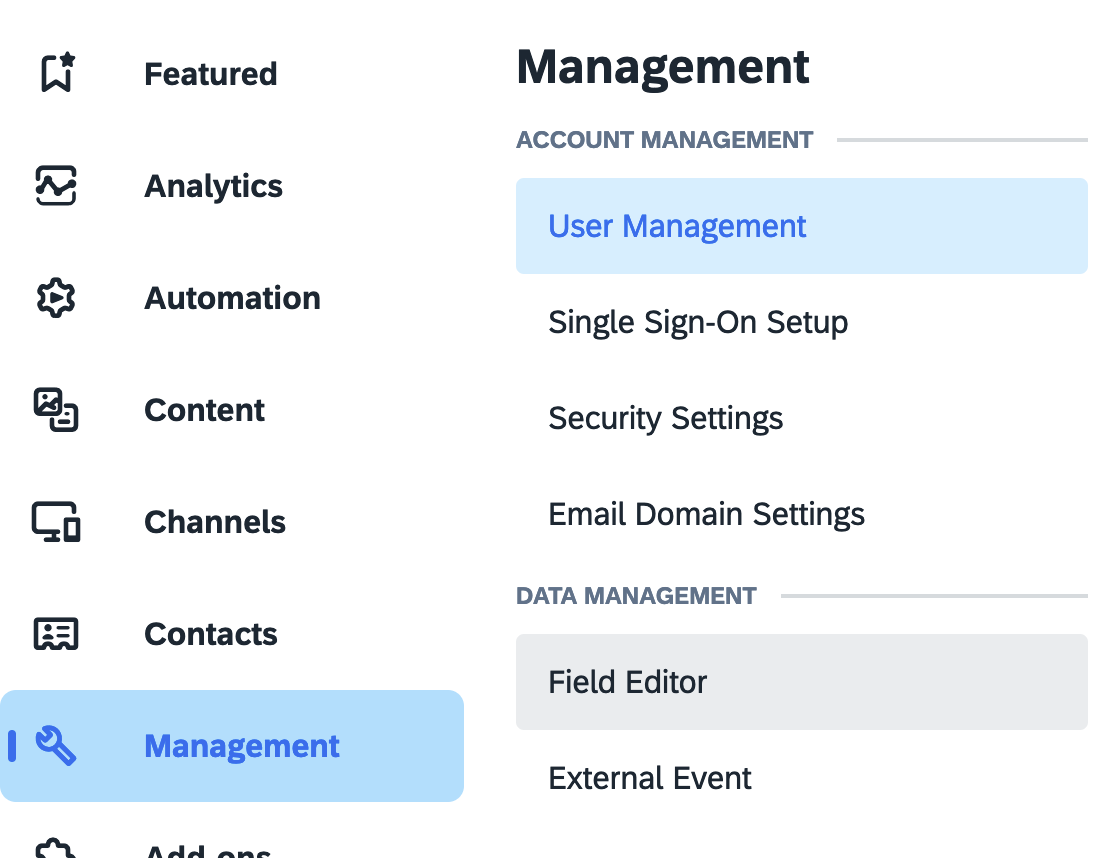
      In the side menu, go to “Management” and then “Field Editor”

      <img className="block dark:hidden" src="https://mintcdn.com/gocertify-db9cc6b8/jGJls7PPp-s8_HqB/images/integrations/cdp/emarsys/emarsysFieldEditor.png?fit=max&auto=format&n=jGJls7PPp-s8_HqB&q=85&s=81b52d6a7fb50ffc54a2877a093997a1" alt="Emarsys field editor" style={{ borderRadius: '0.5rem' }} width="1116" height="858" data-path="images/integrations/cdp/emarsys/emarsysFieldEditor.png" />

      <img className="hidden dark:block" src="https://mintcdn.com/gocertify-db9cc6b8/jGJls7PPp-s8_HqB/images/integrations/cdp/emarsys/emarsysFieldEditor.png?fit=max&auto=format&n=jGJls7PPp-s8_HqB&q=85&s=81b52d6a7fb50ffc54a2877a093997a1" alt="Emarsys field editor" style={{ borderRadius: '0.5rem' }} width="1116" height="858" data-path="images/integrations/cdp/emarsys/emarsysFieldEditor.png" />
    </Step>

    <Step title="Collect the field ID and share with Gocertify">
      Collect the *Field ID* for the following fields:

      * **Email** (it's usually “3”)
      * **Opt-in** (it's usually “31”)
      * **Mobile** (it's usually “37”)
      * **Mobile SMS Opt-In** (it's usually “6949”)
    </Step>
  </Steps>
</Accordion>

## How data will appear in Emarsys

Once the user shares their information with your brand, you will see a new Contact in your base, with the email and mobile *number* (if it's enabled) and the respective Opt-in fields set as *true* (*Opt-in* and *Mobile SMS Opt-In*).

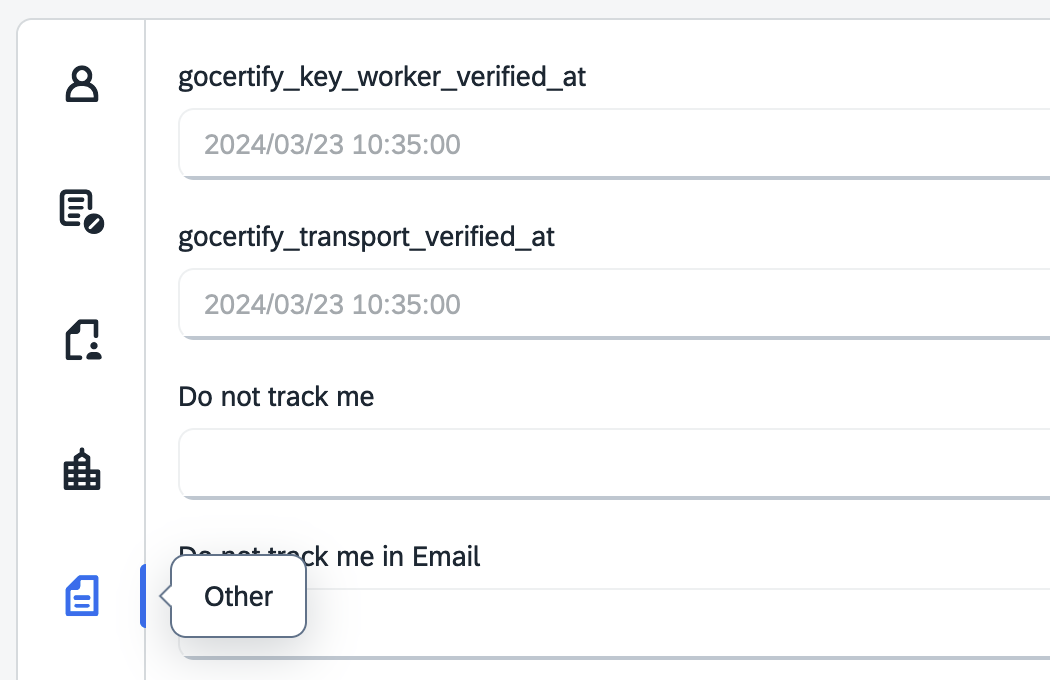
Together with the creation (update) of the Contact, Gocertify will create and trigger an External event, called “gocertify\_consent\_intent”. After the user verifies themself, Gocertify will update the Contact in your base, adding as many “gocertify\_xxx\_verified\_at” fields as needed, with the current date.

<CodeGroup>
  ```json First Event theme={null}
  {
    type: "Code",                         // ← it could be "Code" or "Deal"
    pending_group_type: "Occupation",     // ← might not be present
    pending_group_parent: "Key Worker",   // ← might not be present
    pending_group_child: "NHS Worker",    // ← might not be present
    token: "ABCD1234",                    // ← our internal randomly generated identifier
    subid: "user_1",                      // ← optional, for custom tracking
    brand_slug: "amazon",                 // ← the identifier of the customer
    brand_country: "GB",                  // ← the country set in our system
    user_country: "GB",                   // ← the user's country (based on their mobile number, if shared)
    campaign_id: 1234,                    // ← the Gocertify's campaign's identifier
    campaign_title: "20% OFF for Key Workers",  // ← the title of the campaign
    campaign_url: "https://secure.gocertify.me/at/amazon",   // ← the url of our campaign
    iframe_parent_url: "https://www.customer-website/keyworkers",  // ← might not be present
    date: Time.now.iso8601                // ← the current date, in iso8601 format.
  }
  ```

  ```json Second Event theme={null}
     {
    type: "Code",                         // ← it could be "Code" or "Deal"
    group_type: "Occupation",             // ← might not be present
    group_parent: "Key Worker",           // ← might not be present
    group_child: "NHS Worker",            // ← might not be present
    token: "ABCD1234",                    // ← our internal randomly generated identifier
    subid: "user_1",                      // ← optional, for custom tracking
    brand_slug: "amazon",                 // ← the identifier of the customer
    brand_country: "GB",                  // ← the country set in our system
    user_country: "GB",                   // ← the user's country (based on their mobile number, if shared)
    campaign_id: 1234,                    // ← the Gocertify's campaign's identifier
    campaign_title: "20% OFF for Key Workers",  // ← the title of the campaign
    campaign_url: "https://secure.gocertify.me/at/amazon",   // ← the url of our campaign
    iframe_parent_url: "https://www.customer-website/keyworkers",  // ← might not be present
    date: Time.now.iso8601,               // ← the current date, in iso8601 format.
    code: "COUPONCODE"
  }
  ```
</CodeGroup>

Within your account you will see the shopper:

<Frame caption="Example shopper profile within Emarsys">
  <img className="block dark:hidden" src="https://mintcdn.com/gocertify-db9cc6b8/jGJls7PPp-s8_HqB/images/integrations/cdp/emarsys/emarysysShopper.png?fit=max&auto=format&n=jGJls7PPp-s8_HqB&q=85&s=babd238ed96a149c5436119f2252ea22" alt="Example shopper" style={{ borderRadius: "0.5rem" }} width="1050" height="680" data-path="images/integrations/cdp/emarsys/emarysysShopper.png" />

  <img className="hidden dark:block" src="https://mintcdn.com/gocertify-db9cc6b8/jGJls7PPp-s8_HqB/images/integrations/cdp/emarsys/emarysysShopper.png?fit=max&auto=format&n=jGJls7PPp-s8_HqB&q=85&s=babd238ed96a149c5436119f2252ea22" alt="Example shopper" style={{ borderRadius: "0.5rem" }} width="1050" height="680" data-path="images/integrations/cdp/emarsys/emarysysShopper.png" />
</Frame>

## How to create segments in Emarsys

Once you start receiving data from Gocertify, you will be able to set all the Segments you desire.

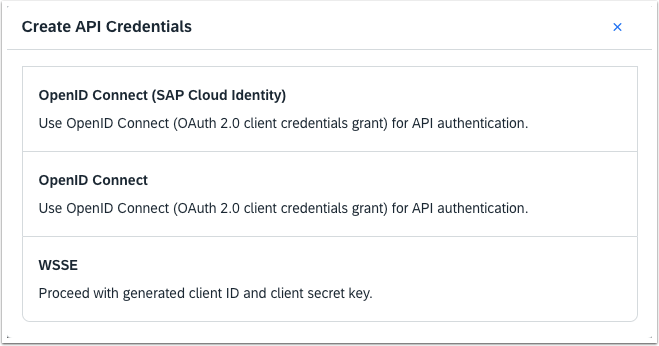
In the side menu, go to “Contacts” > “Segments” and then create a new one. In the Criteria filter, you will have all the “gocertify\_xxx\_verified\_at” fields. Depending on your needs, you can use one, or many conditions.

<Frame caption="Example of how to segment Gocertify shoppers within Emarsys">
  <img className="block dark:hidden" src="https://mintcdn.com/gocertify-db9cc6b8/jGJls7PPp-s8_HqB/images/integrations/cdp/emarsys/emarsysSegmentation.png?fit=max&auto=format&n=jGJls7PPp-s8_HqB&q=85&s=0a6906ff90e7359def39cc958265c4d3" alt="Emarsys segmentation" style={{ borderRadius: "0.5rem" }} width="1468" height="536" data-path="images/integrations/cdp/emarsys/emarsysSegmentation.png" />

  <img className="hidden dark:block" src="https://mintcdn.com/gocertify-db9cc6b8/jGJls7PPp-s8_HqB/images/integrations/cdp/emarsys/emarsysSegmentation.png?fit=max&auto=format&n=jGJls7PPp-s8_HqB&q=85&s=0a6906ff90e7359def39cc958265c4d3" alt="Emarsys segmentation" style={{ borderRadius: "0.5rem" }} width="1468" height="536" data-path="images/integrations/cdp/emarsys/emarsysSegmentation.png" />
</Frame>

If you want to create a Segment with all the Contacts verified through Gocertify, you will need to define that “any of those fields” is not empty.

If you want to create a Segment with only “Transport” workers, simply use the “gocertify\_transport\_verified\_at” field.

If you want to create a Segment with “all the key workers”, simpy use the “gocertify\_key\_worker\_verified\_at” field.