> ## Documentation Index
> Fetch the complete documentation index at: https://docs.gocertify.me/llms.txt
> Use this file to discover all available pages before exploring further.

# Dotdigital

> Start building loyal communities with targeted, gated offers.

When a shopper submits their email and/or mobile number, Gocertify will send this data to the your Dotdigital account in the form of a Gocertify event. This is represented by a “Profile” (either augmenting an existing one or creating a new one).

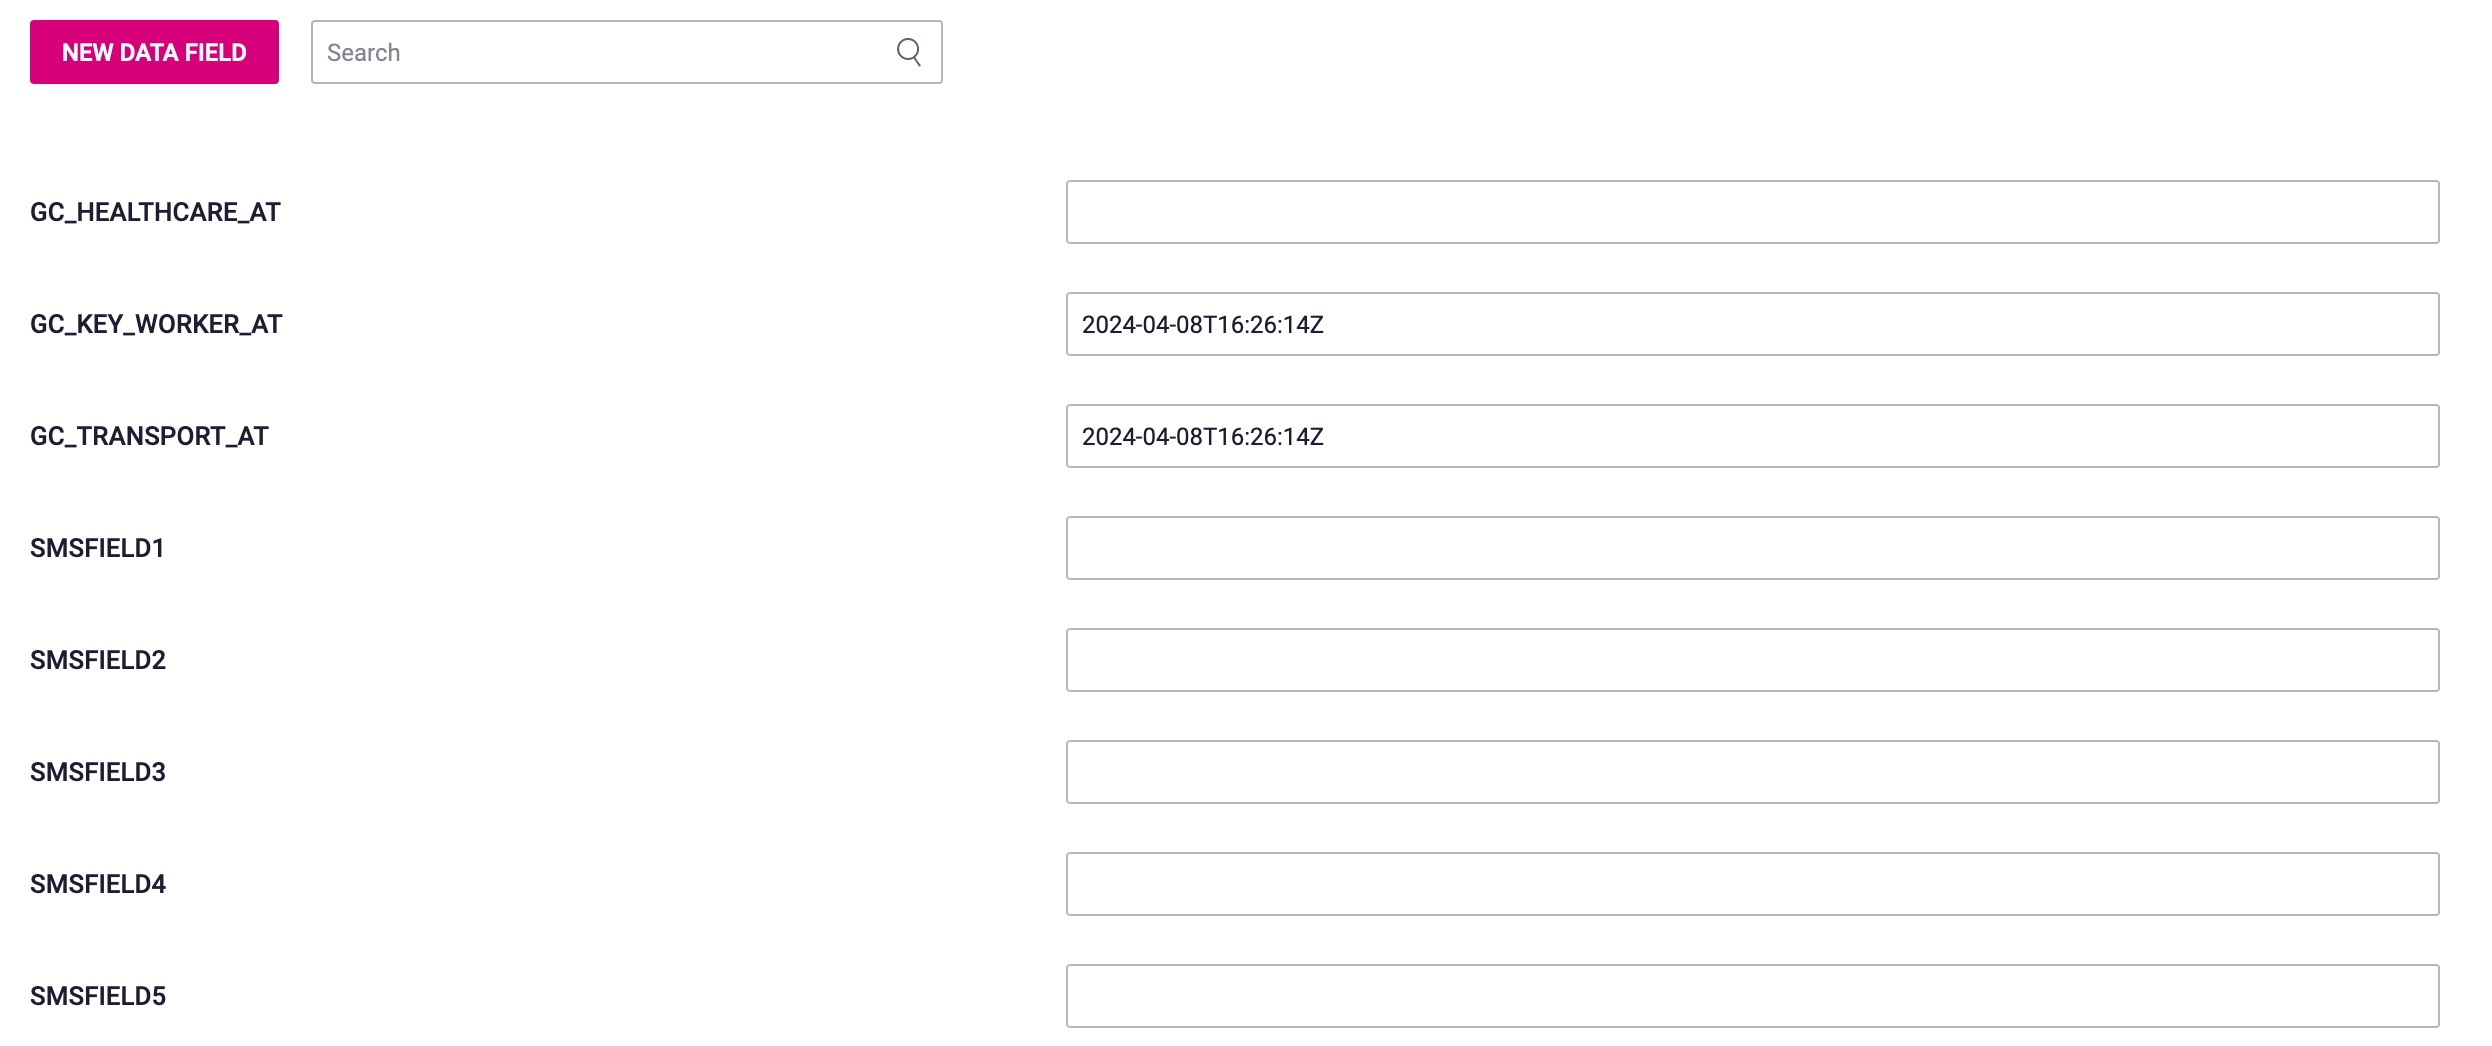
As the shopper goes on to successfully verify as a target group (student, healthcare, senior, etc) another “Event” will be triggered, Gocertify will update the Contact, setting a new field called `GC_{{VERIFIED_GROUP}}_AT` with the current date in IS08601 format.
We will create as many fields to the Contact object as needed according to the campaigns set with Gocertify and use the “group\_verification” from boththe Parent Group and the Child Group. For example, if you are running a Military campaign, you will see 2 fields:

* GC\_MILITARY\_AT
* GC\_KEY\_WORKER\_AT

With this data, you will be able to generate segments based on these events.

<Tip>
  Gocertify is going to truncate the verified group to 14 characters, because we can’t create a data field in Dotdigital larger than 20 characters.
</Tip>

## Requirements to go live

To go live with dotdigital you will need to create an API user and share the details with Gocertify.

<Accordion title="See step by step tutorial">
  <Steps>
    <Step title="Access Project Settings">
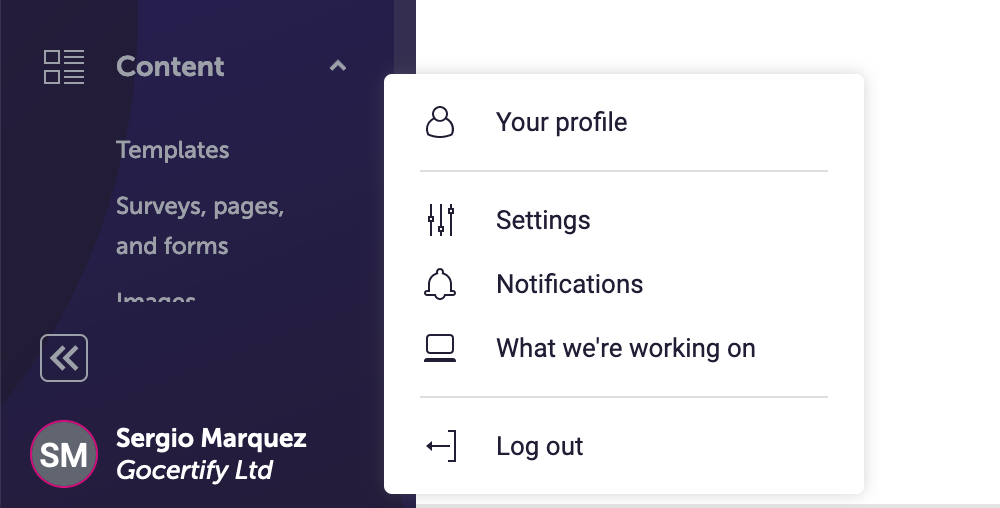
      Sign in to your Dotdigital account and in the sidebar menu, click in “Account settings”
      <img className="block dark:hidden" src="https://mintcdn.com/gocertify-db9cc6b8/jGJls7PPp-s8_HqB/images/integrations/cdp/dotdigital/dotDigitalAccountSettings.png?fit=max&auto=format&n=jGJls7PPp-s8_HqB&q=85&s=d123f299a051ef2577ce3925627d1401" alt="Dotdigital Project Settings" style={{ borderRadius: '0.5rem' }} width="1000" height="508" data-path="images/integrations/cdp/dotdigital/dotDigitalAccountSettings.png" />

      <img className="hidden dark:block" src="https://mintcdn.com/gocertify-db9cc6b8/jGJls7PPp-s8_HqB/images/integrations/cdp/dotdigital/dotDigitalAccountSettings.png?fit=max&auto=format&n=jGJls7PPp-s8_HqB&q=85&s=d123f299a051ef2577ce3925627d1401" alt="Dotdigital Project Settings" style={{ borderRadius: '0.5rem' }} width="1000" height="508" data-path="images/integrations/cdp/dotdigital/dotDigitalAccountSettings.png" />
    </Step>

    <Step title="Navigate to Access Settings">
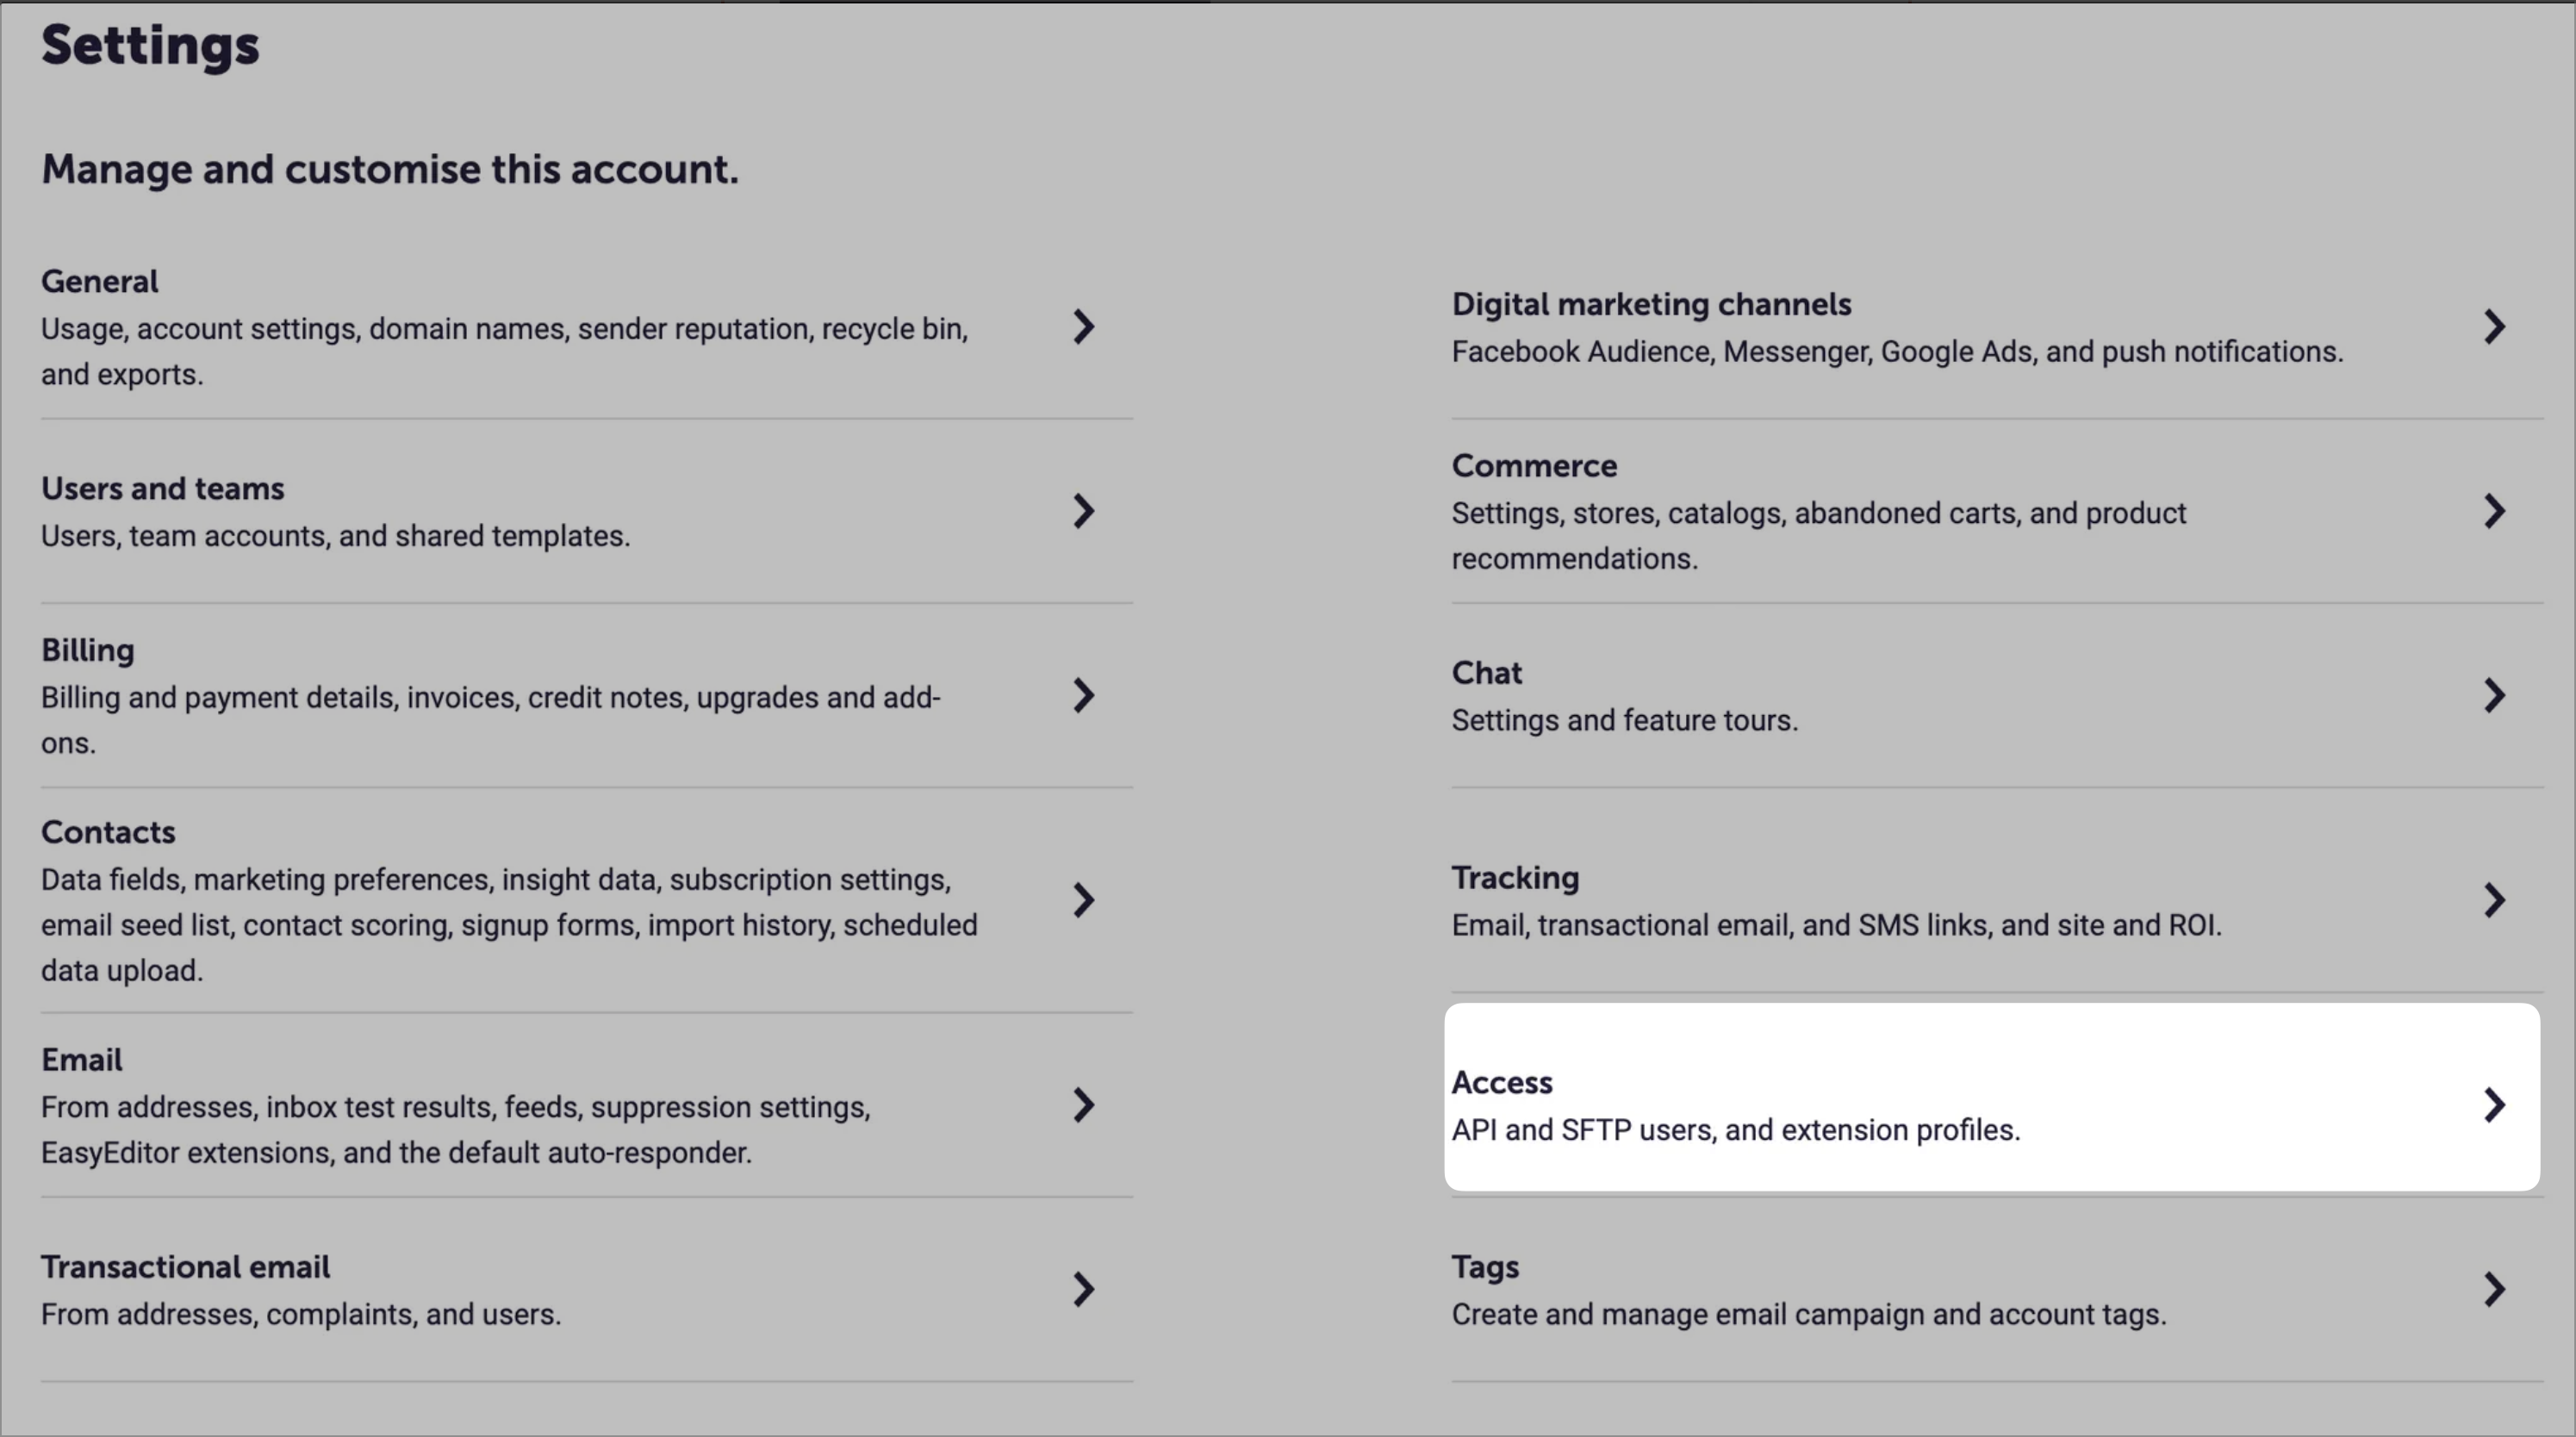
      In the accounts settings choose the “Access” option
      <img className="block dark:hidden" src="https://mintcdn.com/gocertify-db9cc6b8/jGJls7PPp-s8_HqB/images/integrations/cdp/dotdigital/dotDigitalAccessSettings.png?fit=max&auto=format&n=jGJls7PPp-s8_HqB&q=85&s=9fb9b72d35769c173b7a02733c004b68" alt="Dotdigital Access Settings" style={{ borderRadius: '0.5rem' }} width="2990" height="1668" data-path="images/integrations/cdp/dotdigital/dotDigitalAccessSettings.png" />

      <img className="hidden dark:block" src="https://mintcdn.com/gocertify-db9cc6b8/jGJls7PPp-s8_HqB/images/integrations/cdp/dotdigital/dotDigitalAccessSettings.png?fit=max&auto=format&n=jGJls7PPp-s8_HqB&q=85&s=9fb9b72d35769c173b7a02733c004b68" alt="Dotdigital Access Settings" style={{ borderRadius: '0.5rem' }} width="2990" height="1668" data-path="images/integrations/cdp/dotdigital/dotDigitalAccessSettings.png" />
    </Step>

    <Step title="Navigate to API users">
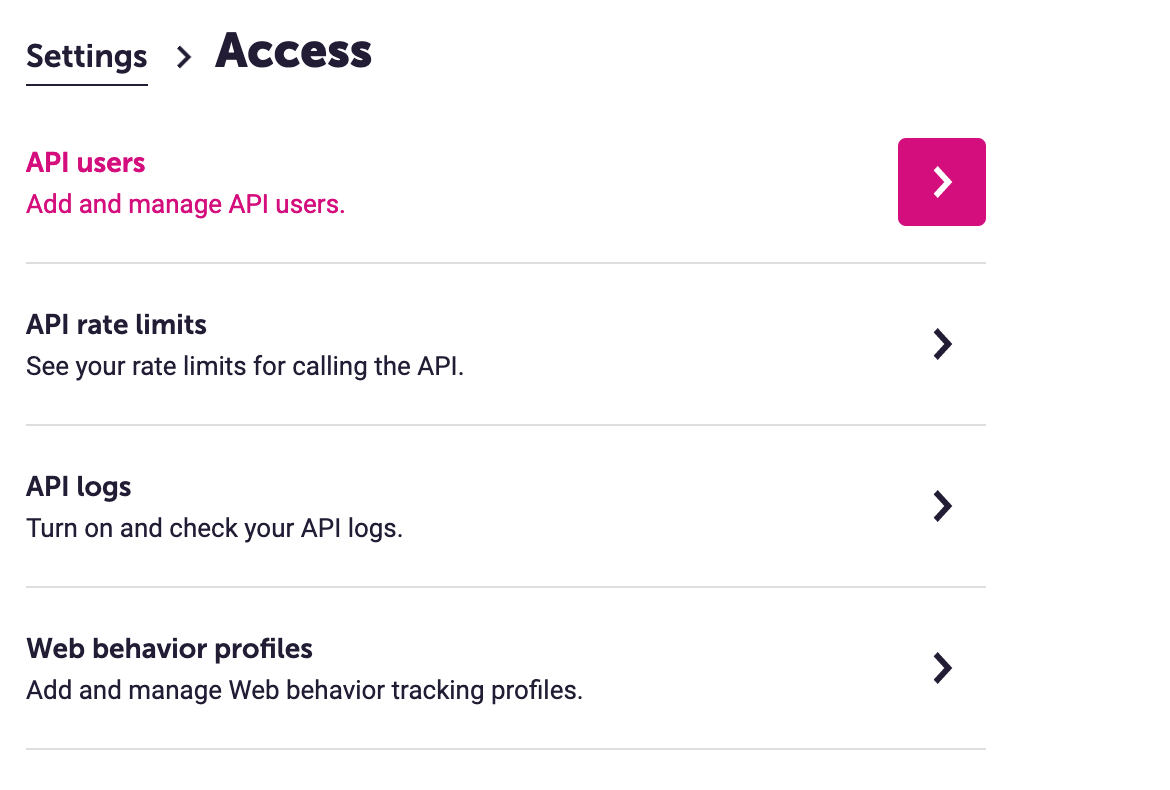
      In the settings access choose “API users”.
      <img className="block dark:hidden" src="https://mintcdn.com/gocertify-db9cc6b8/jGJls7PPp-s8_HqB/images/integrations/cdp/dotdigital/dotDigitalAPIusers.png?fit=max&auto=format&n=jGJls7PPp-s8_HqB&q=85&s=30183d9c8976dbd6f2140391e84364ff" alt="Dotdigital API users" style={{ borderRadius: '0.5rem' }} width="1170" height="790" data-path="images/integrations/cdp/dotdigital/dotDigitalAPIusers.png" />

      <img className="hidden dark:block" src="https://mintcdn.com/gocertify-db9cc6b8/jGJls7PPp-s8_HqB/images/integrations/cdp/dotdigital/dotDigitalAPIusers.png?fit=max&auto=format&n=jGJls7PPp-s8_HqB&q=85&s=30183d9c8976dbd6f2140391e84364ff" alt="Dotdigital API users" style={{ borderRadius: '0.5rem' }} width="1170" height="790" data-path="images/integrations/cdp/dotdigital/dotDigitalAPIusers.png" />
    </Step>

    <Step title="Start creating the API user">
      Create the a new API user clicking the “New user” button.

      <img className="block dark:hidden" src="https://mintcdn.com/gocertify-db9cc6b8/jGJls7PPp-s8_HqB/images/integrations/cdp/dotdigital/dotDigitalAPIUser.png?fit=max&auto=format&n=jGJls7PPp-s8_HqB&q=85&s=8a977a700d02930e855c4e3625b73821" alt="Dotdigital API user" style={{ borderRadius: '0.5rem' }} width="982" height="140" data-path="images/integrations/cdp/dotdigital/dotDigitalAPIUser.png" />

      <img className="hidden dark:block" src="https://mintcdn.com/gocertify-db9cc6b8/jGJls7PPp-s8_HqB/images/integrations/cdp/dotdigital/dotDigitalAPIUser.png?fit=max&auto=format&n=jGJls7PPp-s8_HqB&q=85&s=8a977a700d02930e855c4e3625b73821" alt="Dotdigital API user" style={{ borderRadius: '0.5rem' }} width="982" height="140" data-path="images/integrations/cdp/dotdigital/dotDigitalAPIUser.png" />
    </Step>

    <Step title="Fill the required information">
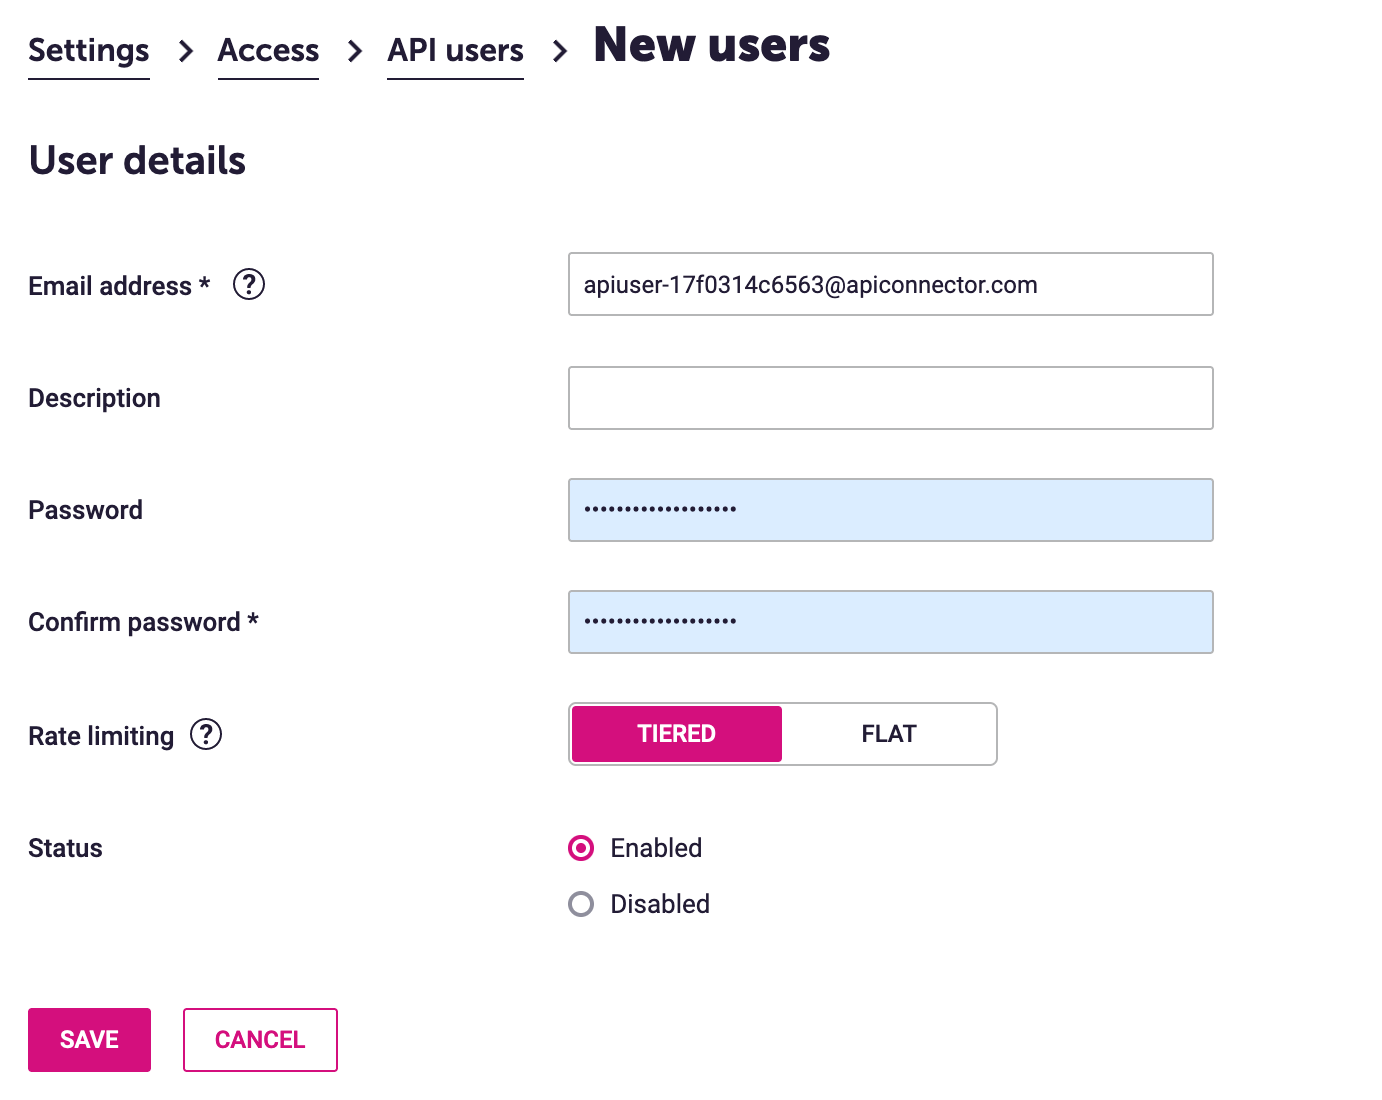
      Fill the required information for the new user and click the save button to create the new API user. Make sure you select “TIERED” as rate limit option.
      <img className="block dark:hidden" src="https://mintcdn.com/gocertify-db9cc6b8/jGJls7PPp-s8_HqB/images/integrations/cdp/dotdigital/dotDigitalAPIUserInfo.png?fit=max&auto=format&n=jGJls7PPp-s8_HqB&q=85&s=50c14814c21e7b5ed4e819102adb8a51" alt="Dotdigital API user info" style={{ borderRadius: '0.5rem' }} width="1382" height="1100" data-path="images/integrations/cdp/dotdigital/dotDigitalAPIUserInfo.png" />

      <img className="hidden dark:block" src="https://mintcdn.com/gocertify-db9cc6b8/jGJls7PPp-s8_HqB/images/integrations/cdp/dotdigital/dotDigitalAPIUserInfo.png?fit=max&auto=format&n=jGJls7PPp-s8_HqB&q=85&s=50c14814c21e7b5ed4e819102adb8a51" alt="Dotdigital API user info" style={{ borderRadius: '0.5rem' }} width="1382" height="1100" data-path="images/integrations/cdp/dotdigital/dotDigitalAPIUserInfo.png" />
    </Step>

    <Step title="Ensure new user is enabled">
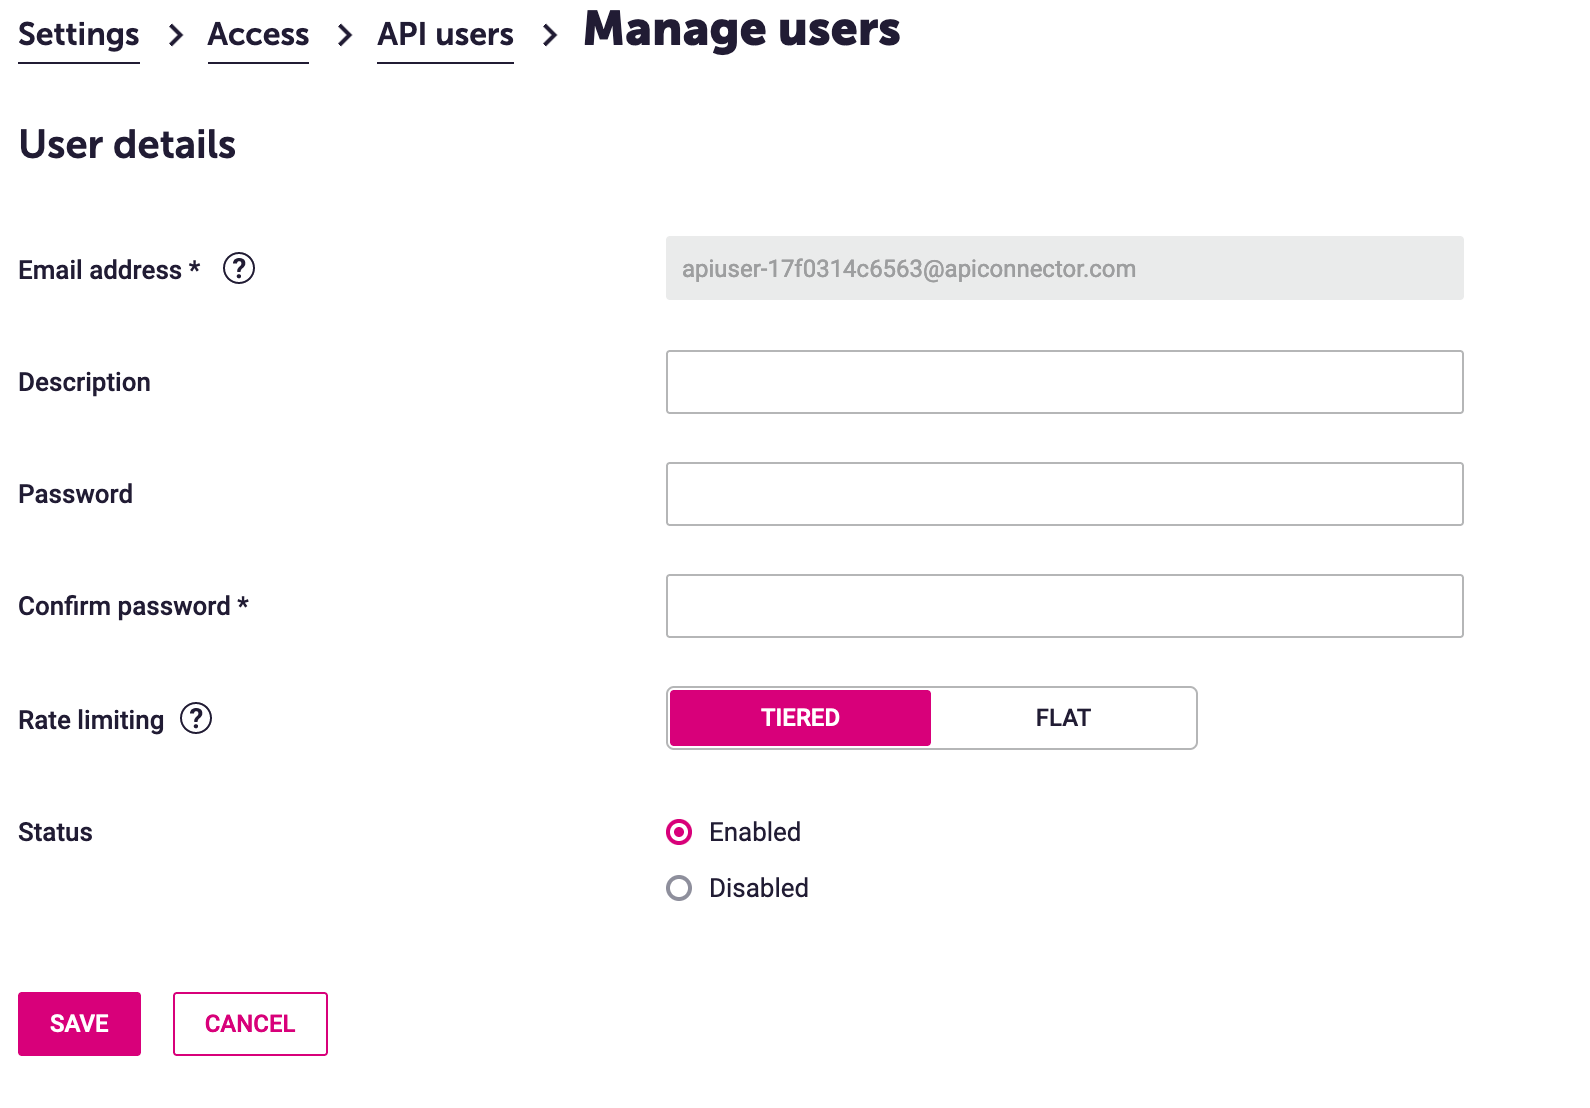
      Make sure the new created user is enabled.

      <img className="block dark:hidden" src="https://mintcdn.com/gocertify-db9cc6b8/jGJls7PPp-s8_HqB/images/integrations/cdp/dotdigital/dotDigitalEnableUser.png?fit=max&auto=format&n=jGJls7PPp-s8_HqB&q=85&s=41ecd686068384cd45b217fb391f6429" alt="Dotdigital enable user" style={{ borderRadius: '0.5rem' }} width="4580" height="200" data-path="images/integrations/cdp/dotdigital/dotDigitalEnableUser.png" />

      <img className="hidden dark:block" src="https://mintcdn.com/gocertify-db9cc6b8/jGJls7PPp-s8_HqB/images/integrations/cdp/dotdigital/dotDigitalEnableUser.png?fit=max&auto=format&n=jGJls7PPp-s8_HqB&q=85&s=41ecd686068384cd45b217fb391f6429" alt="Dotdigital enable user" style={{ borderRadius: '0.5rem' }} width="4580" height="200" data-path="images/integrations/cdp/dotdigital/dotDigitalEnableUser.png" />

      If not please click the pen icon to edit it. Set the status as Enabled and click the save button.
      <img className="block dark:hidden" src="https://mintcdn.com/gocertify-db9cc6b8/jGJls7PPp-s8_HqB/images/integrations/cdp/dotdigital/dotDigitalEnableUserToggle.png?fit=max&auto=format&n=jGJls7PPp-s8_HqB&q=85&s=75bb5d60da323f1993f1c269411c87cd" alt="Dotdigital enable user toggle" style={{ borderRadius: '0.5rem' }} width="1590" height="1108" data-path="images/integrations/cdp/dotdigital/dotDigitalEnableUserToggle.png" />

      <img className="hidden dark:block" src="https://mintcdn.com/gocertify-db9cc6b8/jGJls7PPp-s8_HqB/images/integrations/cdp/dotdigital/dotDigitalEnableUserToggle.png?fit=max&auto=format&n=jGJls7PPp-s8_HqB&q=85&s=75bb5d60da323f1993f1c269411c87cd" alt="Dotdigital enable user toggle" style={{ borderRadius: '0.5rem' }} width="1590" height="1108" data-path="images/integrations/cdp/dotdigital/dotDigitalEnableUserToggle.png" />
    </Step>

    <Step title="Copy the user details">
      Copy the user's email address and password for the user recently created.
    </Step>

    <Step title="Share the user details with Gocertify">
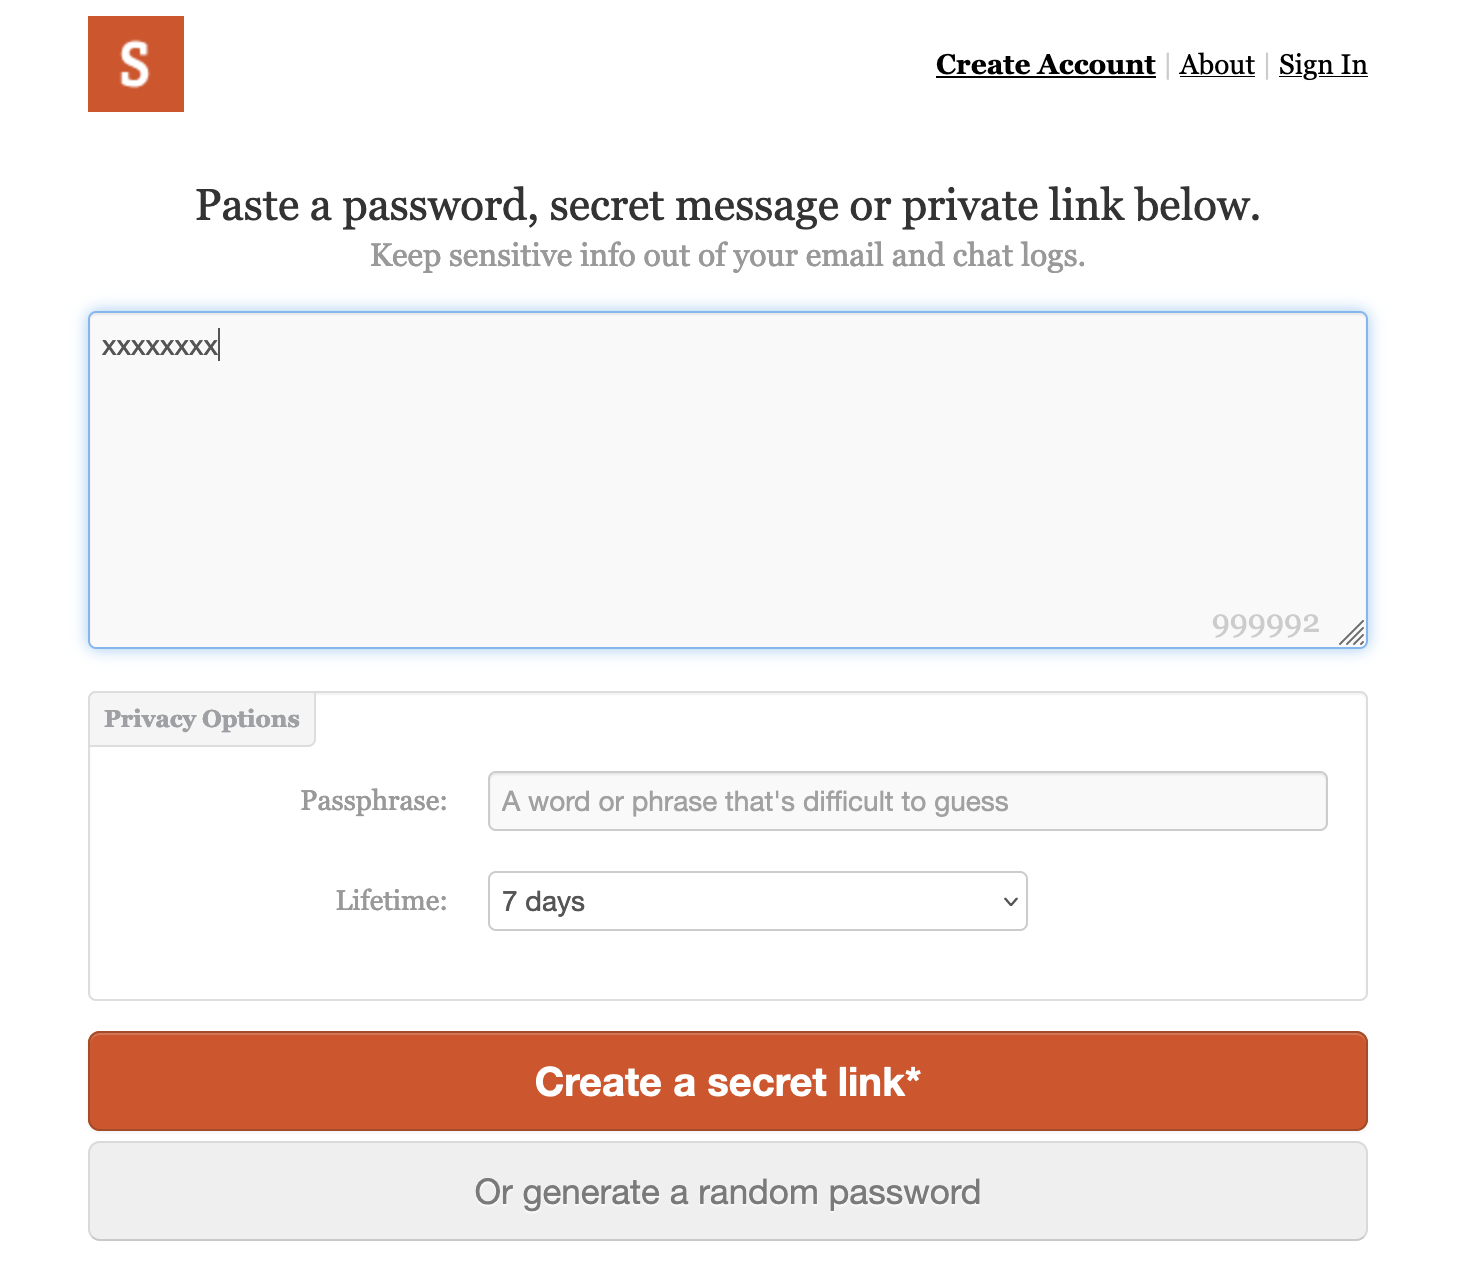
      Go to onetimesecret.com and paste the copied user email and the password. Even if it's not required, we encourage you to also add a random “Passphrase”.
      This will generate a secret link that will expire within 7 days and will be visible only once.

      Share this link with your Customer Success Manager, we will set this User name and Secret in our systems to continue the integration
      <img className="block dark:hidden" src="https://mintcdn.com/gocertify-db9cc6b8/PPr5fj4e8e7ywwBC/images/integrations/cdp/onetimeSecret.png?fit=max&auto=format&n=PPr5fj4e8e7ywwBC&q=85&s=3e17dc8933eb6f7846f5864dd2623518" alt="Onetime Secret" style={{ borderRadius: '0.5rem' }} width="1466" height="1268" data-path="images/integrations/cdp/onetimeSecret.png" />

      <img className="hidden dark:block" src="https://mintcdn.com/gocertify-db9cc6b8/PPr5fj4e8e7ywwBC/images/integrations/cdp/onetimeSecret.png?fit=max&auto=format&n=PPr5fj4e8e7ywwBC&q=85&s=3e17dc8933eb6f7846f5864dd2623518" alt="Onetime Secret" style={{ borderRadius: '0.5rem' }} width="1466" height="1268" data-path="images/integrations/cdp/onetimeSecret.png" />
    </Step>
  </Steps>
</Accordion>

## How data will appear in Dotdigital

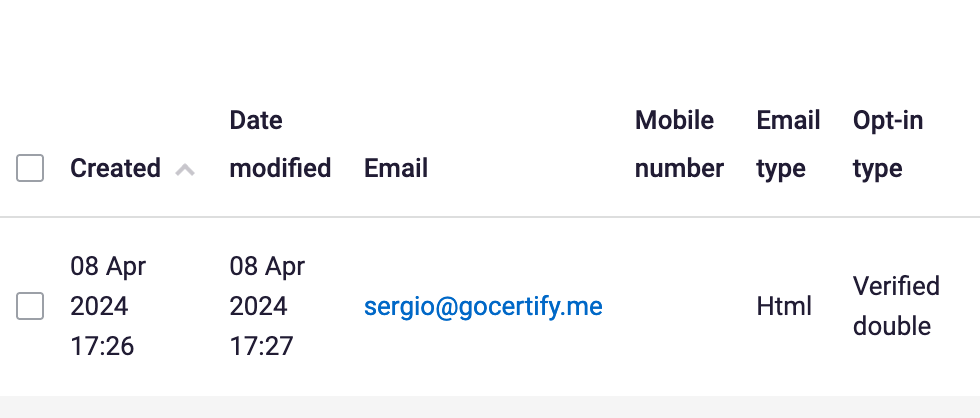
Once the user shares their information with your brand and the user confirms the subscription request (verified double Opt-in option), you will see a new contact in your base,
with the email and mobile\_number (if it's shared) and the respective Opt-in option.
<Frame caption="Example of a Dotdigital user created by Gocertify">
  <img className="block dark:hidden" src="https://mintcdn.com/gocertify-db9cc6b8/jGJls7PPp-s8_HqB/images/integrations/cdp/dotdigital/dotDigitalUser.png?fit=max&auto=format&n=jGJls7PPp-s8_HqB&q=85&s=8025d6c286e447914e705b9adb29984c" alt="Dotdigital user" style={{ borderRadius: '0.5rem' }} width="980" height="418" data-path="images/integrations/cdp/dotdigital/dotDigitalUser.png" />

  <img className="hidden dark:block" src="https://mintcdn.com/gocertify-db9cc6b8/jGJls7PPp-s8_HqB/images/integrations/cdp/dotdigital/dotDigitalUser.png?fit=max&auto=format&n=jGJls7PPp-s8_HqB&q=85&s=8025d6c286e447914e705b9adb29984c" alt="Dotdigital user" style={{ borderRadius: '0.5rem' }} width="980" height="418" data-path="images/integrations/cdp/dotdigital/dotDigitalUser.png" />
</Frame>

After the user verifies themself, Gocertify will update the contact in your base, adding as many `GC_XXXX_AT` data fields as needed, with the current date in ISO8601 format.

You will see something like this:

<Tip>
  Note that we will use uppercase and underscores for the data field name (ie: “KEY\_WORKER” instead of “Key Worker”)
</Tip>

<Frame caption="Example of a Dotdigital user with the respective GC_XXXX_AT fields">
  <img className="block dark:hidden" src="https://mintcdn.com/gocertify-db9cc6b8/jGJls7PPp-s8_HqB/images/integrations/cdp/dotdigital/dotDigitalVerification.png?fit=max&auto=format&n=jGJls7PPp-s8_HqB&q=85&s=c190272b52fb441f45dabda21b5cbdab" alt="Dotdigital verification" style={{ borderRadius: '0.5rem' }} width="2492" height="1046" data-path="images/integrations/cdp/dotdigital/dotDigitalVerification.png" />

  <img className="hidden dark:block" src="https://mintcdn.com/gocertify-db9cc6b8/jGJls7PPp-s8_HqB/images/integrations/cdp/dotdigital/dotDigitalVerification.png?fit=max&auto=format&n=jGJls7PPp-s8_HqB&q=85&s=c190272b52fb441f45dabda21b5cbdab" alt="Dotdigital verification" style={{ borderRadius: '0.5rem' }} width="2492" height="1046" data-path="images/integrations/cdp/dotdigital/dotDigitalVerification.png" />
</Frame>

## How to create segments in Dotdigital

Once you start receiving data from Gocertify, you will be able to set all the Segments you desire.

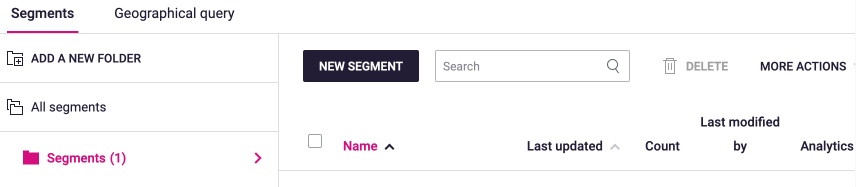
In the side menu, go to “Audience” > “Segments” and then follow the steps to create a new segment based on the data fields created by Gocertify.
<Accordion title="See step by step tutorial">
  <Steps>
    <Step title="Click the “New Segment” button.">
      In the side menu, go to “Audience” > “Segments” and then follow the steps to create a new segment based on the data fields created by Gocertify.

      <img className="block dark:hidden" src="https://mintcdn.com/gocertify-db9cc6b8/jGJls7PPp-s8_HqB/images/integrations/cdp/dotdigital/dotDigitalNewSegment.png?fit=max&auto=format&n=jGJls7PPp-s8_HqB&q=85&s=b9e1495cfcfb5561152d55e94ed7f9ee" alt="Dotdigital new segment" style={{ borderRadius: '0.5rem' }} width="856" height="187" data-path="images/integrations/cdp/dotdigital/dotDigitalNewSegment.png" />

      <img className="hidden dark:block" src="https://mintcdn.com/gocertify-db9cc6b8/jGJls7PPp-s8_HqB/images/integrations/cdp/dotdigital/dotDigitalNewSegment.png?fit=max&auto=format&n=jGJls7PPp-s8_HqB&q=85&s=b9e1495cfcfb5561152d55e94ed7f9ee" alt="Dotdigital new segment" style={{ borderRadius: '0.5rem' }} width="856" height="187" data-path="images/integrations/cdp/dotdigital/dotDigitalNewSegment.png" />
    </Step>

    <Step title="Choose a template.">
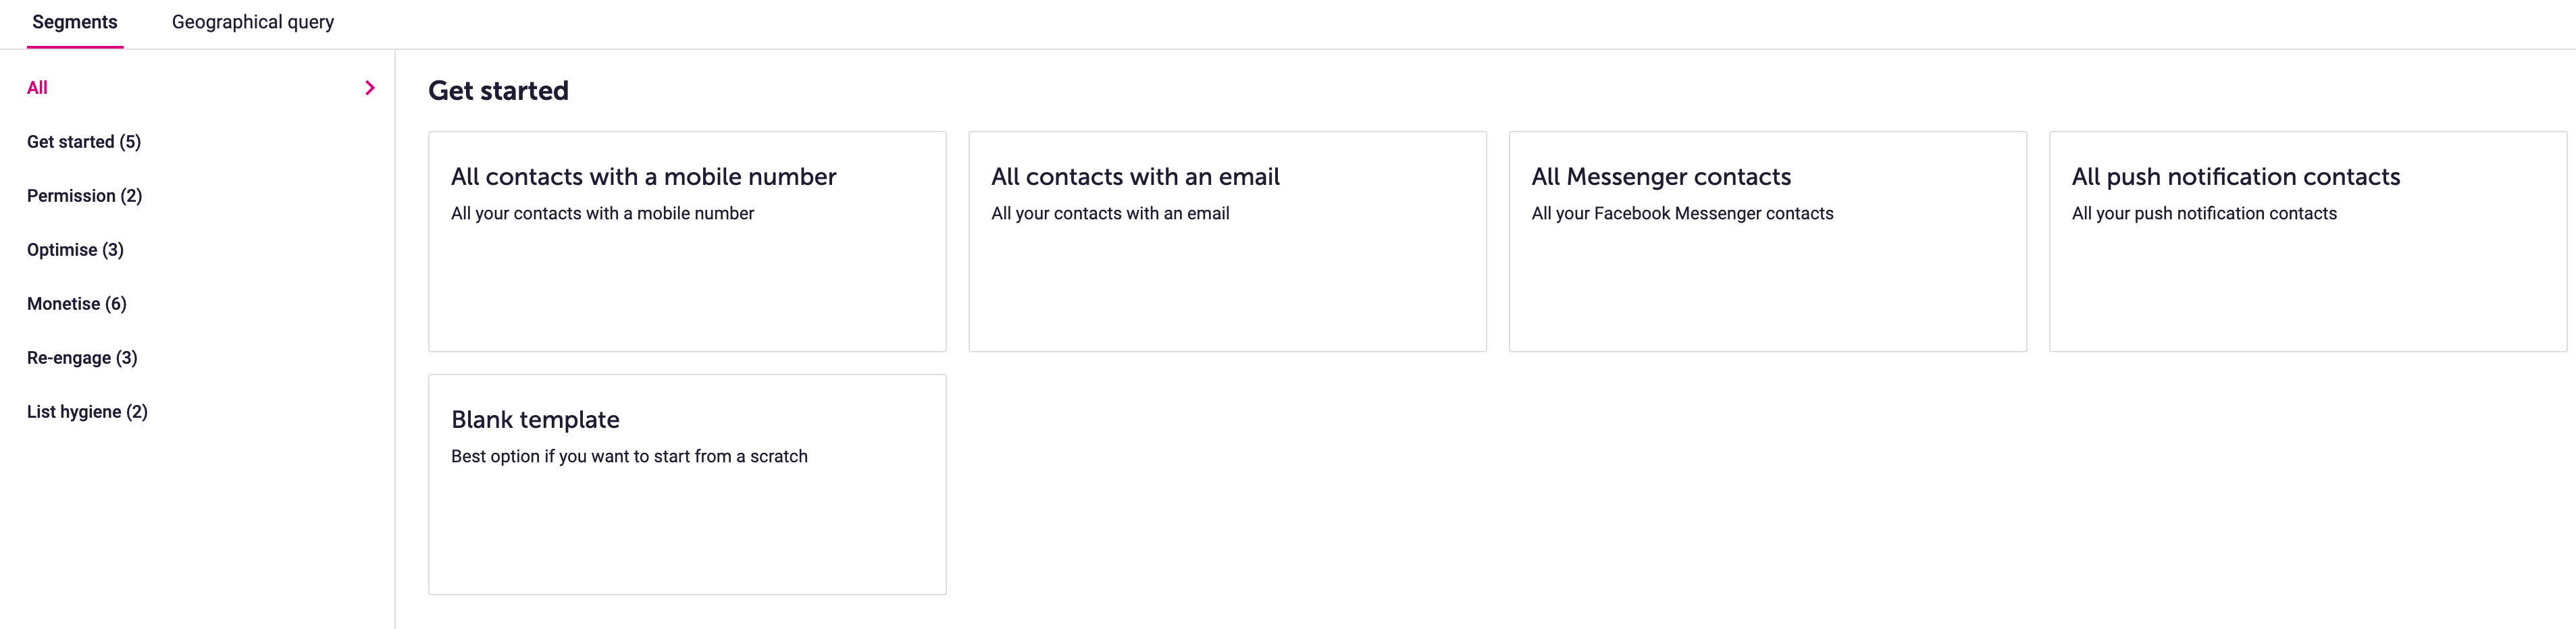
      Choose a template to get started.

      <img className="block dark:hidden" src="https://mintcdn.com/gocertify-db9cc6b8/jGJls7PPp-s8_HqB/images/integrations/cdp/dotdigital/dotDigitalTemplate.png?fit=max&auto=format&n=jGJls7PPp-s8_HqB&q=85&s=fdf259023aeb0ce5a02df1c584abe00c" alt="Dotdigital template" style={{ borderRadius: '0.5rem' }} width="3814" height="932" data-path="images/integrations/cdp/dotdigital/dotDigitalTemplate.png" />

      <img className="hidden dark:block" src="https://mintcdn.com/gocertify-db9cc6b8/jGJls7PPp-s8_HqB/images/integrations/cdp/dotdigital/dotDigitalTemplate.png?fit=max&auto=format&n=jGJls7PPp-s8_HqB&q=85&s=fdf259023aeb0ce5a02df1c584abe00c" alt="Dotdigital template" style={{ borderRadius: '0.5rem' }} width="3814" height="932" data-path="images/integrations/cdp/dotdigital/dotDigitalTemplate.png" />
    </Step>

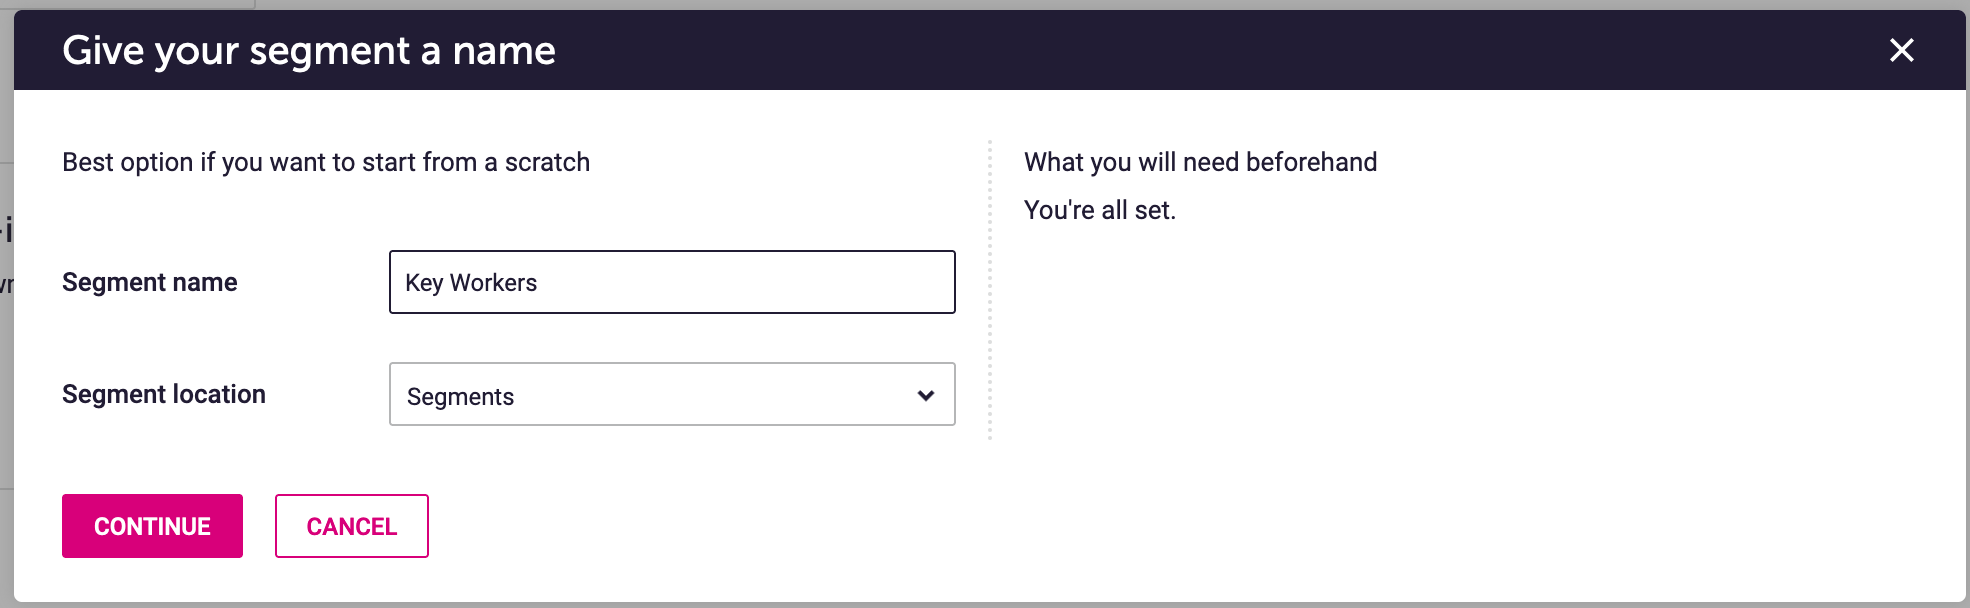
    <Step title="Name segment">
      Give your segment a name that helps you and your team identify it.
      <img className="block dark:hidden" src="https://mintcdn.com/gocertify-db9cc6b8/jGJls7PPp-s8_HqB/images/integrations/cdp/dotdigital/dotDigitalTemplateName.png?fit=max&auto=format&n=jGJls7PPp-s8_HqB&q=85&s=866bdd3e4084f51eabb47e7ad5ceb668" alt="Dotdigital template name" style={{ borderRadius: '0.5rem' }} width="1970" height="608" data-path="images/integrations/cdp/dotdigital/dotDigitalTemplateName.png" />

      <img className="hidden dark:block" src="https://mintcdn.com/gocertify-db9cc6b8/jGJls7PPp-s8_HqB/images/integrations/cdp/dotdigital/dotDigitalTemplateName.png?fit=max&auto=format&n=jGJls7PPp-s8_HqB&q=85&s=866bdd3e4084f51eabb47e7ad5ceb668" alt="Dotdigital template name" style={{ borderRadius: '0.5rem' }} width="1970" height="608" data-path="images/integrations/cdp/dotdigital/dotDigitalTemplateName.png" />
    </Step>

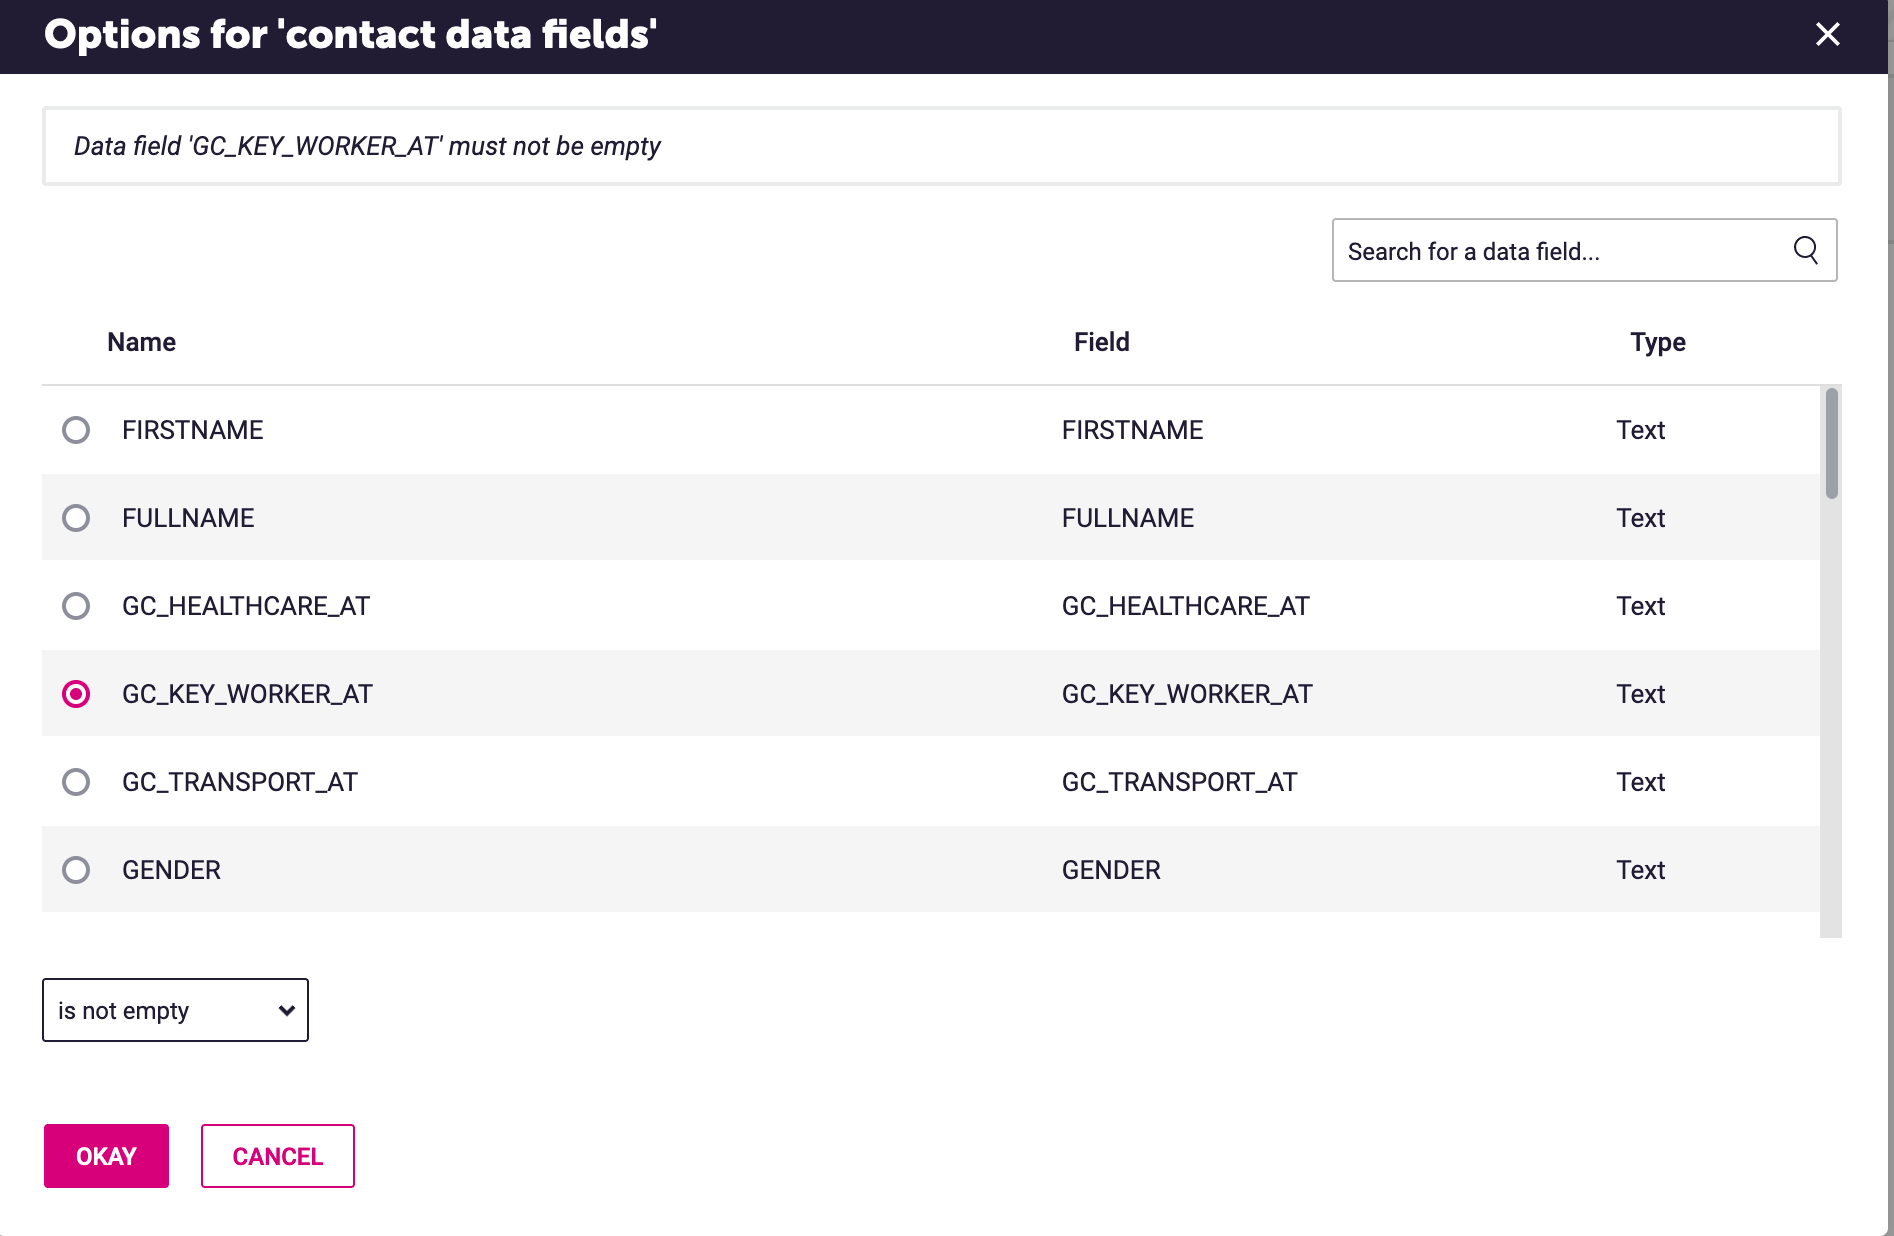
    <Step title="Add filters">
      Add the conditions you want to filter your audience.
      <img className="block dark:hidden" src="https://mintcdn.com/gocertify-db9cc6b8/jGJls7PPp-s8_HqB/images/integrations/cdp/dotdigital/dotDigitalSegmentFilters.png?fit=max&auto=format&n=jGJls7PPp-s8_HqB&q=85&s=5edf1ba25616efc1b01b3c17ca4e3770" alt="Dotdigital segment filters" style={{ borderRadius: '0.5rem' }} width="1894" height="1236" data-path="images/integrations/cdp/dotdigital/dotDigitalSegmentFilters.png" />

      <img className="hidden dark:block" src="https://mintcdn.com/gocertify-db9cc6b8/jGJls7PPp-s8_HqB/images/integrations/cdp/dotdigital/dotDigitalSegmentFilters.png?fit=max&auto=format&n=jGJls7PPp-s8_HqB&q=85&s=5edf1ba25616efc1b01b3c17ca4e3770" alt="Dotdigital segment filters" style={{ borderRadius: '0.5rem' }} width="1894" height="1236" data-path="images/integrations/cdp/dotdigital/dotDigitalSegmentFilters.png" />

      <img className="block dark:hidden" src="https://mintcdn.com/gocertify-db9cc6b8/jGJls7PPp-s8_HqB/images/integrations/cdp/dotdigital/dotDigitalContactFilters.png?fit=max&auto=format&n=jGJls7PPp-s8_HqB&q=85&s=97afdf60b1cf06e79909559357d02577" alt="Dotdigital contact filters" style={{ borderRadius: '0.5rem' }} width="2004" height="394" data-path="images/integrations/cdp/dotdigital/dotDigitalContactFilters.png" />

      <img className="hidden dark:block" src="https://mintcdn.com/gocertify-db9cc6b8/jGJls7PPp-s8_HqB/images/integrations/cdp/dotdigital/dotDigitalContactFilters.png?fit=max&auto=format&n=jGJls7PPp-s8_HqB&q=85&s=97afdf60b1cf06e79909559357d02577" alt="Dotdigital contact filters" style={{ borderRadius: '0.5rem' }} width="2004" height="394" data-path="images/integrations/cdp/dotdigital/dotDigitalContactFilters.png" />
    </Step>
  </Steps>
</Accordion>