> ## Documentation Index
> Fetch the complete documentation index at: https://docs.gocertify.me/llms.txt
> Use this file to discover all available pages before exploring further.
# Bloomreach
> Start building loyal communities with targeted, gated offers.
Once the user submits their email and/or mobile number, Gocertify will send this data to the customer's Bloomreach account, in the form of a “Custom Event” (named “gocertify”). Bloomreach is intelligent enough to either create a new Customer (if the email/phone number is new) or use an existing Customer (if the email/phone number is already in your platform).
After that screen, when the user successfully verifies as a target group (student, healthcare, senior, etc) a second “Custom Event” (named “gocertify” as well) will be triggered, including the details of the verification.
With this data, you will be able to generate segments based on these events.
## Requirements to go live
To start syncing data you'll need to create a new API user and share the details with your Gocertify account manager.
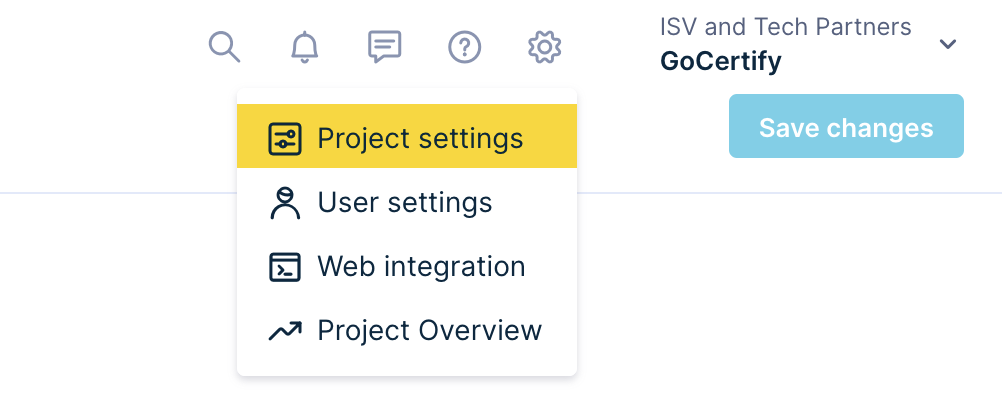
Sign in to your [Bloomreach Engagement](https://engagement.bloomreach.com) instance and in the top right corner, click on the settings icon and then “Project settings”.
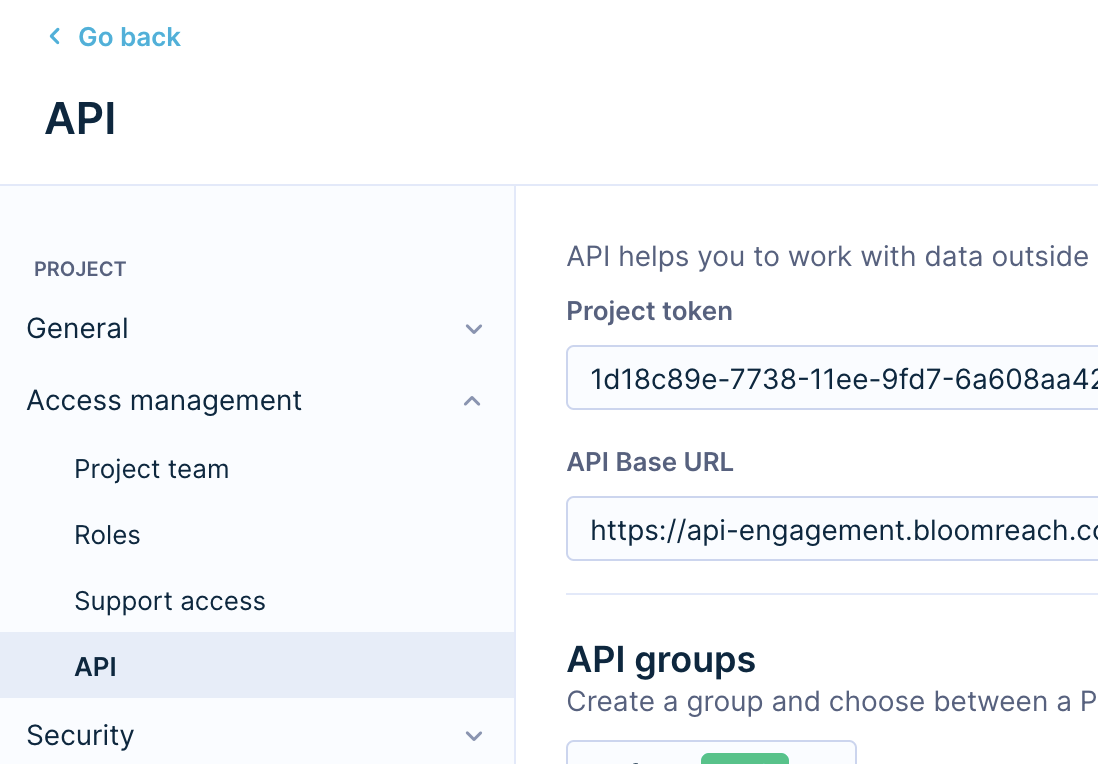
 In the left sidebar, go to “Access management” and then select “API”.
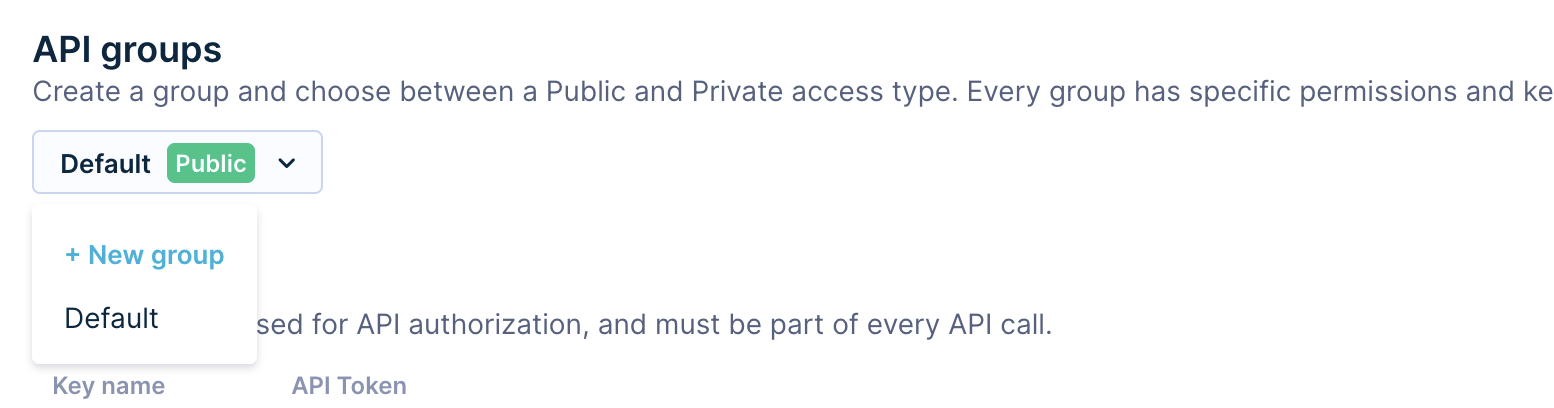
 In the “API groups” section, open the dropdown selector and choose “+New group”
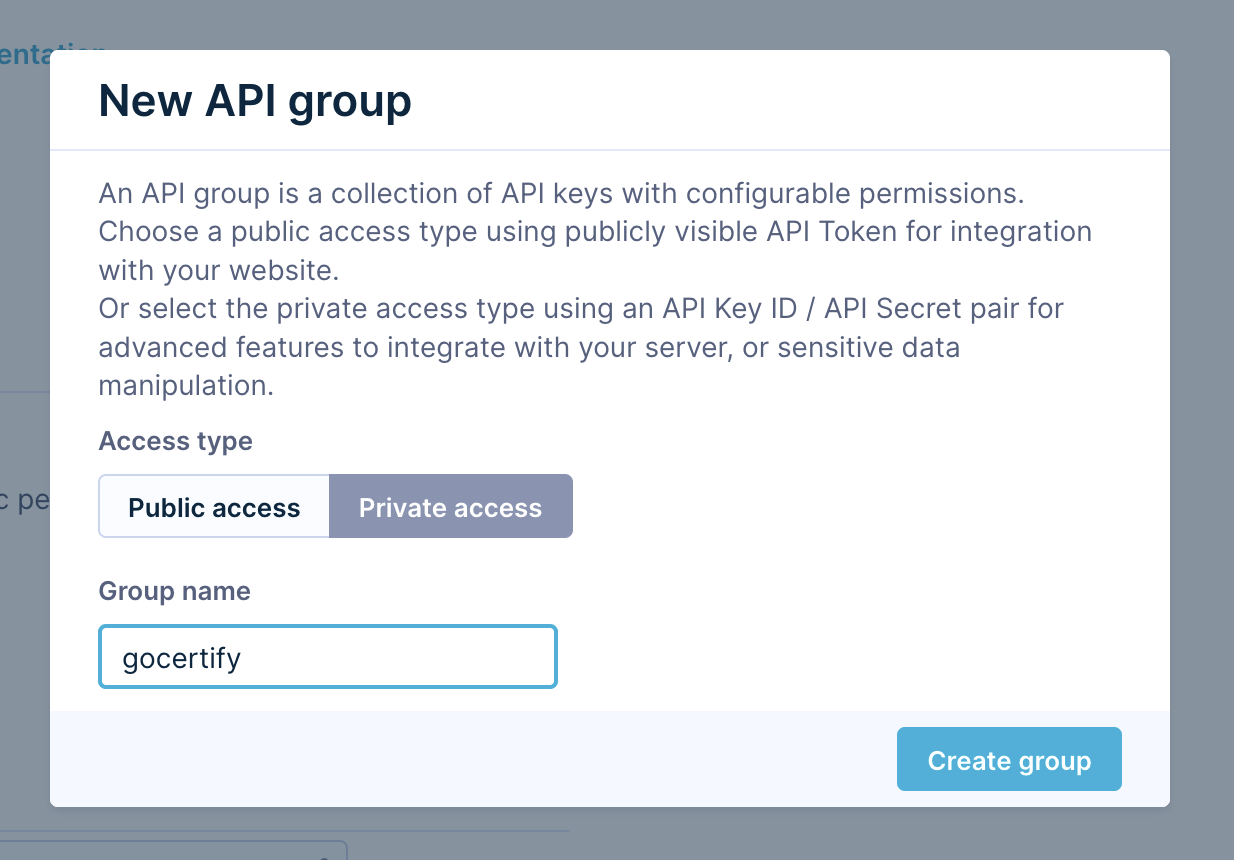
 In the popup, choose “Private access” and name the group “gocertify” and click on “Create group”. You'll be given a secret key, which you'll need to note down for later.
 Scroll down to the “Group permissions” section and click on the “Events” tab. Enable the “Set” checkbox next to “New events”.
This means you will allow us to only “create new type of events”.
Scroll down to the “Group permissions” section and click on the “Events” tab. Enable the “Set” checkbox next to “New events”.
This means you will allow us to only “create new type of events”.
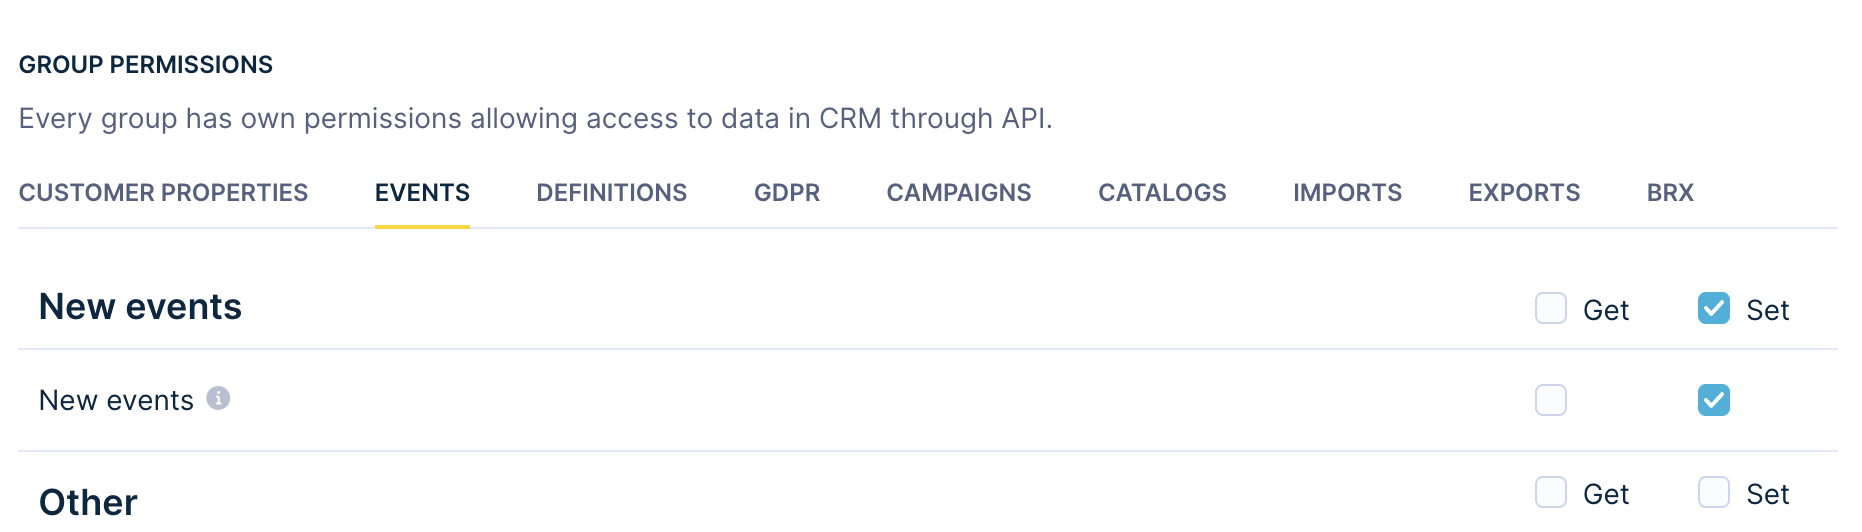 If you already have a “consent” event on that list (under the “Other” section), please enable it too
If you also want to set custom fields (like "First name", "Preferred dress size", "Department preference", etc) and sync them to your Customer profile, you will need to enable these fields under the "Customer properties" section too.
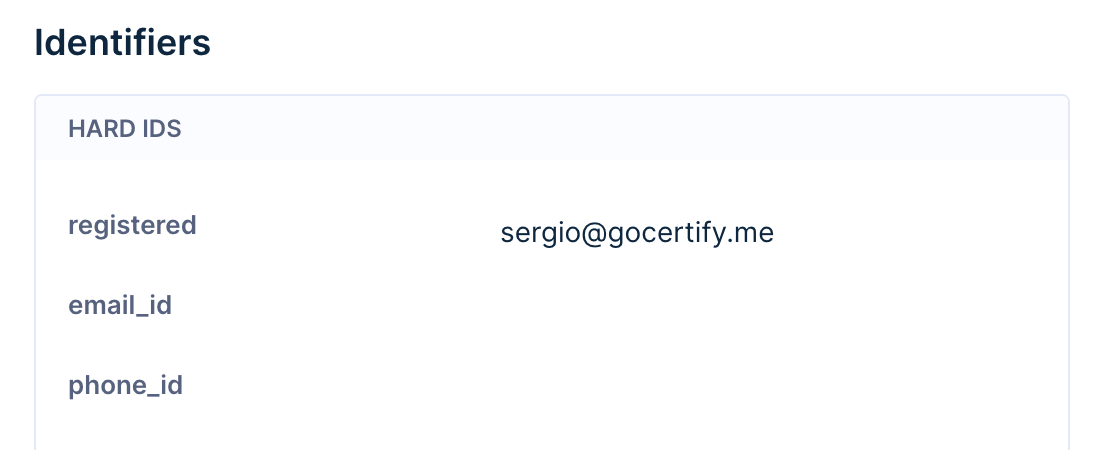
Find your “Hard ID”. Go to visit any Customer profile in your instance, and take a look at the field name where their email is in. It's typically “registered” or “email\_id”. See the example below. In this case, your Hard ID is “registered”:
If you already have a “consent” event on that list (under the “Other” section), please enable it too
If you also want to set custom fields (like "First name", "Preferred dress size", "Department preference", etc) and sync them to your Customer profile, you will need to enable these fields under the "Customer properties" section too.
Find your “Hard ID”. Go to visit any Customer profile in your instance, and take a look at the field name where their email is in. It's typically “registered” or “email\_id”. See the example below. In this case, your Hard ID is “registered”:
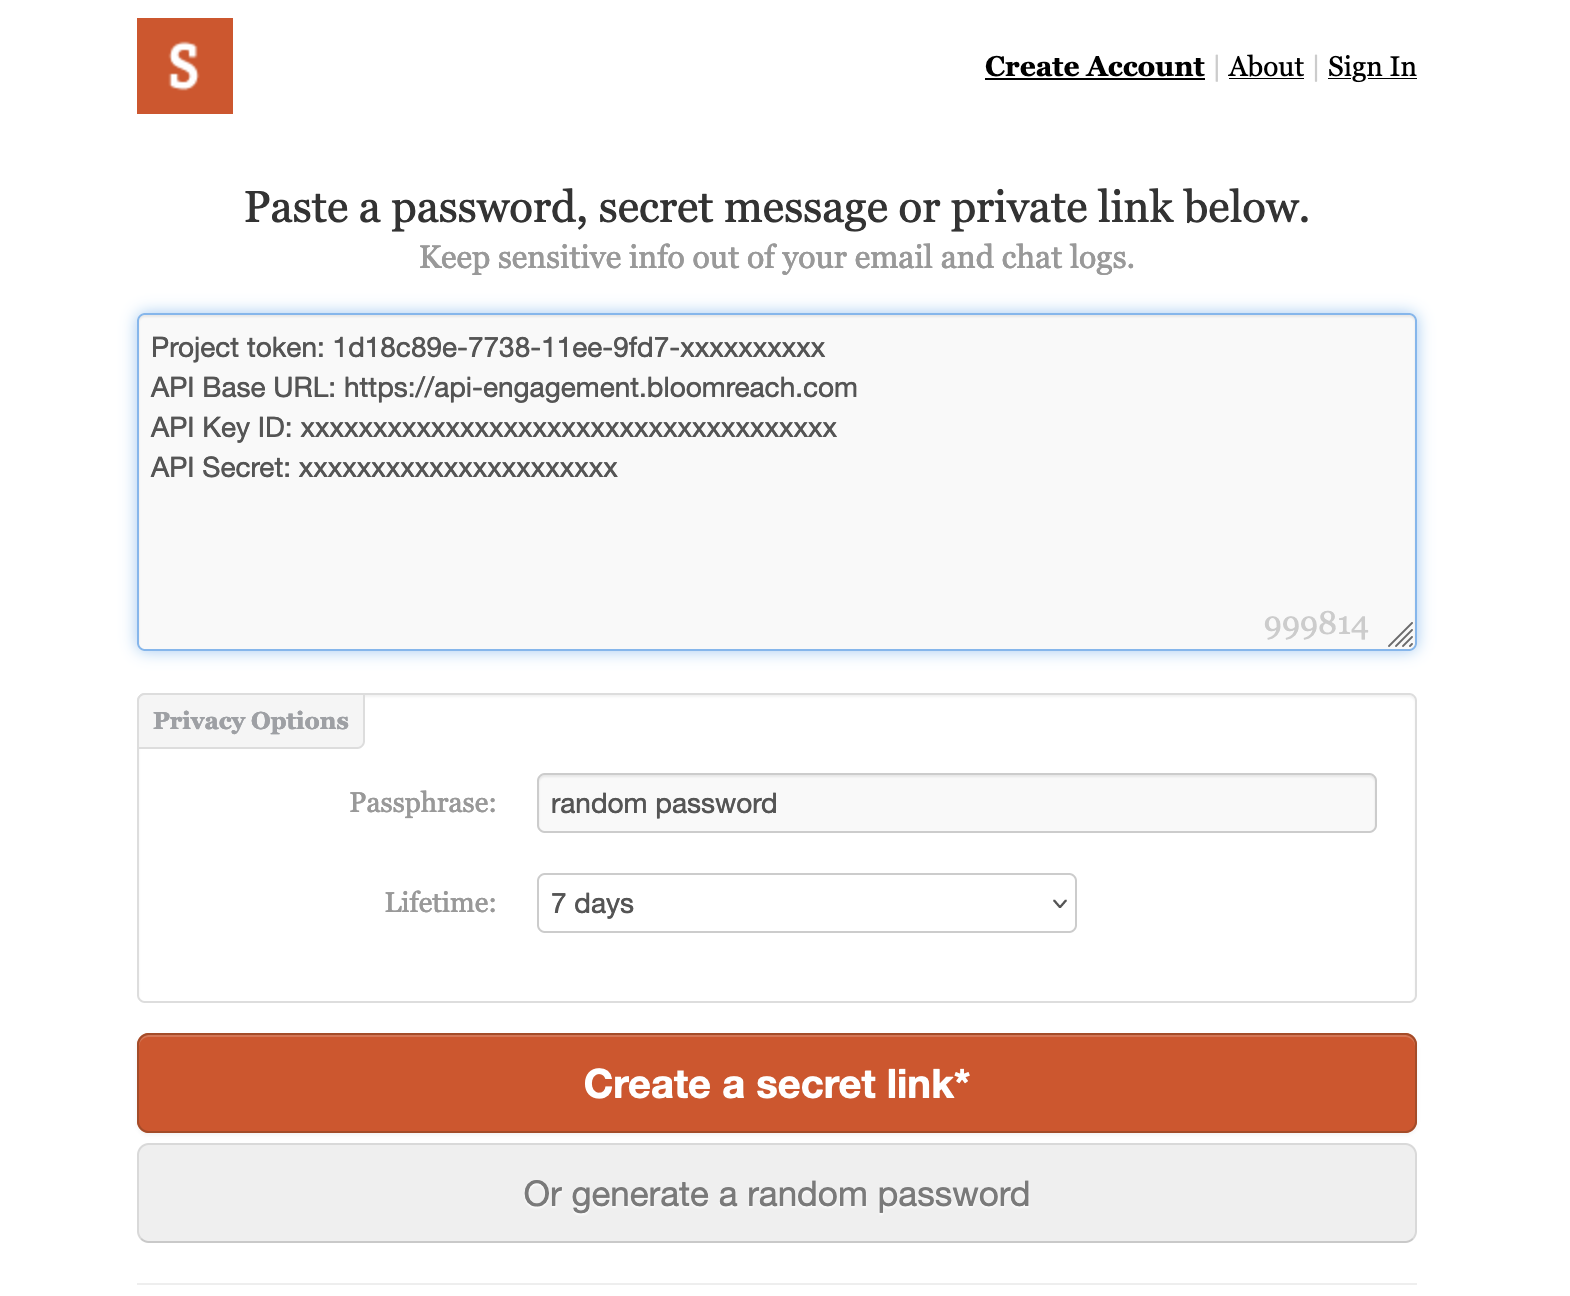
 Go to onetimesecret.com and paste the credentials there, in this format. Even if it's not required, we encourage you to also add a random “Passphrase”. This will generate a secret link that will expire within 7 days and will be visible only once. Once done, share this link with your Customer Success Manager at Gocertify.
 ```YAML Credentials placeholder theme={null}
Project token: xxxxxxx-xxxxxx-xxxxxx-xxxxxxxxxx
API Base URL: xxxxxxxxxxxxxxxxxxxx.bloomreach.com
API Key ID: xxxxxxxxxxxxxxxxxxxxxxxxxxxxxxxxxxxxx
API Secret: xxxxxxxxxxxxxxxxxxxxxx
Hard ID: registered
```
## How data will appear in Bloomreach
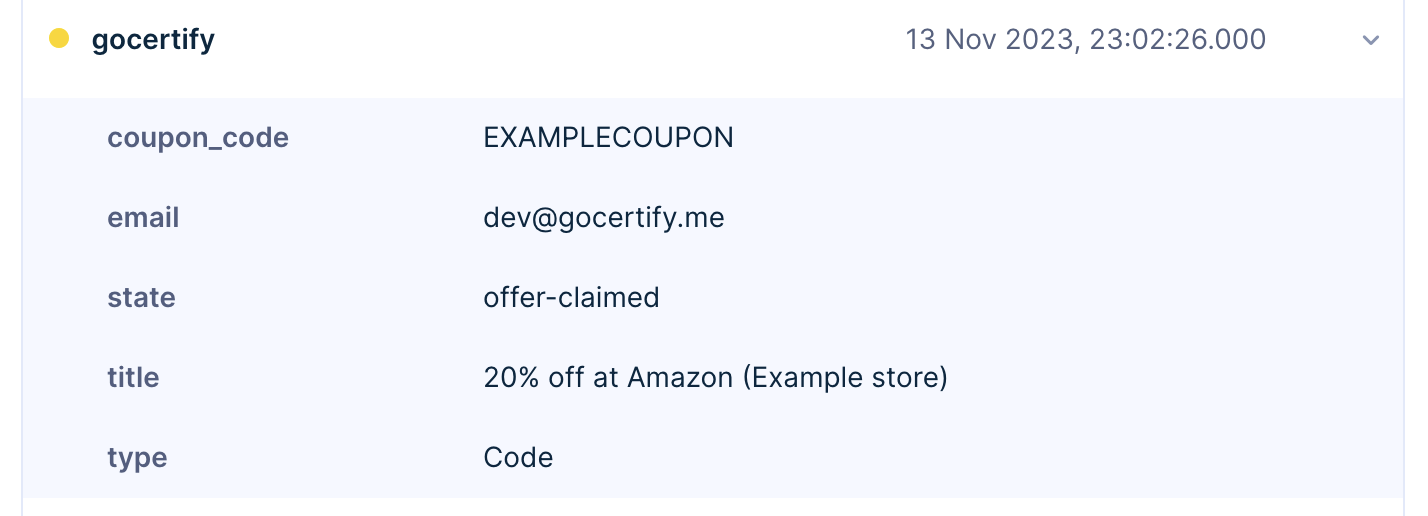
You will end up having one Contact with 2 events (one for the “consent intent” and another one after they verify as a group and claim an offer).
Remember you still need to subscribe the customer to your marketing campaigns.
```YAML Credentials placeholder theme={null}
Project token: xxxxxxx-xxxxxx-xxxxxx-xxxxxxxxxx
API Base URL: xxxxxxxxxxxxxxxxxxxx.bloomreach.com
API Key ID: xxxxxxxxxxxxxxxxxxxxxxxxxxxxxxxxxxxxx
API Secret: xxxxxxxxxxxxxxxxxxxxxx
Hard ID: registered
```
## How data will appear in Bloomreach
You will end up having one Contact with 2 events (one for the “consent intent” and another one after they verify as a group and claim an offer).
Remember you still need to subscribe the customer to your marketing campaigns.
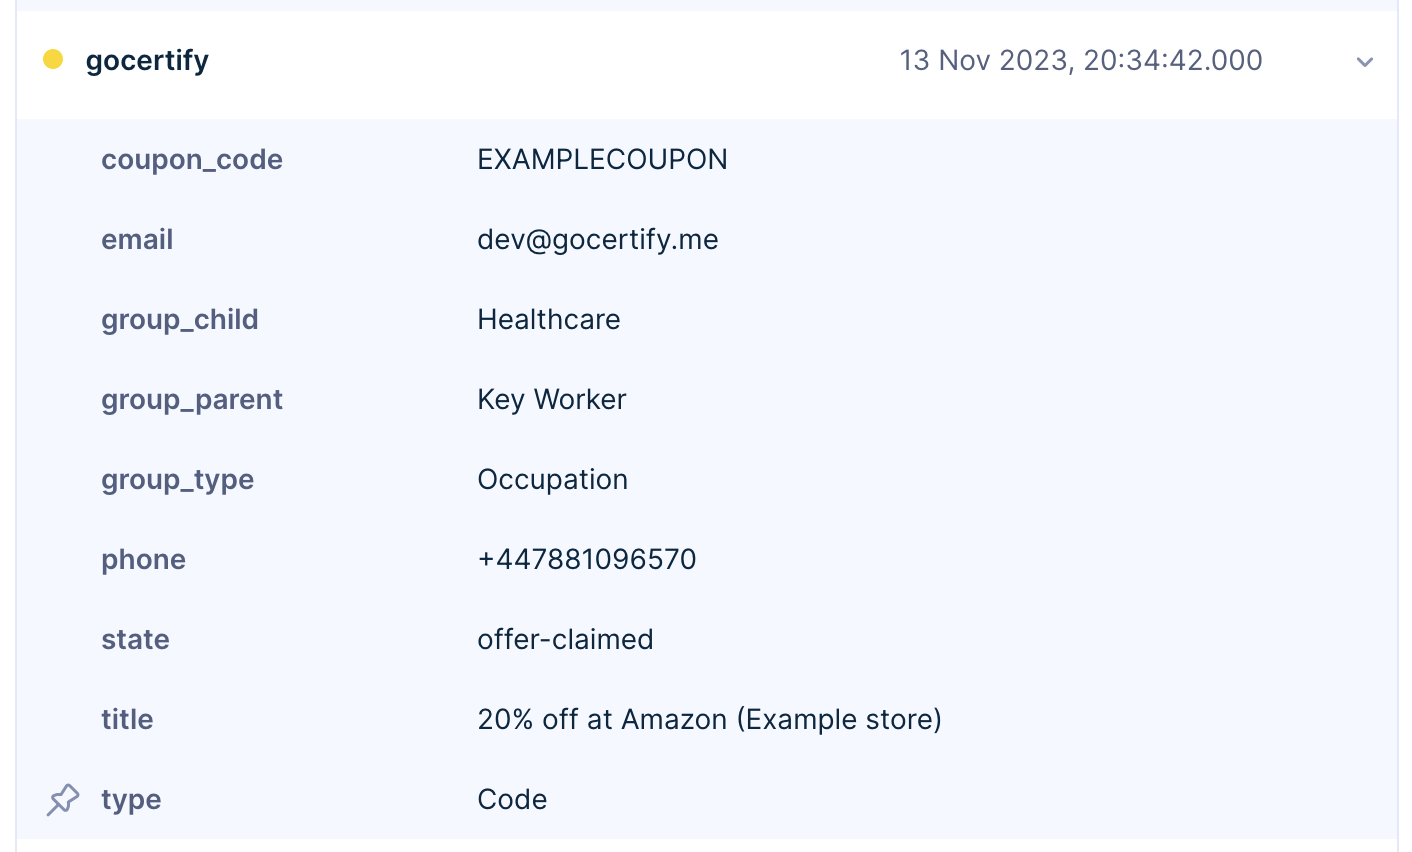
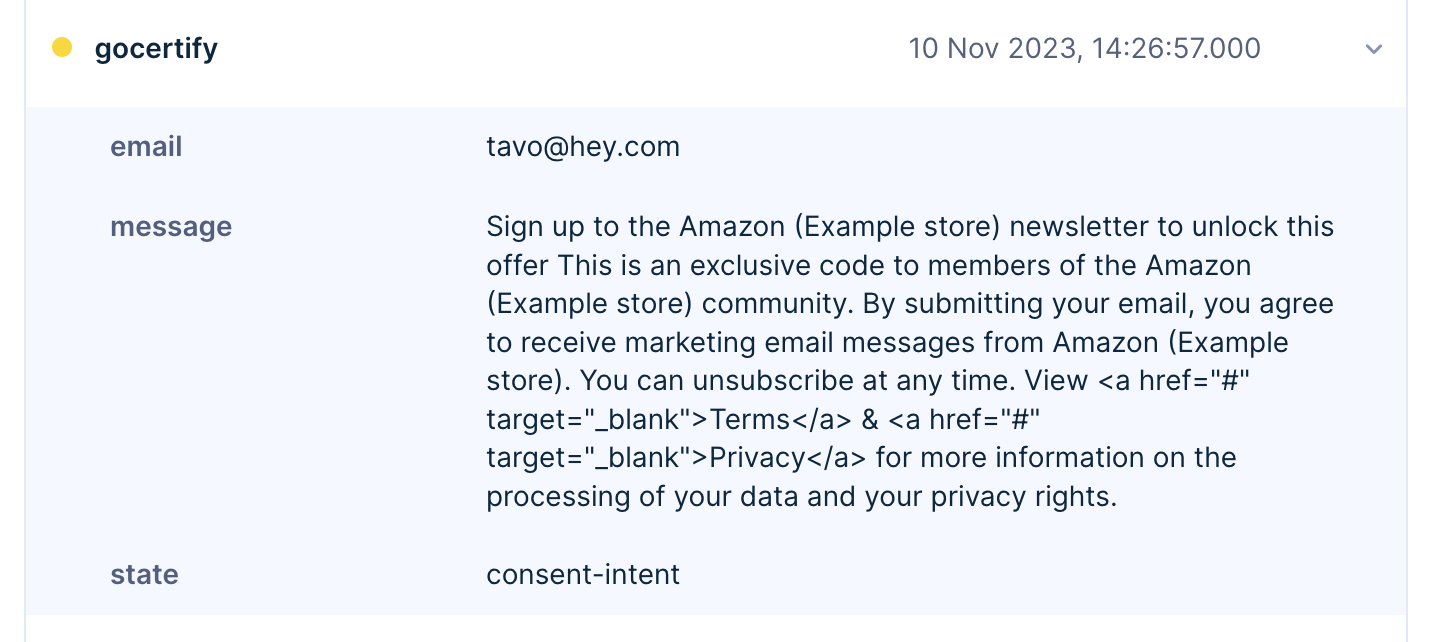 Your second event can have two forms, depending on whether the shopper has verified as a group or not.
 ### Custom fields
If you have added custom fields (like "First name", "Preferred dress size", "Department preference", etc) in your DataCapture form, these custom fields will be included in both events.
By default, we will use a generic key for these fields (e.g. "first\_name", "preferred\_dress\_size", "department\_preference", etc). If you need to use a different key, please let us know and we will update the mapping.
Additionally, it's also possible to sync one or more of these custom fields to your Customer profile. To do this, just let us know which fields you want to sync and we will add them to the mapping.
Remember to enable the desired fields under the "Customer properties" section too in the API settings.
## Consent management
The shopper gives us the consent to share their data with you when they submit their email and/or mobile number
(there is a legal opt-in process in place).
In the backend, we provide 2 options to manage this consent:
### 1. Explicit Opt-in
We will send the native `consent` event to Bloomreach, so you don't need to do anything else.
In order to setup this option, you will need to find the `Consent category` in your Bloomreach instance:
Go to "Project Settings" > "Privacy management" > "Consents".
### Custom fields
If you have added custom fields (like "First name", "Preferred dress size", "Department preference", etc) in your DataCapture form, these custom fields will be included in both events.
By default, we will use a generic key for these fields (e.g. "first\_name", "preferred\_dress\_size", "department\_preference", etc). If you need to use a different key, please let us know and we will update the mapping.
Additionally, it's also possible to sync one or more of these custom fields to your Customer profile. To do this, just let us know which fields you want to sync and we will add them to the mapping.
Remember to enable the desired fields under the "Customer properties" section too in the API settings.
## Consent management
The shopper gives us the consent to share their data with you when they submit their email and/or mobile number
(there is a legal opt-in process in place).
In the backend, we provide 2 options to manage this consent:
### 1. Explicit Opt-in
We will send the native `consent` event to Bloomreach, so you don't need to do anything else.
In order to setup this option, you will need to find the `Consent category` in your Bloomreach instance:
Go to "Project Settings" > "Privacy management" > "Consents".
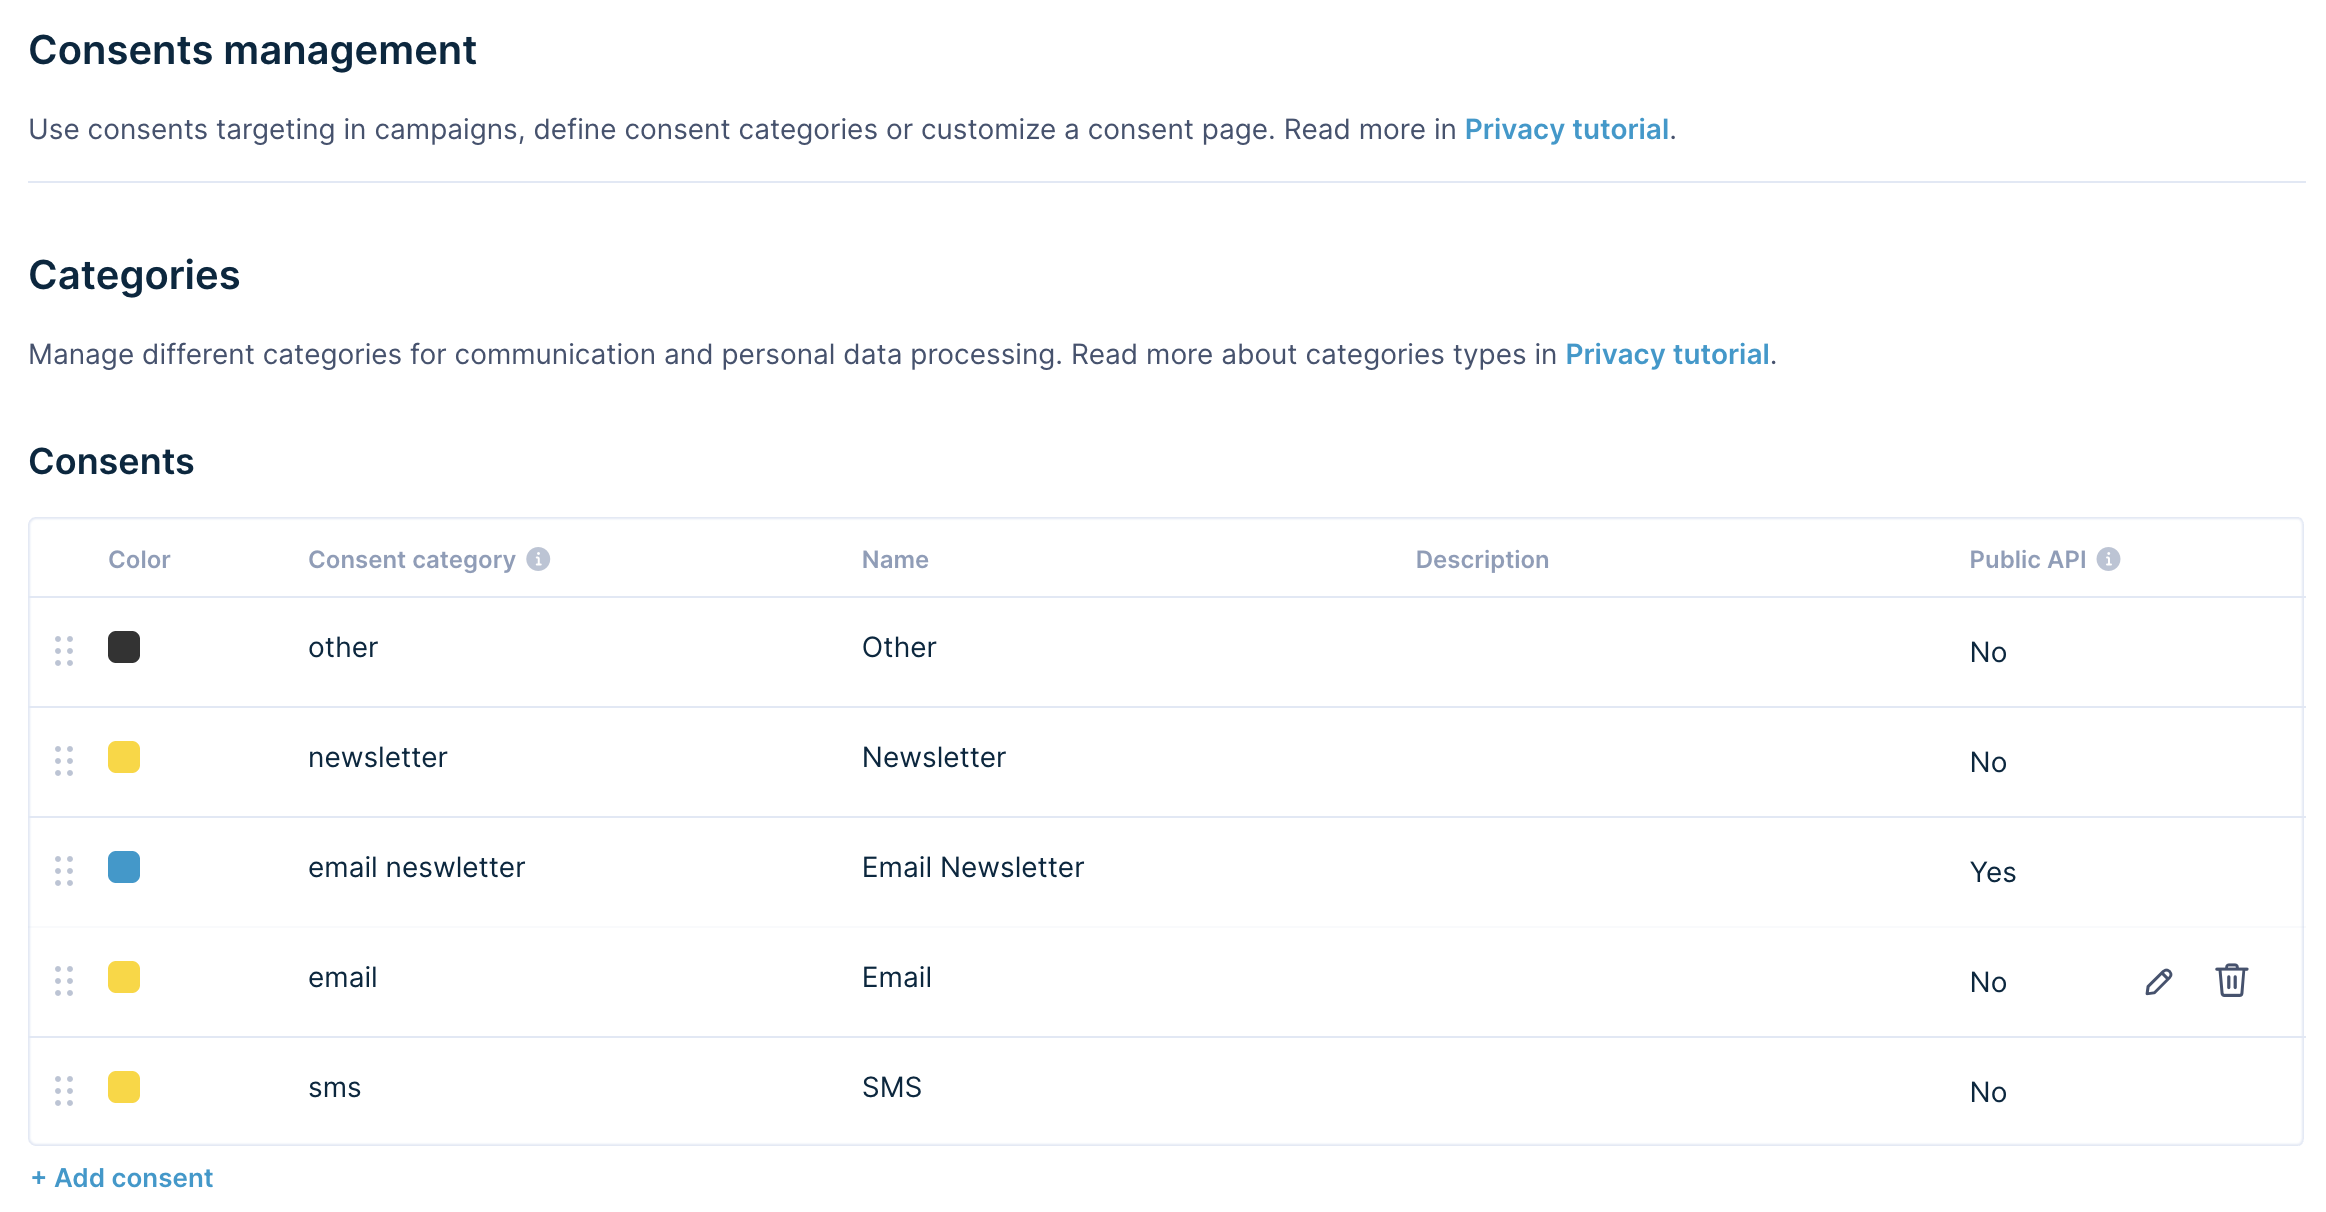 Chose the one you want us to use and send it to your Customer Success Manager at Gocertify.
**Important:** Make sure you gave access to this `consent` event in the API settings.
### 2. Implicit Opt-in
We will send a custom `gocertify` event, with the consent details, to Bloomreach.
This event won't perform any action related to the consent in your Bloomreach instance.
You will need to create an automation in your instance to perform any action based on this event. You can regonise this event by the `state` attribute,
which will be `consent-intent`.
## How to create segments in Bloomreach
You can build segments based on the Custom Events we have sent to your account, by going to “Customers” and then creating filters, like the one below:
Chose the one you want us to use and send it to your Customer Success Manager at Gocertify.
**Important:** Make sure you gave access to this `consent` event in the API settings.
### 2. Implicit Opt-in
We will send a custom `gocertify` event, with the consent details, to Bloomreach.
This event won't perform any action related to the consent in your Bloomreach instance.
You will need to create an automation in your instance to perform any action based on this event. You can regonise this event by the `state` attribute,
which will be `consent-intent`.
## How to create segments in Bloomreach
You can build segments based on the Custom Events we have sent to your account, by going to “Customers” and then creating filters, like the one below:
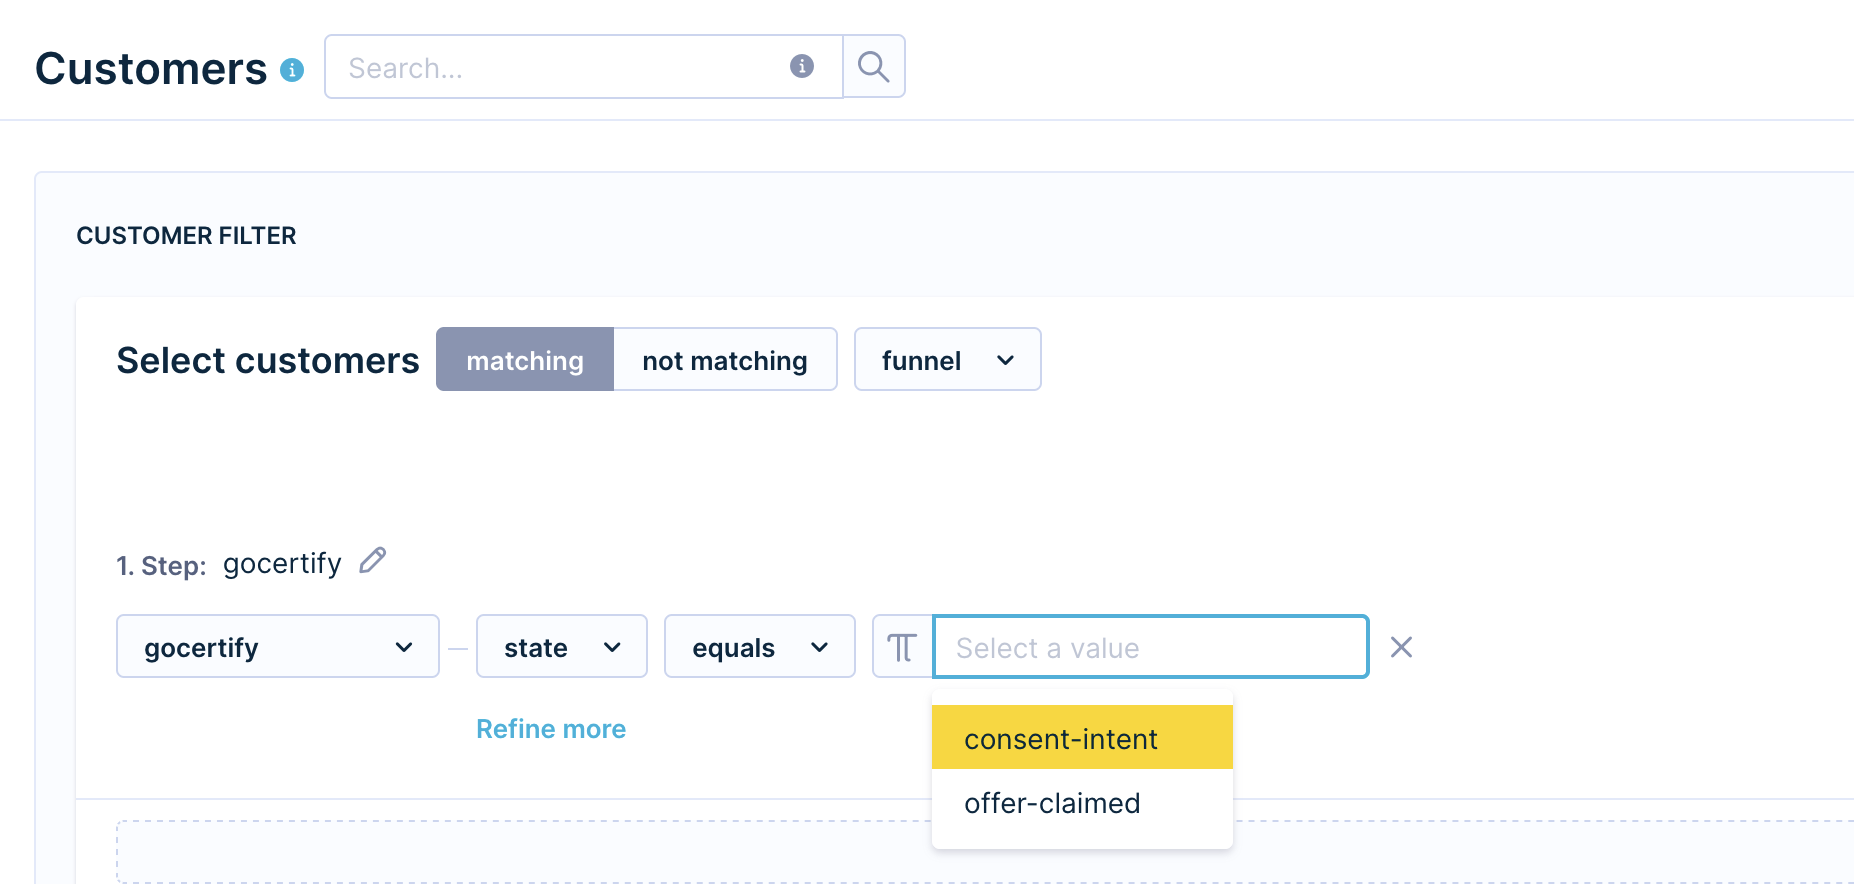 You can use the “state” attribute to filter all the Customers that have given you consent for marketing or the ones that are verified as a group or simply claimed an offer.
When the filter is ready, in the top right corner of that filter you will see the option to save this filter for later.
You can even run automations on your end based on these filters.
You can use the “state” attribute to filter all the Customers that have given you consent for marketing or the ones that are verified as a group or simply claimed an offer.
When the filter is ready, in the top right corner of that filter you will see the option to save this filter for later.
You can even run automations on your end based on these filters.